Closed Herringbone Stitch
Introduction to Closed Herringbone Stitch
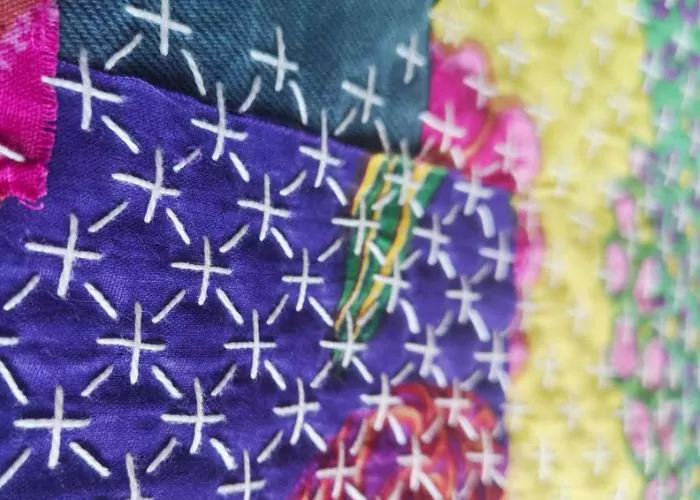
Closed Herringbone Stitch is one of the variations of the Herringbone Stitch. The stitches are placed close to each other so that the points of the stitches are touching each other at the top and the bottom. This stitch is worked on two parallel lines and forms a solid line.
On the back side, this hand embroidery stitch looks like two parallel rows of backstitches. This makes Closed Herringbone Stitch very handy for garment embellishments.
This hand embroidery stitch is relatively flexible – you can modify the row width as you go and make curves with this stitch.
Structural Characteristics
Front Side:
On the front side of the fabric, the Closed Herringbone Stitch forms a solid, continuous line where the stitches are positioned so close together that their ends touch at both the top and bottom. This creates a compact diagonal interlacing effect reminiscent of the arrangement of bones in a fish skeleton (hence the name “herringbone”).
The stitch is worked on two parallel imaginary lines, creating a decorative band of adjustable width. The crossed diagonal structure gives the fabric a rich and defined texture.
Reverse Side:
On the back side of the fabric, this hand embroidery stitch creates a completely different appearance: two parallel rows of backstitches. This bidirectional characteristic makes the stitch particularly valuable, as both sides present a neat and finished appearance. This makes Closed Herringbone Stitch very handy for garment embellishments.


Other names of this embroidery technique
This hand embroidery stitch dates to the 16th century and has many alternative names. We also call this embroidery technique Persian Stitch, Algerian Plait Stitch, Crossed Back Stitch or Close Herringbone Stitch.
The Geographic Journey
Persian Stitch o Cretan Stitch evokes the ancient embroidery traditions of the Middle East, suggesting that this technique may have originated in Persia (modern-day Iran) before spreading westward along the Silk Road. Persian embroidery has long been renowned for its intricate techniques and sophisticated stitchwork, making this attribution particularly meaningful. The name honors a possible homeland where artisans perfected this versatile stitch centuries ago.
Algerian Plait Stitch points to North African textile traditions, where the stitch’s distinctive braided appearance captured the imagination of embroiderers. The term “plait” perfectly describes the woven, interlaced quality of the finished work, reminiscent of plaited hair or woven bands. This name emphasizes the visual beauty of the stitch’s surface texture rather than its construction method.
Crossed Back Stitch or Catch Stitch (especially in tailoring, where it is used to secure linings or hems in a flexible manner) or Mossul Stitch (a more traditional name) takes a more technical approach, describing exactly what happens as you work: the thread crosses back and forth between two parallel lines, creating diagonal intersections. This name would appeal to embroiderers who think analytically about stitch construction and helps learners visualize the working method before they even pick up a needle.
Close Herringbone Stitch (with “close” rather than “closed”) is simply a spelling variation that has persisted in embroidery literature. Both spellings are correct, though “closed” more accurately describes how the stitch points close the gaps, creating a solid line rather than an open pattern.
Double Back Stitch is the name given when the reverse side is the featured surface. Look at the back of your work, and you’ll see two neat, parallel rows of backstitches running side by side—hence “double.” This isn’t just a technicality; it’s a completely different aesthetic that opens up new design possibilities.
Shadow Stitch represents perhaps the most poetic use of this duality. When you work the stitch on sheer or transparent fabrics like organdy, voile, or fine linen, something magical happens: the backstitch pattern on the reverse side becomes visible through the fabric as a subtle shadow. The result is a delicate, ghost-like effect on the front, with the bolder crossed pattern on the back creating depth and dimension. This technique is particularly beloved in heirloom sewing and fine whitework embroidery, where subtlety and refinement are paramount.
Context Determines the Name
A Living Tradition
This multiplicity of names isn’t confusion—it’s richness. Each name preserves a piece of embroidery history, a cultural connection, or a practical insight. When you learn the Closed Herringbone Stitch, you’re not just learning a technique; you’re joining a conversation that has been happening across continents and centuries, spoken in many languages and expressed through countless needles and threads.
Which side is visible: If your embroidery will be seen from the front, you’re working Closed Herringbone. If the back is featured (as in reversible garments), it’s Double Back Stitch.
The fabric transparency: On sheer fabrics where both sides interact visually, Shadow Stitch is the most appropriate term.
Cultural or regional tradition: An embroidery teacher in Algeria might exclusively use “Algerian Plait Stitch,” while someone studying historical Persian embroidery would naturally refer to “Persian Stitch.”
The project type: Garment makers might prefer “Double Back Stitch” for its functional connotations, while decorative embroiderers lean toward “Closed Herringbone” or “Persian Stitch.”
Alternative Nomenclature: A Stitch with Many Names
History and Origins
This stitch has its roots in the 16th century (1500s), representing one of the oldest embroidery techniques still in use today. Its longevity testifies to the versatility and practical utility that have made it popular through the centuries across different cultures and textile traditions.
Renaissance Documentation and Early Use
The Closed Herringbone Stitch first appears in European embroidery pattern books during the Renaissance period. As printing technology spread, embroiderers began documenting techniques in illustrated manuals, preserving stitches previously passed down only through oral tradition.
The stitch’s double-sided nature made it particularly valuable when reversible embroidery was highly prized. Wealthy households demanded linens and garments that looked equally refined from both sides—a mark of superior craftsmanship. The Closed Herringbone perfectly met this requirement.
Geographic Spread and Cultural Exchange
Over time, the stitch spread geographically along established trade routes—the Silk Road, Mediterranean shipping lanes, and later, colonial networks. Each culture that adopted it left its mark, adapting the technique to local aesthetic preferences.
In Persia and the Middle East, embroiderers incorporated the stitch into elaborate textile traditions for both functional household items and ceremonial garments. North African traditions, particularly in Algeria, emphasized the decorative, plaited appearance, using it in elaborate embroidery on traditional garments and textiles.
In England (1600s-1700s), the stitch became associated with smocking and whitework embroidery. It appeared in samplers, household linens, ecclesiastical vestments, and costume embellishment—valued for both durability and beauty.
Victorian Revival and Shadow Work
The Victorian era (1837-1901) saw a massive revival of interest in needlework. Victorian embroiderers rediscovered historical stitches, including the Closed Herringbone, incorporating them into elaborate decorative schemes. The Crazy Quilt craze (1880s-1890s) frequently featured herringbone variations as both structural seams and decorative elements.
By the early 20th century (1900s-1920s), the stitch found particular favor in shadow work embroidery, worked on the reverse of sheer fabrics to create subtle effects. This became especially popular in heirloom sewing for christening gowns, fine lingerie, and delicate blouses. The Arts and Crafts Movement (1880s-1920s) embraced the stitch, valuing its historical authenticity and honest, visible technique.
Modern Continuity
Important embroidery references like Mary Thomas’s encyclopedias (1930s-1940s) helped preserve and standardize knowledge of this stitch. Today, the Closed Herringbone continues to be taught worldwide, featured in historical costume recreation, art embroidery, and sustainable fashion movements, where its strength and decorative qualities align perfectly with contemporary values of durability and craftsmanship. What began as a practical technique in the 1500s remains as relevant in the 21st century, truly testament to its timeless versatility.
Applications of Stitch
Due to its double-sided nature, this hand embroidery stitch is great for embellishing the garments. Besides that, you can use Closed Herringbone Stitch for filling, borders, outlines, or as a part of composite stitches. In botanical embroidery, this embroidery technique is used to depict the flowers’ leaves or petals.
Moreover, Double Back Stitch is convenient for mending tasks. You can replicate the double seams on the edges of the t-shirts with this embroidery stitch.
Technical Properties and Advantages
Flexibility: One of the most appreciated characteristics of the Closed Herringbone Stitch is its adaptability. This hand embroidery stitch is relatively flexible:
Variable width: you can modify the row width as you go, creating dynamic effects
Curving capability: the stitch can make curves while maintaining its structure, making it ideal for organic motifs
Adjustable tension: allows adaptation to different types of fabric
Strength: The crossed structure and double coverage make this stitch particularly resistant to wear, which is why it is traditionally used for garments.
Practical Applications
Garment Decoration
Thanks to its neat appearance on both sides, the Closed Herringbone Stitch is ideal for decorating clothing items where both sides might be visible, such as:
- Hems of shirts and blouses
- Edges of scarves and shawls
- Details on reversible jackets
- Cuffs and collars
Decorative Embroidery
The stitch finds numerous applications in artistic embroidery:
- Filling: creates areas of solid color with interesting texture
- Borders: elegantly defines the contours of a design
- Outlines: delineates shapes with precision
- Composite stitches: combines with other stitches to create complex effects
Botanical Embroidery
In botanical embroidery, this technique is particularly appreciated for depicting:
- Leaves with prominent central veins
- Petals with striated texture
- Stems and branches
The directional effect of the stitch effectively captures the natural lines of plant forms.
Repairs and Functional Sewing
As Double Back Stitch, the stitch is excellent for:
- Repairing open seams
- Replicating the double seams on t-shirt edges
- Reinforcing areas subject to stress
- Joining fabrics in a decorative yet strong manner
More stitches from the Herringbone stitch family
Relationship with Other Stitches in the Family
The Closed Herringbone Stitch belongs to a family of related stitches that share the crossed diagonal structure
Learn how to embroider Closed Herringbone Stitch
Follow the step-by-step tutorial with detailed photos below, and you will learn the Closed Herringbone Stitch stitch in no time. If you are a visual learner, watch a video lesson in the tutorial or on the Practical Embroidery YouTube channel to learn this hand embroidery stitch faster.

How to embroider Closed Herringbone Stitch
Step-by-step hand embroidery tutorial
Instructions
1. Mark two lines on the fabric.
2. Take the needle up on the left bottom corner of the mark. Make a diagonal stitch to the top right.

3. Make one stitch back and come up on the top line.

4. Make a diagonal stitch down.

5. Make one stitch back and come up on the lower line.

6. Make a diagonal stitch to the top right. This stitch should be parallel to the first stitch. Make a stitch back. Take a needle up on the top line at the same point where the last stitch was made.

7. Make a diagonal stitch down. The stitch is parallel to the previous stitch.

8. A stitch back to the same point as the previous stitch.

9. Repeat the sequence of the stitches until you fill the entire row.

Video tutorial closed herringbone Stitch
Tools and materials I used for this sampler
Disclaimer. To cover the cost of creating free embroidery patterns and video tutorials for this blog, I do sometimes link to products. Please assume these links are affiliate links. If you choose to buy through my links then THANK YOU – it will make it possible for me to keep doing this.


What’s next?
If you’re in the mood to explore more hand embroidery stitches, check out the Stitches and Techniques page for the list of other fantastic stitches available on my blog. From timeless classics to modern twists, a whole world of stitches is waiting for you to explore and master. So, grab your hoop and needle, and let’s stitch our way to creative bliss!
Don’t miss a thing!
Follow me on Instagram, Facebook, and Pinterest. Or why not subscribe to Practical Embroidery and get embroidery tips straight to your inbox every few weeks?
Need More Guidance?
The top 10 hand embroidery stitches to learn is a free online course created for beginners.