Turkey work
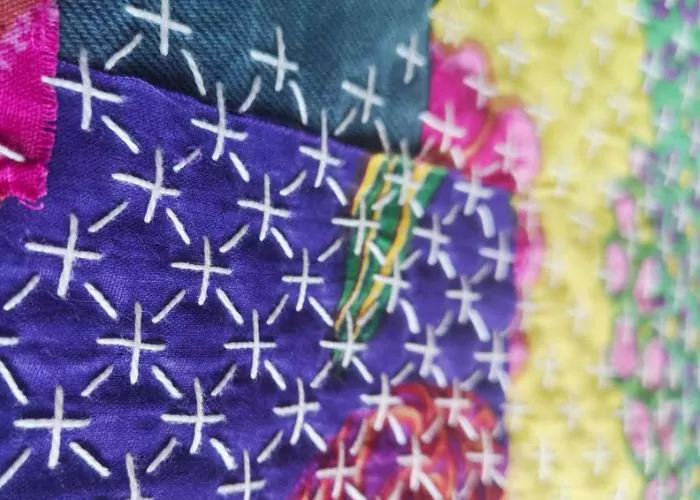
Turkey work is one of the hand embroidery stitches from the knot stitch family that will add a lot of structure and volume to your work. It is fast to learn and adds to your stitch library.
This hand embroidery stitch is hugely versatile and gives you many visual options. To embroider the stitch, you will make small loops. You can cut the loops and trim the stitches short, leave long threads, or even leave the loops. These options will create various looks. Besides that, the choice of the embroidery thread will give you even more options. Choose wool yarns for a trimmed pile like a carpet, six strands of embroidery floss for a more structured fringe, or non-divisible threads like pearl cotton to accentuate each thread.
Other names of the stitch
This hand embroidery stitch has a long history and has various different names. The origins of the stitch are from carpet making, so you will often find this stitch called a Turkey rug knot. Also, the names of the Ghiordes knot, Raya stitch, Fringe stitch, and Turkey stitch are often used interchangeably.


Applications of the Turkey work
Turkey work is a versatile hand embroidery stitch with various surface embroidery applications. From large areas filled with a pile of stitches to flower centers, petals, and other botanical elements. Also, from depicting animal furs to recreating the surface structure of household objects, garments, or human hair. From fluffy clouds to soft meadows.
This hand embroidery stitch is widely used in Stumpwork embroidery and Brazilian embroidery.
More stitches from the knot stitch family
Learn how to embroider Turkey work stitch
Follow the step-by-step tutorial with detailed photos below, and you will learn the Turkey rug knot stitch in no time. If you are a visual learner, watch a video lesson in the tutorial or on the Practical Embroidery YouTube channel to learn this hand embroidery stitch faster.

How to embroider Turkey Work Stitch
Step-by-step hand embroidery tutorial
Instructions
1. Take the needle down to the fabric at the left bottom of the shape you want to fill. Do not make a knot nor secure the first stitch. Leave the tail of the thread on the surface.

2. Bring the needle up a little bit on the left. Make a tiny stitch to the right and take the needle down into the fabric a bit to the ight from the starting stitch.

3. Pull the thread to the back side of the fabric, but do not close the loop yet. Take the needle up inside the loop.

4. Pull the thread to close the loop. Pull the needle up and draw the thread through. The first holding stitch is created.

5. Take the needle down to the fabric at a distance of one stitch to the right. Now, instead of the tail, you have a loop.

6. Hold the loop and bring the needle up on the left from the stitch. Make a stitch to the right.

7. Pull the needle up and draw the thread through. Tighten one more holding stitch.

8. Repeat the stitches till the row is filled with stitches.

9. Make as many rows as you need to fill the shape.

10. Cut the loops and trim to the same length.

11. Use a brush to fluff up the surface and remove the cut-off threads.

12. Use the lint remover or a piece of tape to gather cut-off threads.

Turkey work embroidery Video tutorial
Tools and materials I used for this sampler
Disclaimer. To cover the cost of creating free embroidery patterns and video tutorials for this blog, I do sometimes link to products. Please assume these links are affiliate links. If you choose to buy through my links then THANK YOU – it will make it possible for me to keep doing this.

What’s next?
If you’re in the mood to explore more hand embroidery stitches, check out the Stitches and Techniques page for the list of other fantastic stitches available on my blog. From timeless classics to modern twists, a whole world of stitches is waiting for you to explore and master. Decorative stitches, techniques for filling and outlines, borders or mending – all in one place!
Don’t miss a thing!
Follow me on YouTube, Instagram, Facebook, Flipboard, Telegram, Reddit or Pinterest. On the other hand, you can subscribe to the Practical Embroidery newsletter and get embroidery tips straight to your inbox every week!
Need More Guidance?
The top 10 hand embroidery stitches to learn is a free online course created for beginners.