
9 Ways To Embroider Leaves: Free PDF Pattern + Step-by-step Hand Embroidery Tutorial
Embroider Leaves in 9 ways, with Free Pattern and Tutorial
Nature around us and the natural world are the biggest sources of inspiration for hand embroidery designs. Botanical embroidery designs – plants, leaves, flowers, greenery, and landscape scenes are the most popular among needlecrafters. If you are planning to embroider botanical designs, you might wonder what the best ways to stitch the leaves of the plants are. There are many ways to embroider leaves – from simple outlines to fully filled textural stitches. You can use basic stitches like Chain Stitch or Blanket Stitch or more covering options like Fishbone Stitch or Closed Cretan Stitch.
Care to learn 9 ways to embroider leaves? Download a free “9 Leaves Hand Embroidery PDF Pattern” and stitch along with me!
9 ways to embroider leaves: Step-by-step tutorial
Tolls and materials

- 9 Ways To Embroider Leaves PDF pattern – download it and print a pattern page.
- Fabric. I used white linen fabric, 25×25 cm in size. Any even weave fabric of a similar size will work for this sampler.
- Embroidery floss or thread. I used pearl cotton by DMC and other producers and DMC embroidery floss in various shades of green for this project.
- Embroidery hoop (18 cm / 7 inches) and a hoop stand (optional).
- Embroidery needles.
- Embroidery scissors.
- Friction pen for pattern transfer. I used a lightbox method with a sunny window as a light source to transfer the pattern. Read the article “How To Trace Pattern on Fabric: Five Methods For Fast And Easy Embroidery Pattern Transfer” to choose the best method for your fabric.
How to embroider leaves: Step-by-step instructions
1. Transfer the pattern to the fabric

2. Stretch your fabric in the hoop and tighten the tension screw. You can use a hoop stand for more convenience.

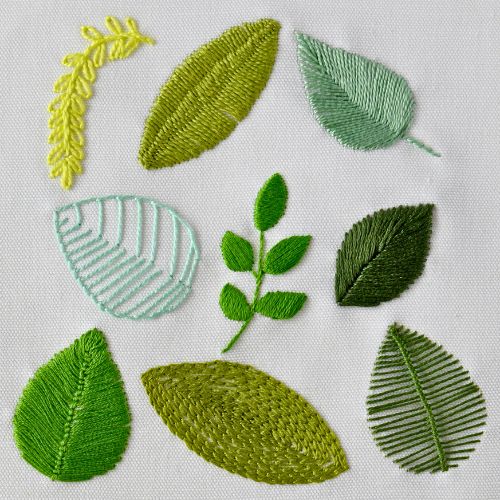
3. Detached Chain Stitch leaves. I used pearl cotton thread for this leafy branch.

4. Start with embroidering leaves on one side of the branch. Then, on the return path, add Detached Chain stitches on the other side of the branch.

5. Finally, stitch a stem with a Stem Stitch.

6. Closed Cretan Stitch leave. To embroider this fully filled leave, I used pearl cotton thread.

7. Start with drawing two additional guidelines in the center of the leaf. These will define the width of the central braided part of the stitch.

8. Start at the tip of the leaf and fill the entire shape with a Closed Cretan Stitch.

9. Maintain the same density of the stitches throughout the whole shape.

10. Fishbone Stitch leaf. I used a light green pearl cotton to embroider this leave.

11. Start at the tip of the leaf. Fill the entire shape with a dense Fishbone Stitch.

12. Finish to fill the shape and add a stem with a Stem Stitch.

13. Blanket Stitch leave. I embroidered this shape with pearl cotton.

14. Start from the tip and make equally distanced Blanket Stitches on one side. Then, add the stitches on the other side of the leaf shape. You can vary the density of the stitches to make your leaves more filled or lighter.

15. Satin Stitch leaves. I embroidered this plant with two strands of embroidery floss.

16. Start with the outline with a Split Backstitch.

17. Then, fill it with parallel stitches to create a Satin Stitch. Start at the center of the shape and make all the filling stitches parallel to the first one.

18. Different directions of filling will result in different visual effects. You can fill the leaves horizontally, vertically, or diagonally.


19. Leaf Stitch leaf. I used six strands of embroidery floss to stitch this leaf.

20. Start at the tip of the shape with one central stitch. Then, embroider with Leaf Stitch – make straight stitches towards the center line, alternating the sides.

21. Vandyke Stitch leaf. I used DMC pearl cotton to stitch this leaf.

22. Start with a tiny cross stitch at the tip of the shape and then weave the stitches under the previous ones to make Vandyke Stitch. Keep the tension steady so the braid is in the center of the leaf and forms a central vein.

23. Closed Fly Stitch leaf. I stitched this leaf with six strands of embroidery floss.

24. Start with one straight stitch at the tip of the leaf. Then, add a Closed Fly Stitch under it.

25. Add Closed Fly Stitch, one after another, till the entire shape is filled.

26. Chain Stitch filling. I used two strands of embroidery floss to embroider this leaf shape.

27. First, outline the shape with a Chain Stitch.

28. Then, add a second row of the Chain Stitch, the third one, and so on, until the entire shape is filled with rows of Chain Stitch.

Video Tutorial Embroider Leaves in 9 ways, with Free Pattern and Tutorial
Recommended Products
Disclaimer. To cover the cost of creating free embroidery patterns and video tutorials for this blog, I do sometimes link to products. Please assume these links are affiliate links. If you choose to buy through my links then THANK YOU! – it will make it possible for me to keep doing this.


Over to you
Foliage is a fundamental part of botanical designs; therefore, knowing different ways to embroider leaves will help you create your own nature-inspired embroidery patterns and stitch them with confidence.
Do you have a favorite stitch for botanical designs? Which hand embroidery technique is your go-to way to stitch the leaves? Please share with us in the comments!
More botanical embroidery projects on this Blog

Botanical Embroidery Patterns: Nature-Inspired Stitching

Scented sachets with a floral embroidery DIY tutorial

DIY embroidered napkins with an olive branch: Free pattern download and step-by-step hand embroidery tutorial
