
Sashiko Style Mending: Step-by-step Tutorial for Repairing Jeans
Have you ever had a favorite pair of jeans rip, leaving you torn between tossing them out or holding onto them in the back of your closet? Instead of saying goodbye, there’s a beautiful and practical way to give your jeans a second life: Sashiko style mending.
Sashiko (which translates to “little stabs” in Japanese) is a centuries-old mending technique that began as a way to repair and reinforce worn clothing. Farmers and workers in Japan used simple, repetitive stitches to attach the patches and reinforce the fabric. Over time, this mending method evolved into an artistic technique that transforms everyday garments into one-of-a-kind, artisanal pieces. What started as a necessity has since become an art form—celebrated for its intricate patterns, meditative process, and sustainable philosophy.

Today, sashiko reigns in the world of visible mending. Rather than hiding holes and frays, this technique transforms them into design features, celebrating the history of your clothes and extending their lifespan. On jeans especially, sashiko style mending looks striking—combining the ruggedness of denim with the elegance of geometrical stitching.
In this blog post, I’ll walk you through the basic steps of sashiko style mending: from damage assessment to patching and sashiko stitching. And if you wish to follow along, I prepared a Free downloadable pattern for your sashiko style mending project.
Popular sashiko patterns
One of the most enjoyable parts of sashiko is experimenting with its wide range of geometric patterns. Each design has a story behind it, often inspired by nature or traditional Japanese symbolism. Here are a few classic motifs you might want to try in your own mending projects:
Asanoha – Hemp leaf

A star-like design made from interlocking triangles. The hemp plant grows quickly and is resilient, so this pattern symbolizes growth, strength, and protection. It’s one of the most iconic sashiko patterns.
Juji Kikkō – Turtle shell with cross

A hexagon-based pattern that mimics the shell of a tortoise. This traditional Sashiko pattern combines geometry, symbolism, and quiet repetition. The hexagonal shape represents longevity and wisdom in Japanese culture.
Seigaiha – Ocean waves

A repeating series of arches forming wave-like shapes. This elegant motif symbolizes peace, resilience, and the ebb and flow of life.
Yagasuri – Arrow feather

A repeating chevron pattern inspired by the fletching of arrows. It’s associated with determination and moving forward, as arrows are difficult to pull back once shot.
These are only a few of the patterns developed over time. For more patterns and inspiration, grab a Sashiko book or a Sashiko card deck.


Each of these patterns can be as bold or subtle as you like, depending on your thread color and stitch spacing. Whether you’re patching a small hole or decorating an entire pant leg, mixing different motifs can turn your mended jeans into wearable art.


In the tutorial below, I used the Komezashi – Rice stitch. It is a grid-based stitch, named for its resemblance to the Japanese Kanji character for rice. The base of this pattern is a Jujizashi sashiko, meaning “ten cross stitch” in Japanese. It is a fundamental sashiko embroidery technique that uses a basic running stitch to create a pattern of intersecting horizontal and vertical lines forming crosses.

Tutorial: Sashiko Style Mending Jeans
Underside patch and sashiko embroidery – step-by-step guide
Tolls and materials
- Your damaged garment needs to be mended. I will mend my broken jeans.
- Sashiko pattern. Choose the design you wish to embroider. If you want to follow along with my stitching, download and print my free pattern with a grid for Komezashi – Rice stitch.
- Water-soluble stabilizer for a pattern transfer.
- Sharp fabric scissors and small embroidery scissors or snips.
- Durable thread. Sashiko thread and pearl cotton work best for mending projects.
- A needle. Get a sharp embroidery needle or a sashiko needle.
- A thimble.
- Some pins and safety pins.
Preparation for sashiko style mending
1. Gather tools and materials. Download and print the sashiko grid.

2. Assess the holes and thinned fabric you plan to mend. Cut away fraying threads. Slide a protective layer inside the leg of the jeans. I will use a plastic envelope for this.

3. Cut out the piece of fabric for a patch. It should be big enough to cover the holes and thinned fabric.

Sewing an underside patch
1. Pin the patch to the reverse side of the leg of the jeans. Use safety pins, so you don’t hurt yourself while stitching.

2. Turn the leg inside out. And slide the protection layer inside again. Turn the edge of the hole inside and pin it at the edge. Do not pin the whole perimeter, but work section by section.

3. Thread your needle with pearl cotton thread and make a knot at the end. Hide the knot inside the fold and sew the edge of the hole to the patch fabric.

4. Use a slip stitch for sewing and remove the pins as you go. Move around and sew the entire edge. After the last stitch is done, push the needle to the back of the fabric and secure the thread on the back of the patch.

5. Use the same method to patch all the holes.

6. Turn the jeans inside out and add basting stitches around the patch. Turn the edge inside and use pins to hold the edge while you add running stitches around. After the basting is finished, remove all safety pins.

7. On the front side of the jeans, on the edge of the patch, mark a double straight line. I used a friction pen for this task. It will be easy to remove the tracing marks with a hot iron.

8. Thread your needle with pearl cotton and make a knot on the end. Leave the knot on the back side of the jeans and sew a running stitch around the patch edge. Sew two rows of running stitch to have a super secure patch.

9. After both rows of running stitch are done, remove the basting stitches. The patching is finished, and you could stop here, but I will add sashiko-style stitching on top.

Sashiko style embroidery
1. I will use a water-soluble stabilizer to transfer the stitching grid. I printed the grid on a sheet of water-soluble stabilizer and cut the page into two parts. One part will work as a decorative sashiko layer over the patch.

2. I will add sashiko stitching to the left leg, too, as it has some thinned fabric that needs reinforcing.

3. Thread the needle and make a knot. I used pearl cotton, but you can opt for sashiko thread instead. I highly recommend using a thimble for this stitching, as the jeans fabric, layered with a patch and a stabilizer, is rather thick. Start with horizontal lines of running stitches.

4. Use the dots of the grid as guidelines for the length of the stitches. The stitches of the second row are offset from the first row. Stitch in the first row = gap in the second row.

5. I will split this huge patch into two parts and add a red color to the stitching. Use the same technique – embroider offset rows of running stitches.

6. Now add the running stitches in another direction – at a 90-degree angle.
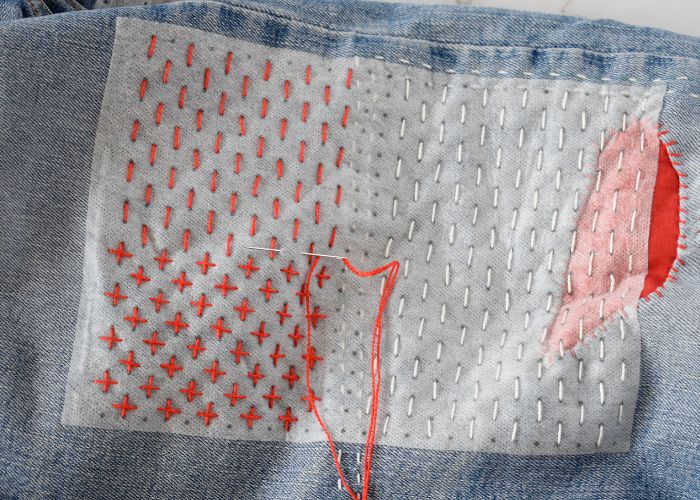
7. These stitches will cross the stitches from the previous set, forming +. Cross each running stitch of the design.

8. For the third layer of the design, I will use a white pearl cotton thread. The stitches of this layer will diagonally connect crossed stitches.

9. Finally, add a fourth layer – the second set of diagonal stitches. This layer of running stitches will fill the resting gaps in the design.

10. For this section of my sashiko stitching, I will use only white thread. The stitching method is the same. Start by making + stitches.

11. Then, connect them with two sets of diagonal stitching.

12. For the patch on the other leg, I used the same sashiko style mending stitch, but inverted the colors.

13. After finishing the stitches, I soaked my jeans in lukewarm water. Then, I washed them in the washing machine to remove the residue of water-soluble stabilizer. Do not tumble dry embroidered items, but hang them to dry naturally.

Video Tutorial
Recommended Products
Disclaimer. To cover the cost of creating free embroidery patterns and video tutorials for this blog, I do sometimes link to products. Please assume these links are affiliate links. If you choose to buy through my links then THANK YOU! – it will make it possible for me to keep doing this.


Over to you
Sashiko is so much more than just a mending technique—it’s a blend of tradition, sustainability, and creativity that turns everyday repairs into meaningful acts. By choosing to repair your garments with sashiko style mending, you’re not only extending the life of your clothing but also connecting with a craft that has been passed down through generations.
So the next time you find a rip or worn spot in your jeans, see it as an opportunity, not an ending. Pick up your needle and thread, enjoy the slow rhythm of stitching, and create a piece that reflects both your style and your care for the planet.
Happy mending—and may your jeans carry many more adventures stitched with love and resilience.
Bonus: get the Ad-free, printable PDF tutorial!
Love this tutorial and want to keep it forever—without ads or distractions? Now you can!
I’ve created a beautifully formatted, ad-free PDF version of this Sashiko Style Mending Guide, designed for easy reading, printing, and offline stitching.

Why get the PDF?
- Printable grid for sashiko embroidery, stitching directions for Komezashi – Rice stitch sashiko, list of tools and materials, step-by-step mending guide with detailed photos, additional reading and video resources and a link to a video tutorial – all in one convenient PDF.
- Save it forever – no need to search for the tutorial again; download once and keep it on your device.
- Print & stitch anywhere – take it to your craft room, stitch on the go, or add it to your embroidery workbook.
- Clean, ad-free layout – focus on learning without distractions.
- Support future tutorials – your purchase helps me create more free content!
More on mending on this blog

How to mend holes in jeans by hand. A simple method with running stitch embroidery

Embroidery Mending Basics: Beginner’s Guide to Sustainable Wardrobe

Visible Mending Knitwear: A Creative and Sustainable Approach
