
14 Chain Stitch Variations For Borders, Outlines, and Decoration
Chain Stitch and it’s variations is one of the most basic and widely used hand embroidery techniques. Small loops of thread are positioned one after another to form a tiny rope that works great for outlines, lettering, filling, and as a border design.
But Chain Stitch has much more to offer. Countless variations of the Chain Stitch and composite stitches were created to embellish garments and home textiles, for lettering and monogramming, as well as for decorative surface embroidery, crazy quilting, and other textile arts.

I shortlisted the 14 Chain Stitch variations I use the most and created a sampler to demonstrate and practice these stitches. So, if you are interested in learning new hand embroidery techniques, download the pattern and stitch along with me!
Chain Stitch variations for outlines and lettering
Chain Stitch & Reverse Chain Stitch


The base of all the stitches that will follow is the Chain Stitch. You can embroider it as a Regular Chain Stitch or as a Reverse Chain Stitch.
The stitch is versatile and lends itself to outlines, borders, lettering, or filling.
Cable Chain Stitch

The Cable Chain Stitch is a decorative Chain Stitch variation that resembles a real chain. It looks excellent in decorative embroidery, on garments, or in crazy quilting.
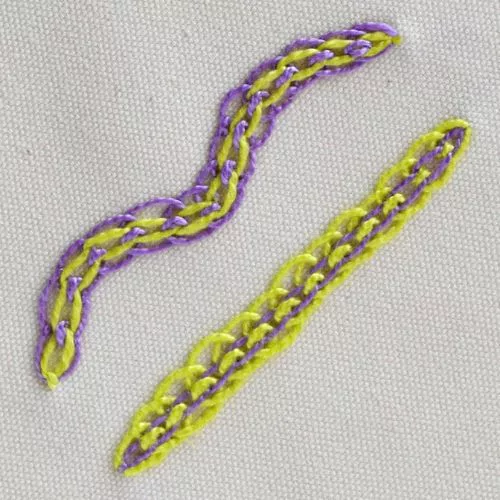
Hungarian Braided Chain Stitch

The Hungarian Braided Chain Stitch yields a heavier, richer braided line. It is relatively fast and straightforward to make, yet the result is very decorative and bold. Use it for decorative borders and embellishments.
Alternating Twisted Chain Stitch

The Alternating Twisted Chain Stitch is another variation of the Chain Stitch, suitable for borders, decorative outlines, and botanical embroidery. Twisted Chain Stitches are positioned in an alternating manner to create a decorative line that you can embroider on straight or curvy lines.
Chain Stitch variations for edges and embellishments
Zig Zag Chain stitch

The Zig-Zag Chain Stitch looks great as a decorative band, a bold outline, or an embellishment on cuffs and necklines. Simple embroidery technique for bold results.
Basque Stitch

Basque Stitch is a combination of the Twisted Chain Stitch and the Blanket Stitch. This mix produces a decorative band that resembles a line with petals or leaves attached to it.
This technique is a beautiful option for decorative borders, outlines, and embellishments. It also works great in botanical embroidery or Crazy Quilting.
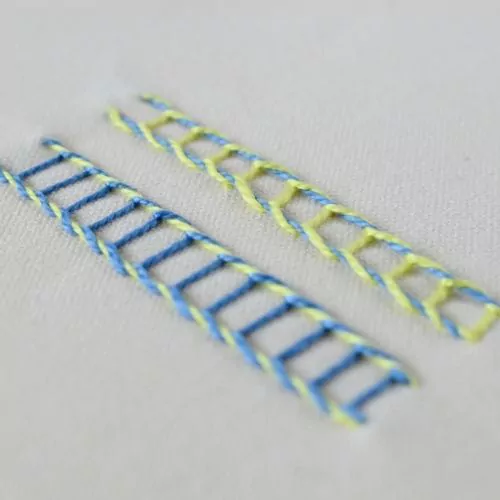
Open Chain Stitch

Open Chain Stitch, also known as Square Chain Stitch, is a decorative and versatile technique. You can use it for borders, outlines, lettering, decorative filling, or crazy quilting. The stitch takes curves well, allowing you to embroider vines and other botanical elements with ease using the Open Chain Stitch.
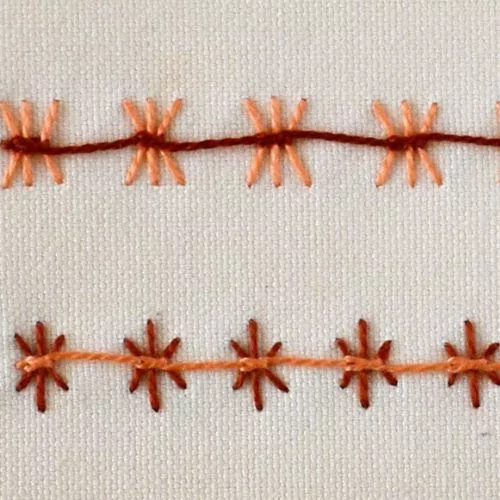
Wheatear Stitch

Wheatear Stitch is a decorative yet straightforward hand embroidery technique, excellent for borders and decorating the seams. It works well on straight and curved lines. Besides that, you can add beads to this stitch to make it even more decorative. It is widely used in floral embroideries for its wheat-like shape. You can add some Backstitches under the Wheatear stitches group and create a grain plant.
Detached Chain Stitch Variations
Lazy Daisy Stitch


The most simple and straightforward way to embroider a flower is – The Lazy Daisy Stitch. It is a group of detached Chain Stitches grouped around the center. You can opt for a regular Lazy Daisy or Double Lazy Daisy version.
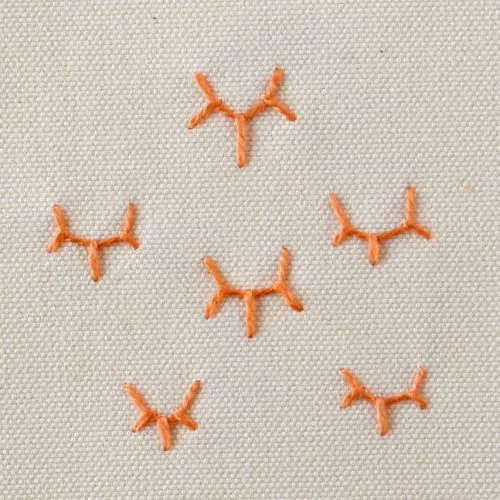
Tulip Stitch


Tulip Stitch is a decorative variation of the Chain Stitch – a detached Chain Stitch with an extra slipped stitch to form decorative petals. This stitch is simple to make and can add floral vibes to your borders or decorated seams.
You can stitch small tulips as detached decorative elements or connect them in a line to create a decorative border.
Heart Chain Stitch

Heart Chain Stitch is a group of two Detached Chain Stitches positioned on the same starting point. This way of grouping stitches creates a small decorative element shaped like a heart.
You can embroider this stitch as a single detached decorative element or as an ornamental band.
Chain Stitch Filling


Chain Stitch filling is a hand embroidery technique that uses a regular Chain Stitch or a Reverse Chain Stitch to fill large or small design elements.
This filling technique is versatile and easy to implement. It can be applied to any shape and form, resulting in beautiful textural filling with a dynamic surface.
Detached Chain Stitch


A Single Chain Stitch, also known as a Detached Chain Stitch, is a variation of the Chain Stitch in which each link of the chain is embroidered separately.
Single Chain Stitch is a decorative and versatile embroidery technique. You can use it for adding small decorative details, embroidering interrupted lines, filling, or creating flowers.
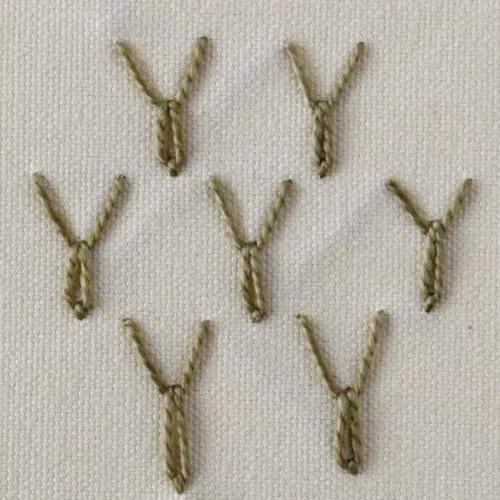
Long-Tailed Chain Stitch


The Long-Tailed Chain Stitch is one of the many variations of the basic Chain Stitch. To make this stitch, we anchor a small detached chain stitch with a long, straight stitch – a long tail. In general, the embroidery technique of this stitch is the same as that of the Detached Chain Stitch. The only difference is the length of the anchoring stitch – instead of the tiny anchoring stitch, we use a long one.
You can use this stitch to fill large areas, create decorative borders, or cluster the stitches to form decorative shapes, such as flowers or snowflakes.

Learn how to embroider 14 variations of Chain Stitch
Sampler with 14 variations of Chain Stitch – fun way to learn hand embroidery
Tolls and materials
- Embroidery pattern. Download and print my free 14 Variations of Chain Stitch Sampler PDF pattern.
- Fabric. Use linen, cotton, or blended fabric with a high thread count.
- Embroidery hoop and hoop stand. I used an 18 cm (7 inches) hoop and a tabletop hoop stand.
- Scissors.
- Embroidery needles.
- Friction pen for pattern transfer.
- Embroidery floss. I used bright-colored DMC cotton floss.
Preparation
1. Download and print the pattern. Gather tools and materials for the project.

2. Transfer the pattern to the fabric. Choose your favorite method to trace the pattern to the fabric (read the guide “How To Trace Pattern on Fabric: Five Methods For Fast And Easy Embroidery Pattern Transfer” for options).
3. Stretch the fabric in the hoop and tighten the screw. You can use a hoop stand for more stability and convenience.
A square shape with a Chain Stitch and Reverse Chain Stitch
1. To embroider the Chain stitch outline, I used three strands of #3746 dark blue violet embroidery floss. I started with a horizontal line and embroidered it with a regular Chain Stitch.

2. For the vertical line, I switched to reverse Chain stitch. Use the anchoring stitch of the last chain on the horizontal line as a starting stitch for the reverse chain.

3. For the second horizontal line, switch to the regular Chain Stitch. The endpoint of the last reverse chain stitch and the first regular chain stitch will be the same. Therefore, you risk unpicking the stitch. To avoid that, on the reverse side, pass the needle under the previously made stitch to anchor it and then – stitch regularly.

4. For the last vertical line, switch to the reverse chain stitch. Use the anchoring stitch of the Chain stitch as the starting stitch for the reverse chain.

A rectangle with an Alternating Twisted Chain Stitch
1. Use three strands of #553 violet embroidery floss to embroider the Alternating twisted chain stitch.

2. To create nice and sharp angles, anchor the last stitch in the row.

3. Then, start stitching as if starting a new row.

4. Work around the shape using the Alternating Twisted Chain Stitch, securing all four angles.

Wavy shape with a Cable Chain Stitch
1. To embroider Cable Chain Stitch, use three strands of #3842 dark Wedgwood embroidery floss. First, twist a thread around the needle.

2. Then, push the needle to the fabric. This step will form a link between two chains.

3. Take the needle up to the surface one stitch away, inside the loop of the working thread.

4. Pull the thread to tighten the loop. This will form a chain.

5. Repeat the steps to embroider the outline with Cable Chain Stitch.

Oval shape with a Hungarian Braided Chain Stitch
1. To embroider Hungarian Braided Chain Stitch, use three strands of #794 light cornflower blue embroidery floss. Start with a small anchoring stitch and add a reverse chain stitch. Then, make the second chain stitch, anchoring it to the same starting stitch. Leave the loop of the stitch half-open.

2. Pass the needle under the previous chain stitch. Use the back of the needle to avoid snagging the stitch.

3. While the needle is still under the stitch, pull the working thread to tighten the loop.

4. Make a loose chain stitch again and repeat the steps to outline the entire shape.

A rainbow shape with Open Chain Stitch, Basque Stitch, and Zig Zag Chain stitch
1. To embroider the first band in the rainbow, use Open Chain Stitch. Embroider it with three strands of #3733 dusty rose embroidery floss.

2. Embroider the entire shape and secure it with two anchoring stitches on both angles of the last stitch.

3. For the middle band, use Basque Stitch. Embroider it with three strands of #720 dark orange spice embroidery floss. Pass the needle through the fabric at a 90-degree angle and leave it in place. Pass the working thread under the needle to form a loop.

4. Pull the thread through and tighten the loop. Add an anchoring stitch to secure the chain.

5. Push the needle up at the starting point of the previous stitch.

6. Repeat the steps as many times as needed to embroider the entire shape.

7. For the final band, use the Zig Zag Chain stitch. Embroider it with three strands of #703 chartreuse embroidery floss. Start with a Chain stitch positioned diagonally between the left and right lines that mark the shape.

8. Add one more chain, which is now positioned diagonally between the right and left sides of the shape. Continue like this till you embroider the entire shape.

Grain plants
1. To embroider grain plants, use Wheatear Stitch. Embroider it with strands of #730 very dark olive green embroidery floss. Start with two straight stitches at the top of the figure.

2. Use the reverse chain stitch technique to create a chain – pass the needle under the straight stitches to anchor the loop.

3. Push the needle down at the starting point to close the loop.

4. Add two more straight stitches on the sides.

5. Add one more chain stitch. Repeat the steps to embroider the entire shape and finish with some backstitches for the stem.

The sun with a Chain Stitch Filling, Detached Chain Stitch, and Long Tailed Chain Stitch
1. To embroider the body of the sun, use the Chain Stitch Filling technique. Embroider it with three strands of #725 mild light topaz embroidery floss. Start at the center of the shape and embroider the entire swirl using a Chain stitch.

2. You can position the rows close to each other to fully cover the fabric or leave some of it visible.

3. To embroider short rays, use Detached Chain Stitch.

4. Use Long Tailed Chain Stitch to depict longer rays.

Daisy flowers
1. To embroider flowers, use Lazy Daisy Stitch. Embroider it with three strands of #3350 ultra dark dusty rose embroidery floss. Start with one petal, made with a Detached Chain Stitch.

2. Move in a circle and add the second petal.

3. Embroider all the petals of the flower.

4. Move from one flower to the next until you have embroidered all the floral shapes.

Hearts
1. To embroider the hearts with a Heart Chain Stitch, use three strands of #347 very dark salmon embroidery floss. Start with one side – make a stitch from the tip to the center of the shape. Leave the loop of the working thread open.

2. Anchor the loop at one side of the heart shape with a tiny anchoring stitch.

3. Repeat the steps to embroider the second half of the shape.

4. Use this method to embroider all the hearts in the design.

Tulips
1. To embroider tiny tulip flowers using a Tulip Stitch, use three strands of #3731, very dark dusty rose embroidery floss. Start with a Detached Chain Stitch. Come up and push the needle back to the fabric at the same point, leaving the loop of the working thread open.

2. Tighten the loop and anchor it with a tiny stitch.

3. Take the needle up to the surface on the side of the drop and pass the needle under the anchoring stitch.

4. Take the needle down on the other side of the mini tulip shape. Repeat the steps to embroider all the tulips in this sampler.

Final steps
1. Wash and iron the sampler if needed. A hot iron will remove the tracing marks of the friction pen, while water will dissolve the soluble ink or stabilizer.

2. Frame the sampler for display in the hoop or use it in a creative project, such as making a quilt, sewing a zipper pouch, or creating a stitch book.

14 Chain Stitch Variations – Hand Embroidery Tutorial for Beginners & Beyond! – Video Tutorial
Recommended Products
Disclaimer. To cover the cost of creating free embroidery patterns and video tutorials for this blog, I do sometimes link to products. Please assume these links are affiliate links. If you choose to buy through my links then THANK YOU! – it will make it possible for me to keep doing this.


Over to you
As you can see, hand embroidery techniques from the Chain Stitch family are versatile. They can range from the simple Lazy Daisy to more complex composite stitches, such as the Basque Stitch or Wheatear Stitch.
And this is only the tip of the iceberg – there are many more Chain Stitch variations than one sampler can handle.
More Chain Stitch variations for borders:
Detached stitches for decorative elements:
- Bulls Head
- Crown Stitch
- Oyster Stitch
Chain Stitch variations for outlines:


Which variation of Chain Stitch is your favorite? Did any of these options surprise you? Please share in the comments!
Don’t miss a thing!
Follow me on YouTube, Instagram, Facebook, Flipboard, Telegram and Pinterest. On the other hand, you can subscribe to the Practical Embroidery newsletter and get embroidery tips straight to your inbox every week!
Bonus: get the Ad-free, printable PDF tutorial!
Love this tutorial and want to keep it forever—without ads or distractions? Now you can!
I’ve created a beautifully formatted, ad-free PDF version of this 14 Variations of Chain Stitch – Sampler and Tutorial, designed for easy reading, printing, and offline stitching.

Why get the PDF?
- Printable pattern, Stitch guide, Color guide, embroidery instructions and Step-by-step of every stitch – all in one convenient PDF.
- Save it forever – no need to search for the tutorial again; download once and keep it on your device.
- Print & stitch anywhere – take it to your craft room, stitch on the go, or add it to your embroidery workbook.
- Clean, ad-free layout – focus on learning without distractions.
- Support future tutorials – your purchase helps me create more free content!
More samplers for hand embroidery beginners

Basic embroidery stitches for beginners: 18 basic hand embroidery stitches to start stitching like a pro

Beginner Flower Embroidery: Hand Embroidery Tutorial & Free PDF Pattern Download

Beginner Embroidery Stitches + Free Cactus Hand Embroidery Sampler To Learn Basics
