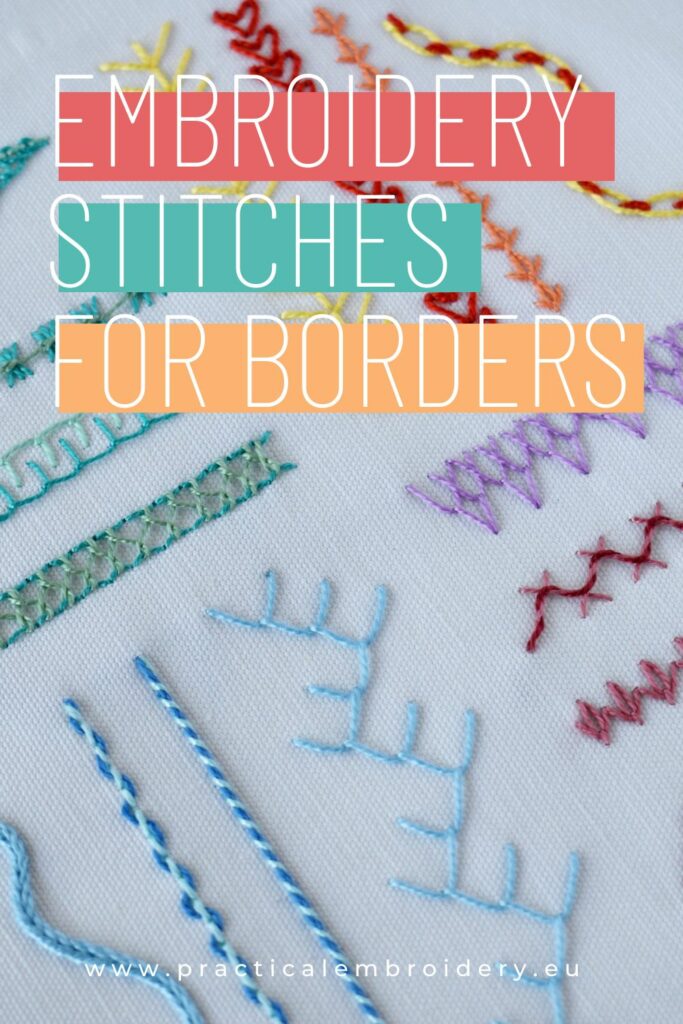
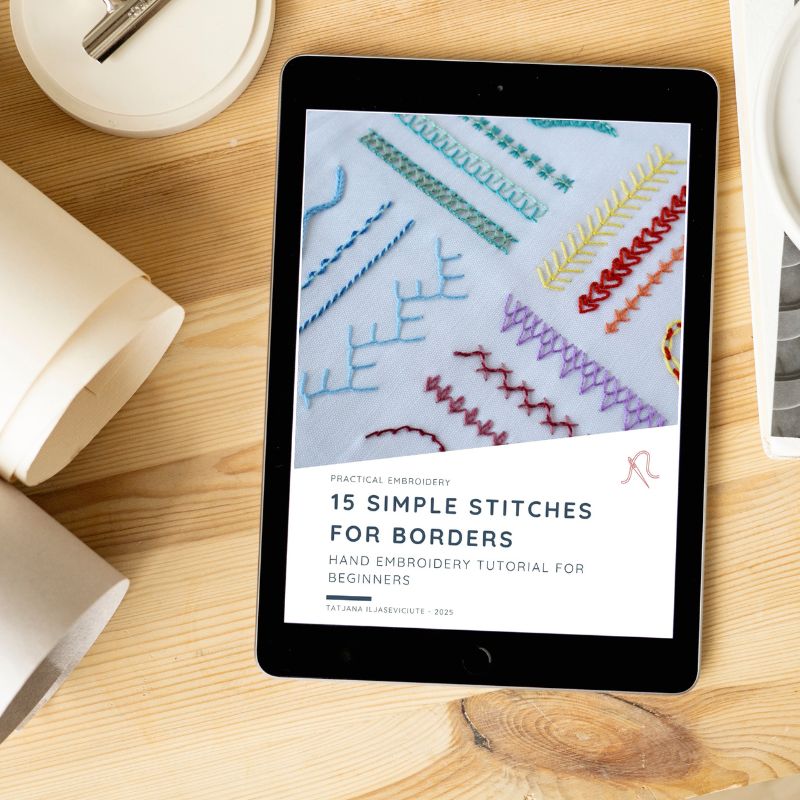
Simple Stitches For Borders: Hand Embroidery Tutorial For Beginners
Borders are the finishing touch that can elevate any hand-embroidered piece from ordinary to extraordinary. Whether you’re embellishing a handkerchief, framing a design, or adding detail to a garment, simple stitches for borders provide structure, definition, and a polished look.
For beginners, mastering these foundational stitches is a great way to build confidence and expand your embroidery skills. In this tutorial, we’ll explore easy yet effective border stitches that anyone can learn—perfect for adding clean edges, decorative outlines, or intricate accents to your projects.
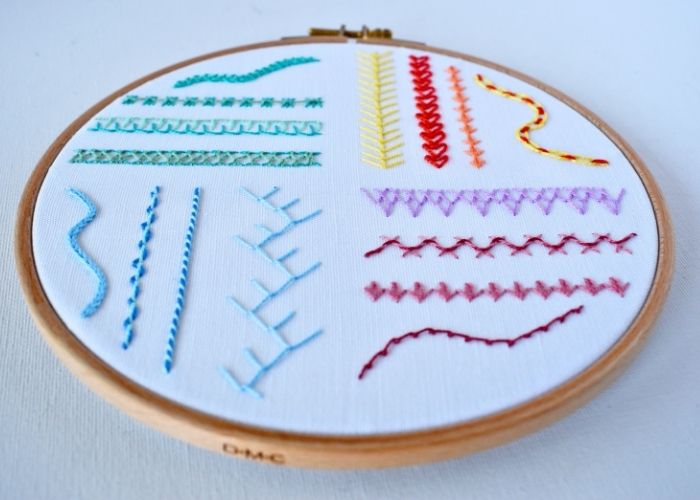
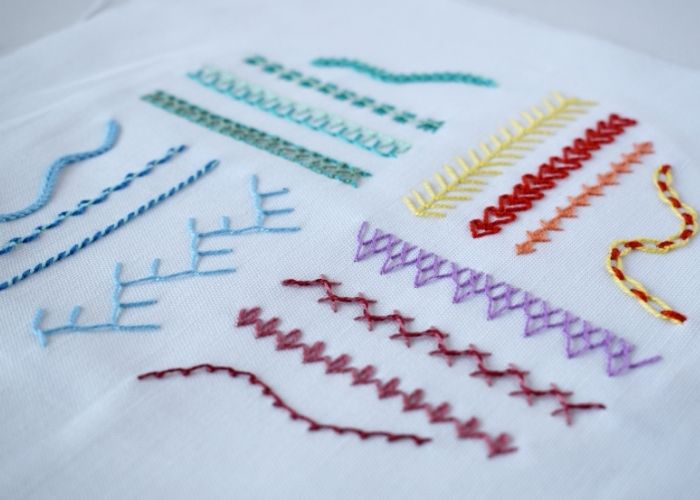
To make your learning as easy as possible, I’ve created a downloadable sampler, so you can follow along and learn all these stitches with me.
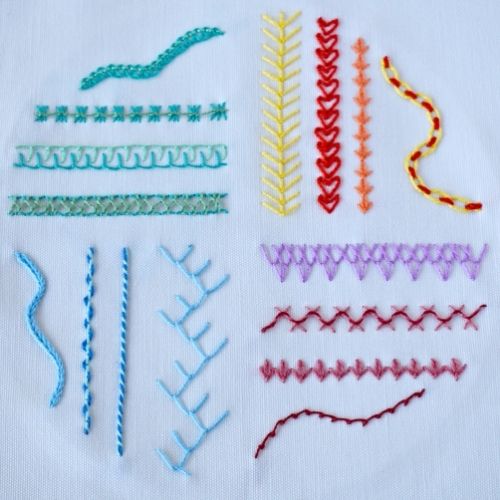
Simple stitches for borders
There are plenty hand embroidery stitches and their combinations you can use for decorative borders. Yet, I recommend that beginners start with the most simple stitches for borders. They are easier to learn and less complex to stitch, yet often guarantee great results and beautiful looks.
In this tutorial, I’ve included 15 simple stitches for borders, so you can try them out and choose the best one for your next project.
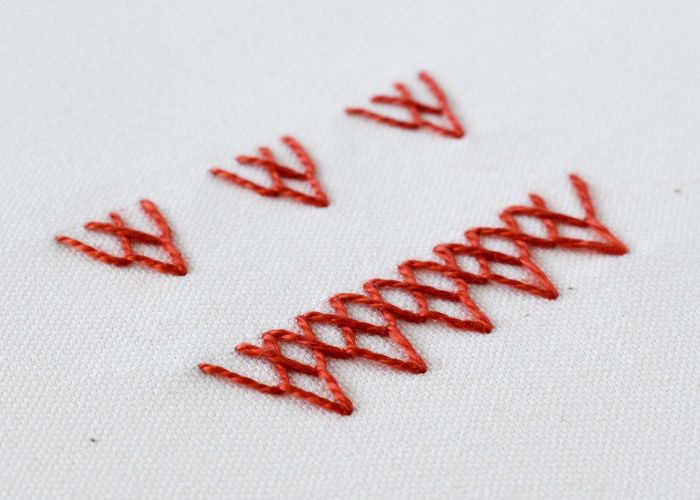
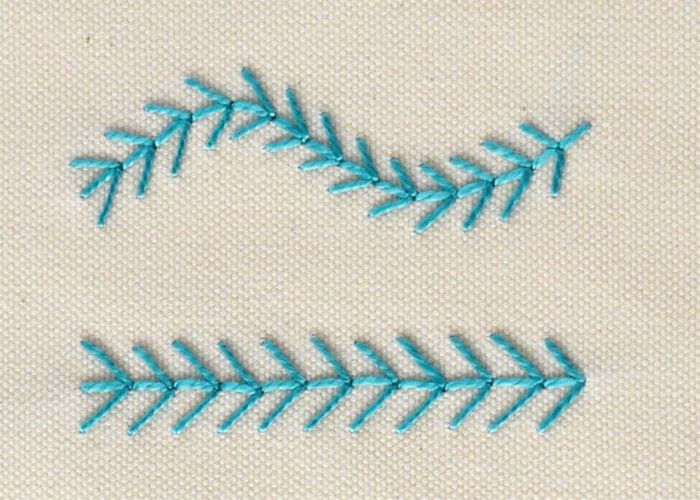
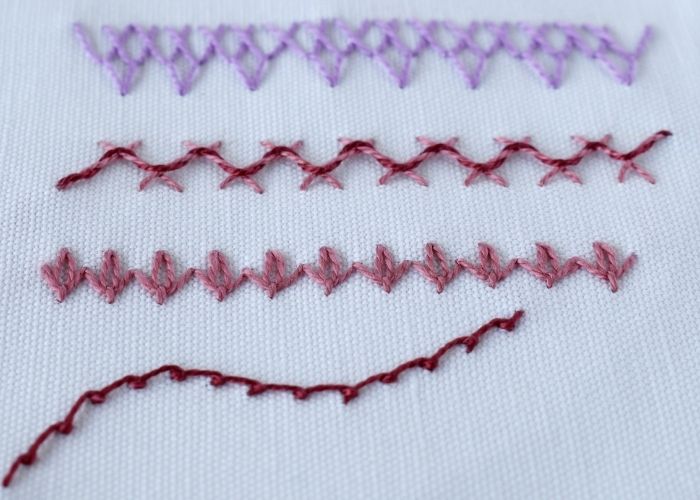
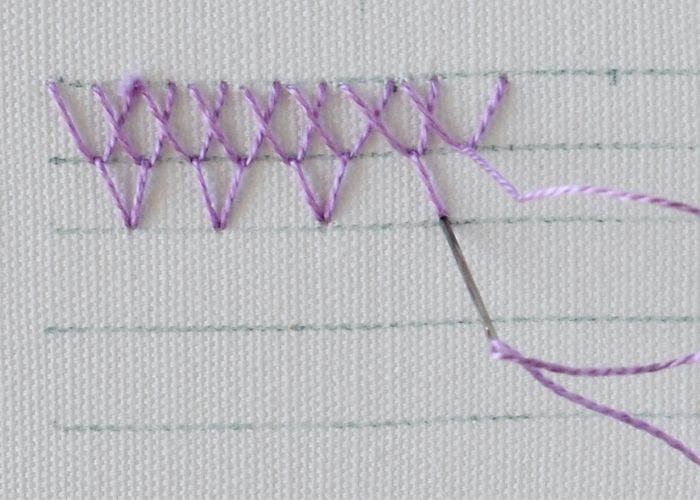
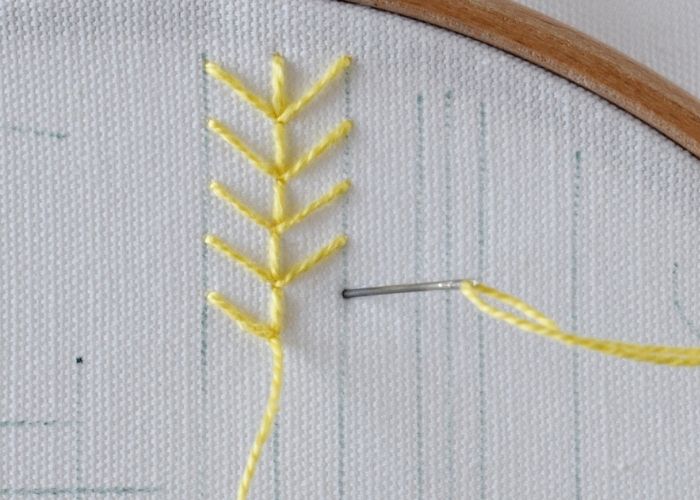
Double Feather Stitch
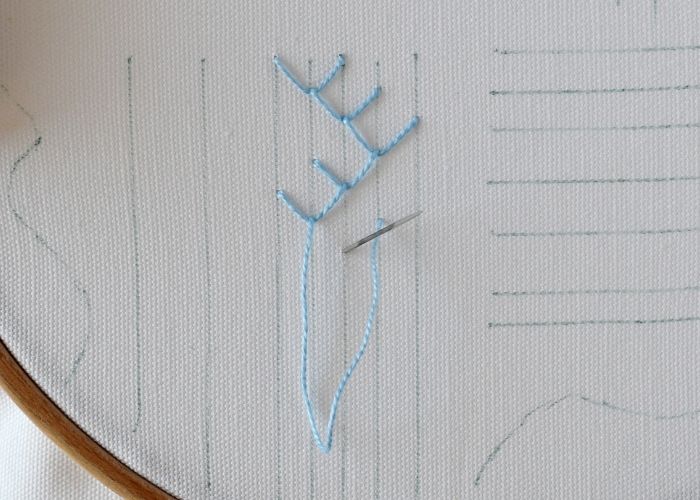
Double Feather Stitch is a series of V-shaped stitches connected between them in a zig-zag shape line. This stitch looks good on straight lines and slight curves, which makes it perfect for botanical embroideries, edges of the garments and other bold borders.
For more details about this simple stitch for borders, read a Step-by-step tutorial or watch a video guide.
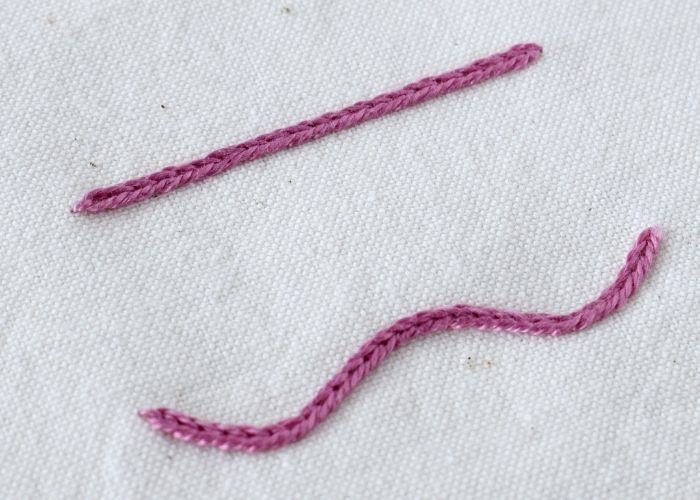
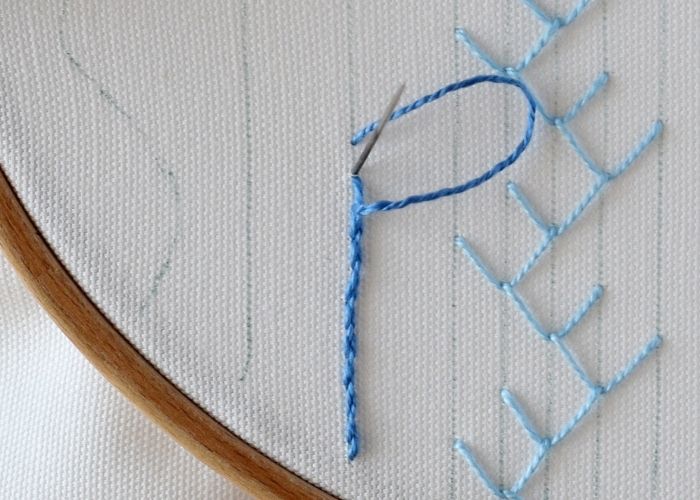
Whipped Stem Stitch
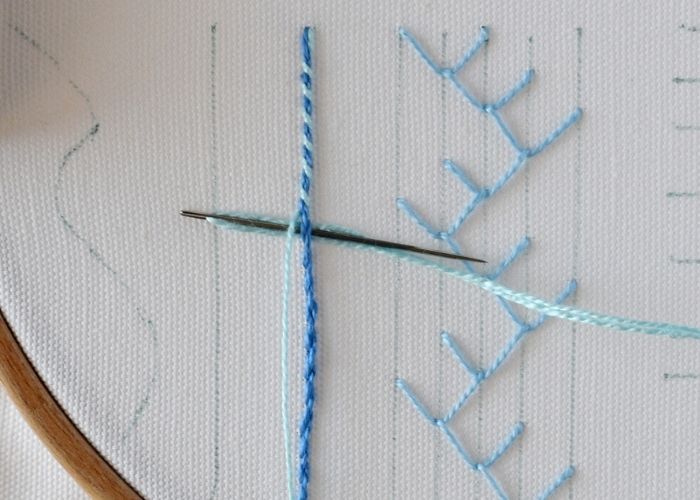
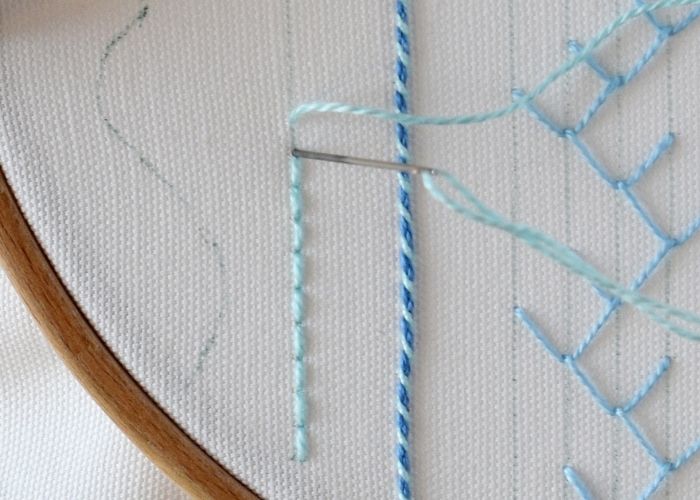
Whipped Stem Stitch is a decorative variation of the classical Stem Stitch. Additional passage – Whipping the stitch results in a more raised, smooth, rope-like line. This decorative hand embroidery technique is particularly effective in outlining, borders, or lettering.
The stitch can be embroidered with one thread color for a smooth, raised line or with two contrasting colors to create a decorative rope.
To learn more about this simple stitch for borders, read a Step-by-step tutorial or watch a video guide.
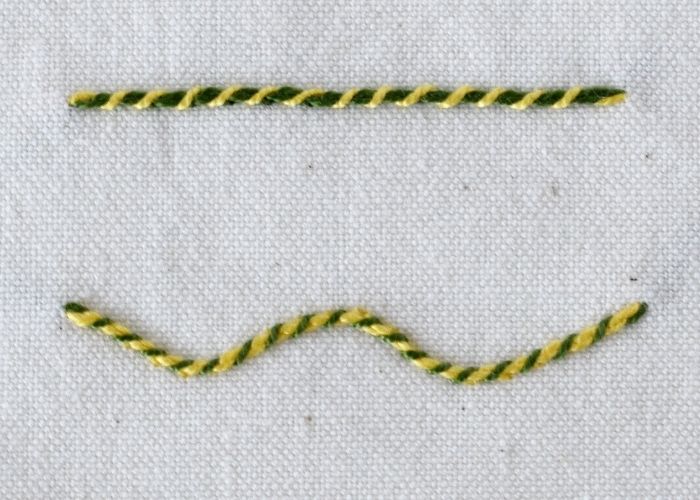
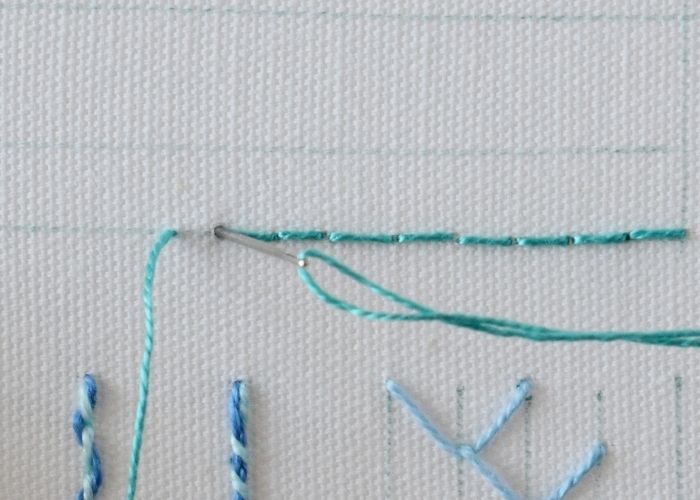
Threaded Backstitch
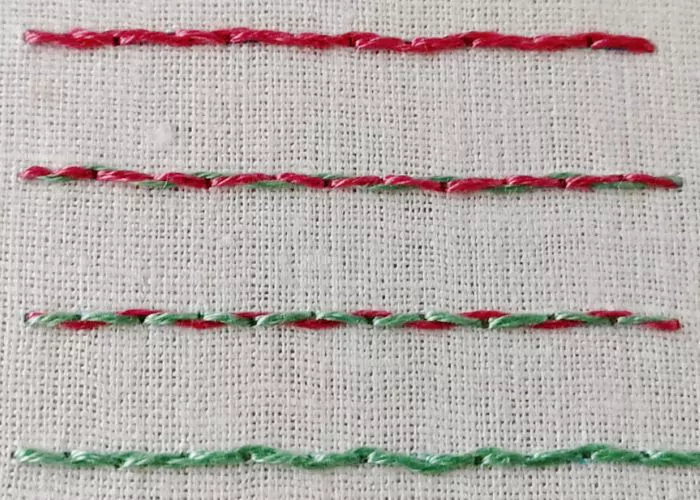
Threaded Back Stitch is a hand embroidery technique that combines the foundation stitch (Backstitch) and threading. You can embroider the Threaded Backstitch in a single color and create a wavy line or choose two contrasting colors to create exciting patterns.
This simple stitch will work great for lettering, outlines and simple border designs.
For more details about this simple stitch for borders, read a Step-by-step tutorial or watch a video guide.
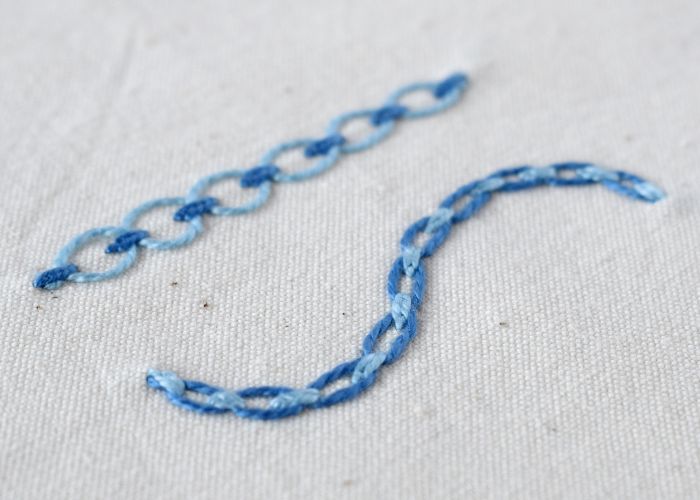
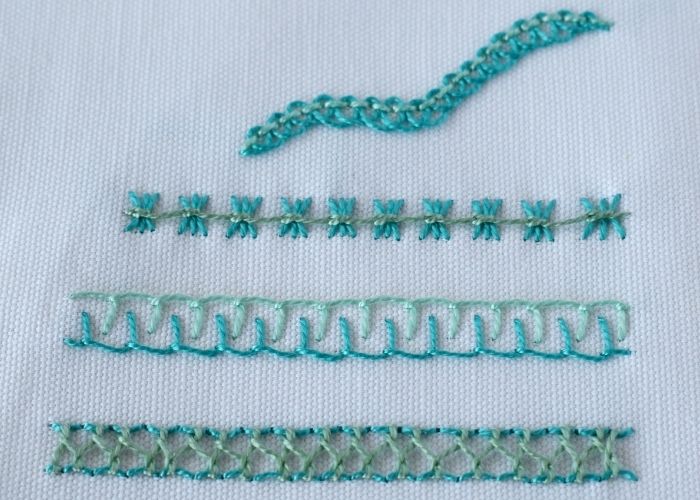
Heavy Chain Stitch
Heavy Chain Stitch is a variation of the Reverse Chain Stitch with a braided, voluminous look.
The decorative raised look of this technique works great for heavier outlines, ornamental borders, or lettering. You can use it in botanical embroidery, crazy quilting projects, or any surface embroidery project. It looks especially lovely in monograms and lettering.
To learn more about this simple stitch for borders, read a Step-by-step tutorial or watch a video guide.
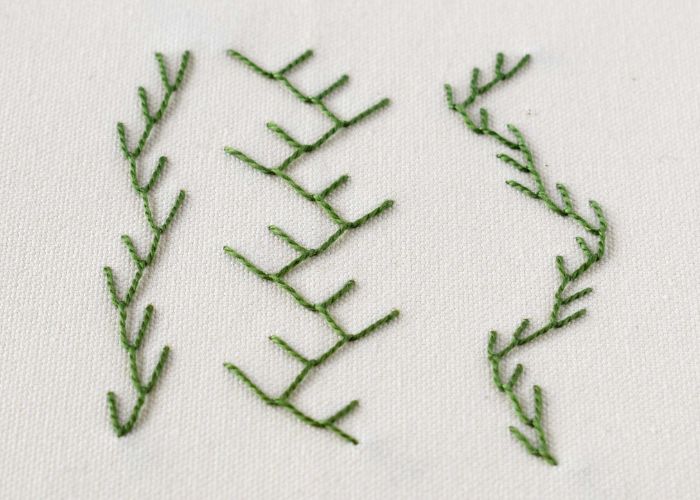
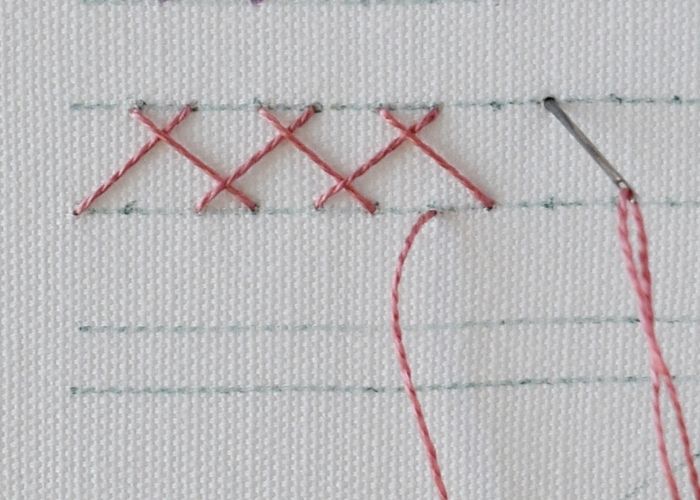
Anklet Stitch
Anklet Stitch hand embroidery is a decorative variation of the Fly Stitch.
In modern surface embroidery, the Anklet Stitch can be used as a simple, yet, decorative border. Combining this stitch with French knots or a Detached Chain Stitch can create intricate floral borders. Adding beads to the stitch will create more luxurious outlines.
For more details about this simple stitch for borders, read a Step-by-step tutorial or watch a video guide.
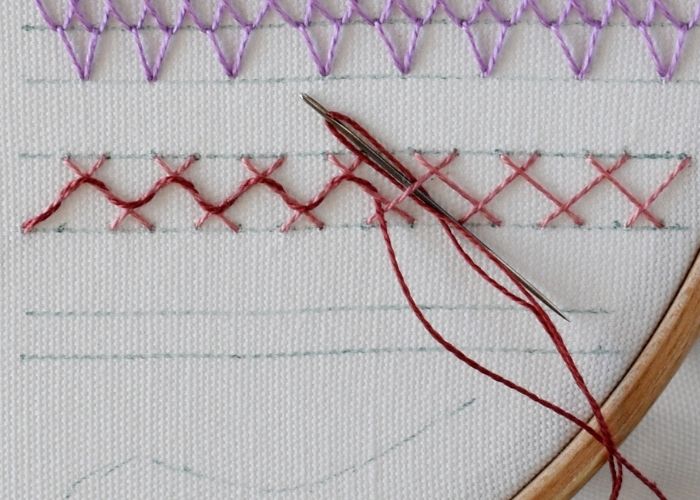
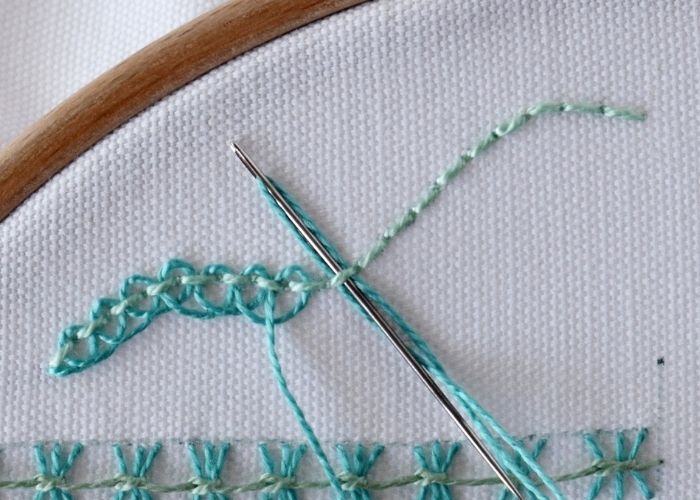
Laced Herringbone Stitch
Laced Herringbone Stitch is a decorative band is created by lacing the Herringbone Stitch with an additional thread upwards and downwards through the foundation stitches.
This embroidery stitch looks great as a decorative border or a bold outline.
To learn more about this simple stitch for borders, read a Step-by-step tutorial or watch a video guide.
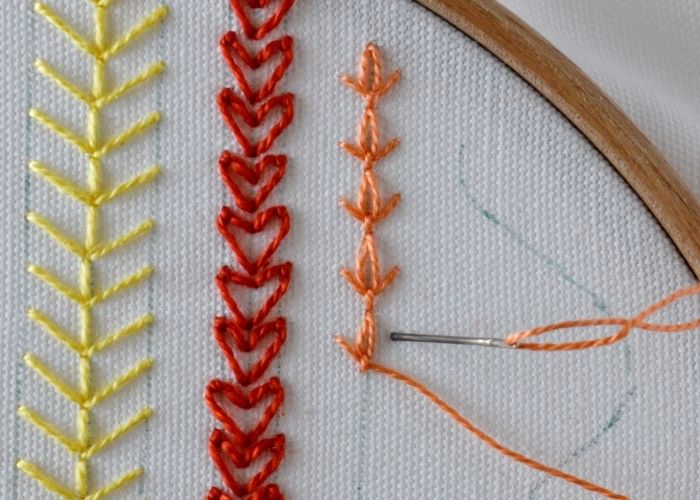
Tulip Stitch
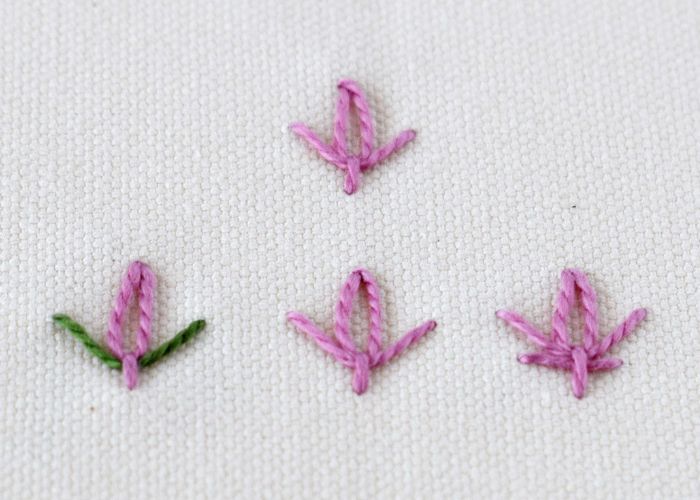
Tulip Stitch is a decorative variation of the Chain Stitch – a Detached Chain Stitch with an extra slipped stitch to form decorative petals. This stitch is simple to make and can add floral vibes to your borders or decorated seams.
This hand embroidery technique is playful and versatile. You can embroider it as a detached stitch or in horizontal or vertical straight lines. Use this stitch for borders, to decorate the seams, or as an accent detached stitch.
For more details about this simple stitch for borders, read a Step-by-step tutorial or watch a video guide.
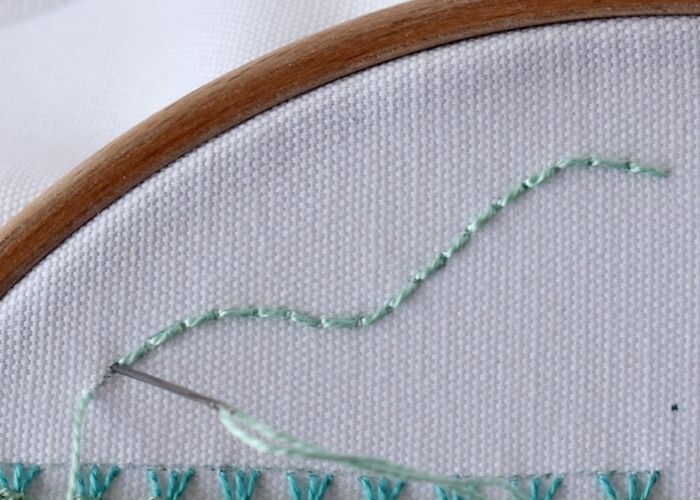
Scroll Stitch
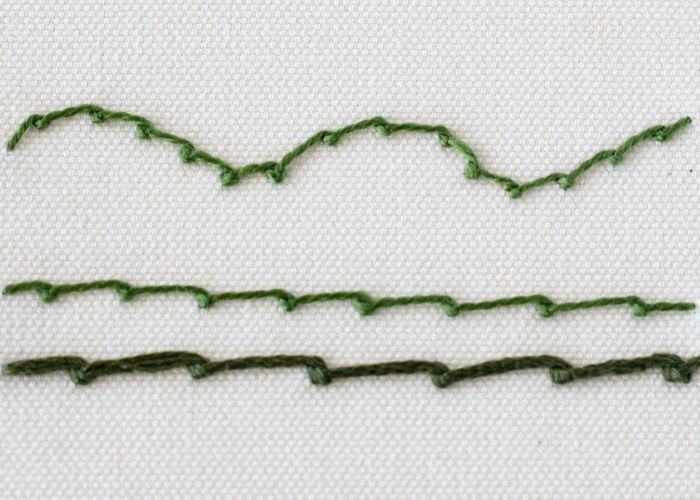
Scroll Stitch is a decorative outline stitch from the family of Knots. This hand embroidery technique forms a wavy knotted line, similar to Coral Stitch.
The Scroll Stitch technique can be applied to straight and curved lines. It is excellent for outlines, lettering, simple borders, and botanical embroidery.
To learn more about this simple stitch for borders, read a Step-by-step tutorial or watch a video guide.
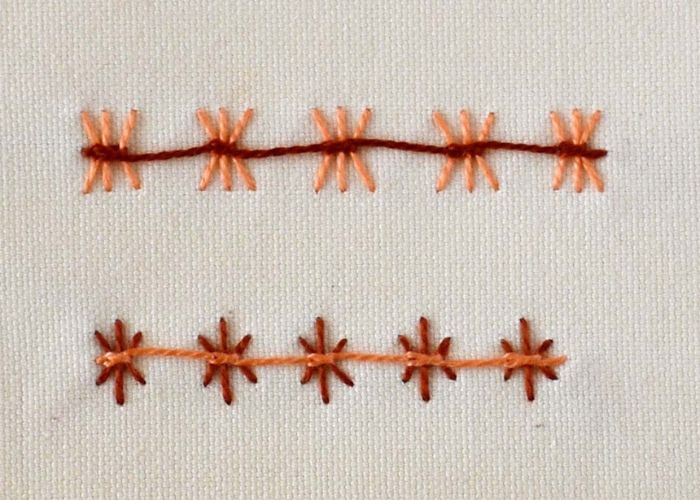
Fern Stitch
Fern Stitch is a simple hand embroidery stitch from the Straight Stitch family. This stitch is formed from three straight stitches and can be embroidered in lines, rows, or even detached stitches. This embroidery stitch looks excellent in straight and curved lines and has multiple uses in textile arts.
You can use this stitch as a decorative border in straight or wavy lines, embroider it on the cuffs, edges or collars of the garments.
For more details about this simple stitch for borders, read a Step-by-step tutorial or watch a video guide.
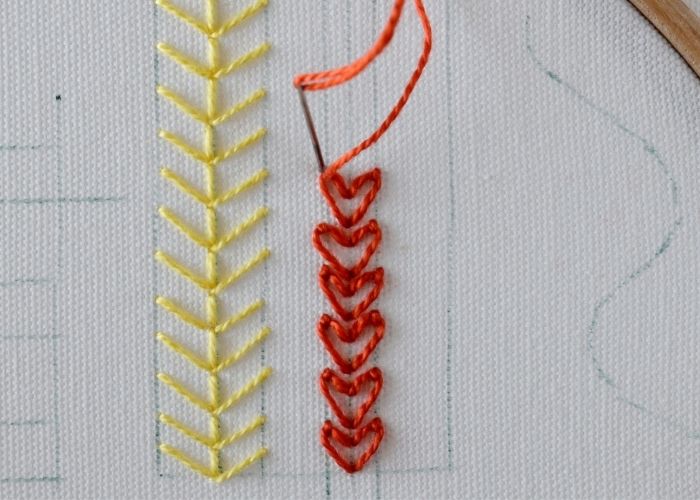
Heart Stitch
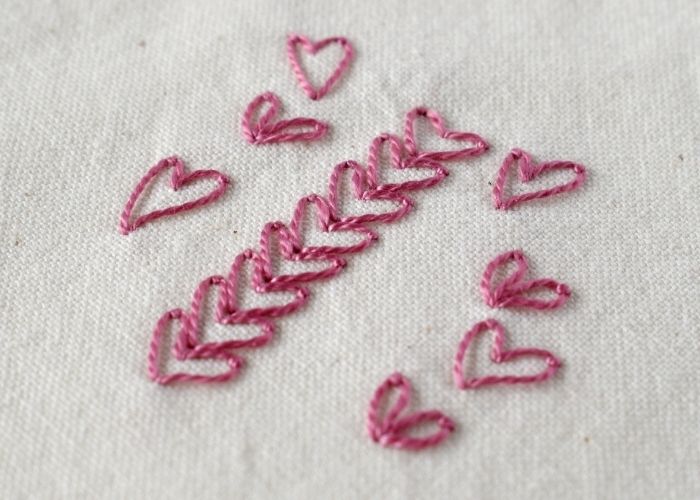
Heart Chain Stitch is a fun and decorative variation of the Chain Stitch embroidery technique.
This hand embroidery technique creates heart-shaped motives. Therefore, you can use it anywhere this decorative motive is required or fits.
Small detached hearts will look nice on children’s garments, socks, napkins, and anywhere you feel like adding one.
Hearts positioned in a row will look nice as a border stitch to embellish seams, edges, cuffs, or necklines of the garments.
To learn more about this simple stitch for borders, read a Step-by-step tutorial or watch a video guide.
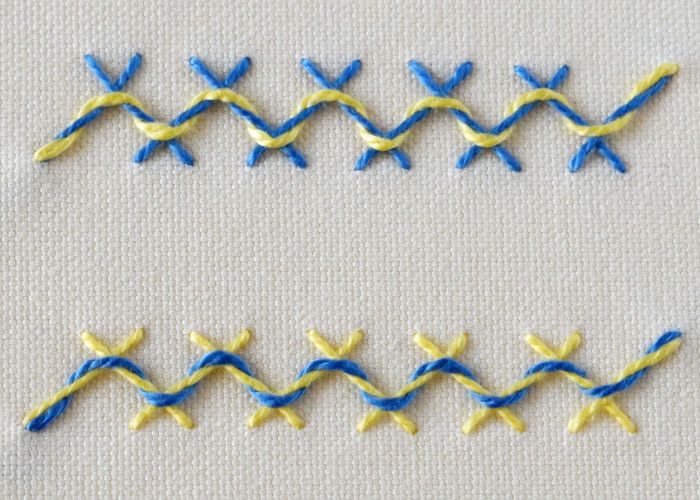
Threaded Lazy Daisy
Threaded Lazy Daisy is one of the decorative variations of the Chain Stitch – a combination of Detached Chain Stitch and decorative lacing.
This hand embroidery technique creates a bold, decorative band that you can use to embellish the garments or home textiles. In decorative surface embroidery, you can use it for decorative frames and outlines, lettering and even for filling.
Up to three colors can be used to embroider this decorative stitch. One is for the detached chain stitch, and one or two colors are used for the threading.
For more details about this simple stitch for borders, read a Step-by-step tutorial or watch a video guide.
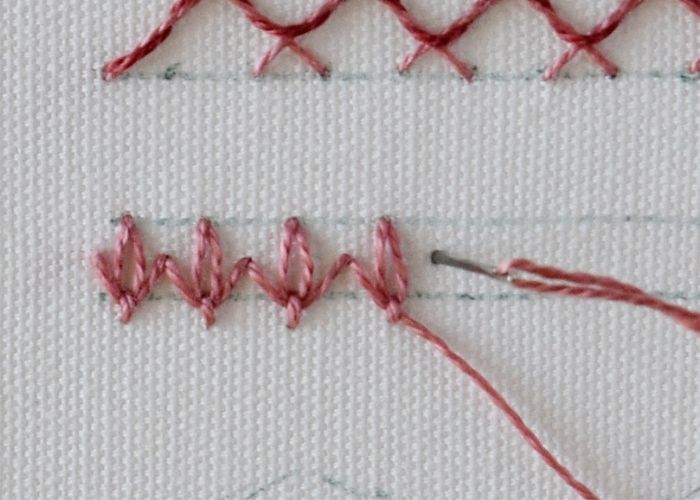
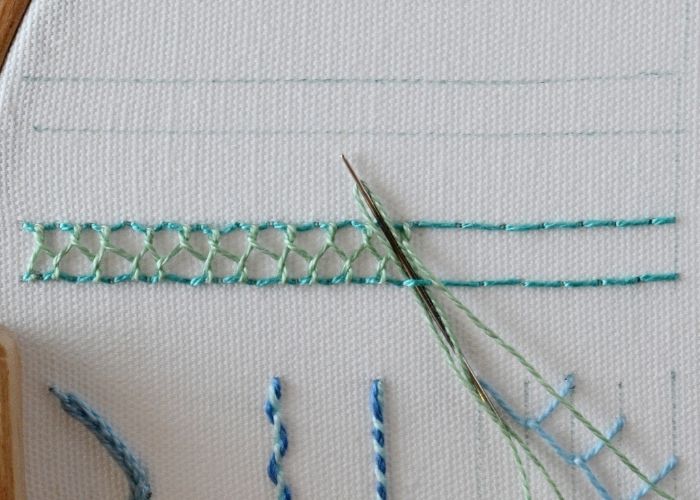
Herringbone Ladder Stitch
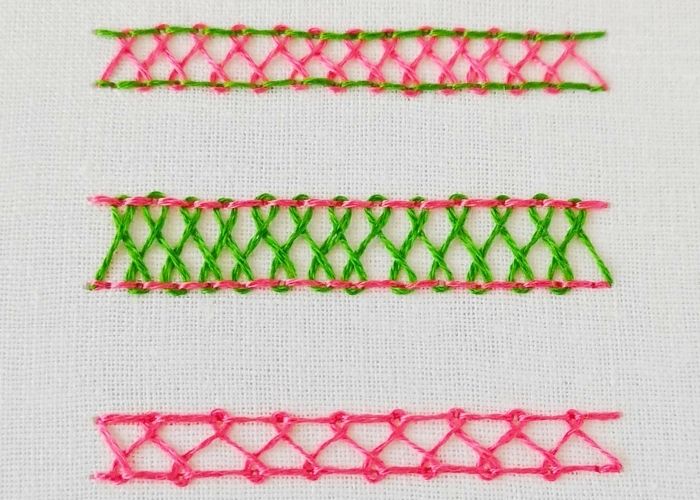
Herringbone Ladder stitch is made combining the foundation stitch (Back stitch) and threading.
After embroidering two parallel lines of the Backstitch, loop the thread through the Backstitches without entering the fabric. This threading, made in precise order, creates a decorative band perfect for simple decorative borders.
There are two methods of lacing – one when the lacing passes under two Backstitches and creates more flat look, and the second (used in my tutorial below), when the lacing passes under each Backstitch and creates more voluminous look.
Watch a this video guide to see flat lacing or follow the tutorial below.
Double Blanket Stitch

Double Blanket Stitch is a decorative variation of a Blanket stitch.
To embroider this decorative stitch, embroider two rows of blanket stitches, one in front of the other. You can play with colors, the density of the stitches, and a mode two rows of stitches interfere. Different placements of the stitches and colors will create visually different patterns.
This hand embroidery stitch is excellent for decorating borders and seams. Besides that, you can also use it for mending clothes or embellishing home textiles.
To learn more about this simple stitch for borders, read a Step-by-step tutorial or watch a video guide.
Butterfly Chain Stitch
The Butterfly Chain Stitch is a composite hand embroidery technique combining a Straight Stitch with a Twisted Chain stitch to form a decorative band.
This decorative hand embroidery stitch is excellent for decorative borders and bands. You can easily embroider Butterfly Chain Stitch on straight lines and curves and make angles.
For more details about this simple stitch for borders, read a Step-by-step tutorial or watch a video guide.
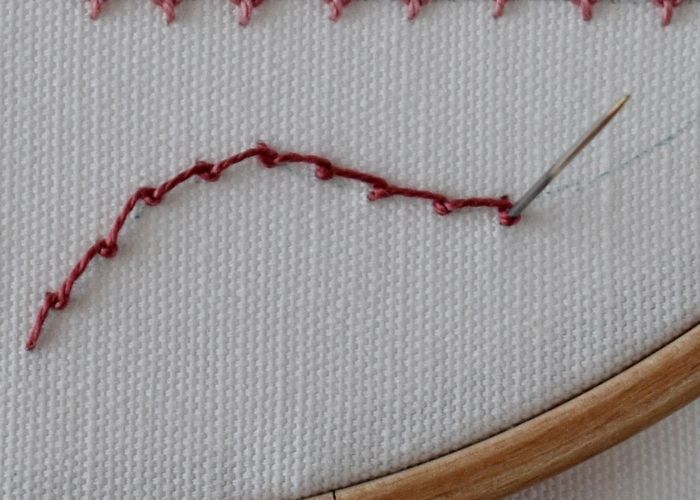
Pekinese Stitch
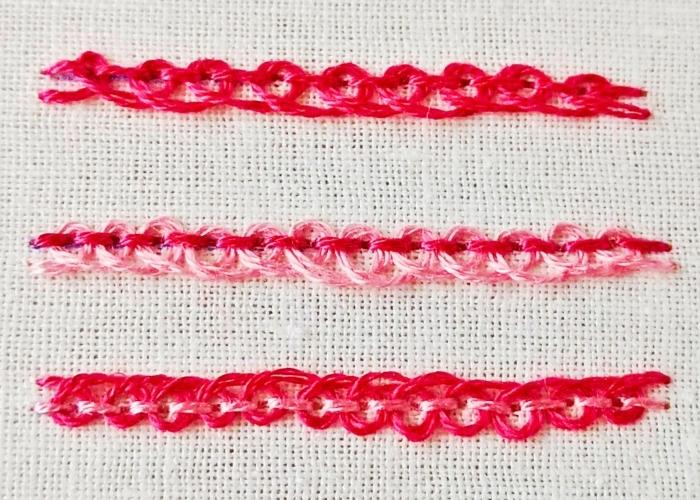
Pekinese Stitch is a decorative technique made of two combined stitches – the Backstitch and decorative looping. First, we embroider the Backstitch and then lace it, forming the loops.
It is an excellent technique for border designs. Use it to decorate the seams of garments or the borders of home textiles.
To learn more about this simple stitch for borders, read a Step-by-step tutorial or watch a video guide.
How to embroider simple stitches for borders: Step-by-step tutorial
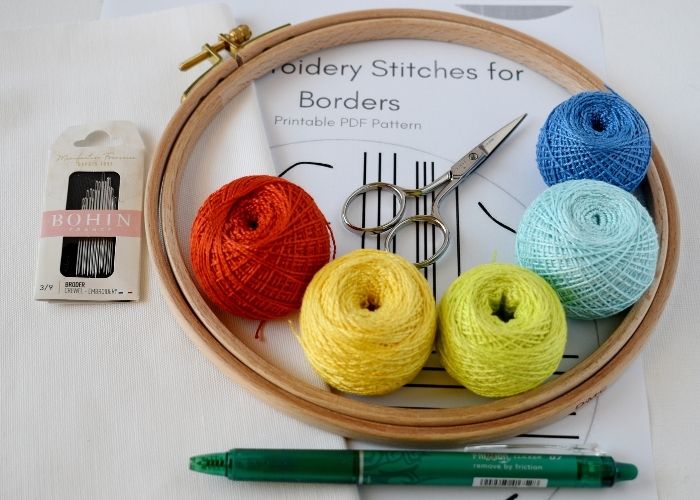
Tolls and materials
- Embroidery pattern.
- Fabric. Use linen, cotton, or blended fabric with a high thread count.
- Embroidery hoop and hoop stand. I used an 18 cm (7 inches) hoop and a tabletop hoop stand.
- Scissors.
- Embroidery needles.
- Friction pen for pattern transfer.
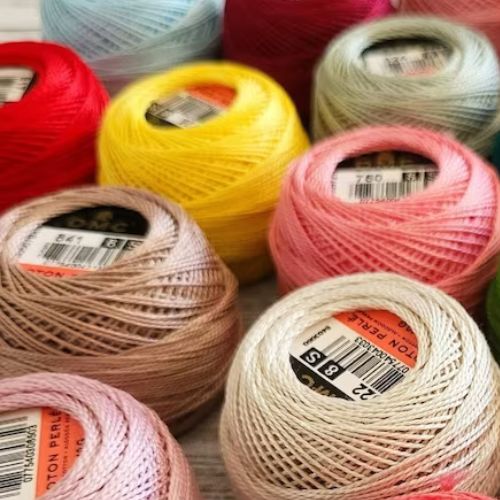
- Colorful pearl cotton embroidery thread.
Step-by-step Embroidery tutorial
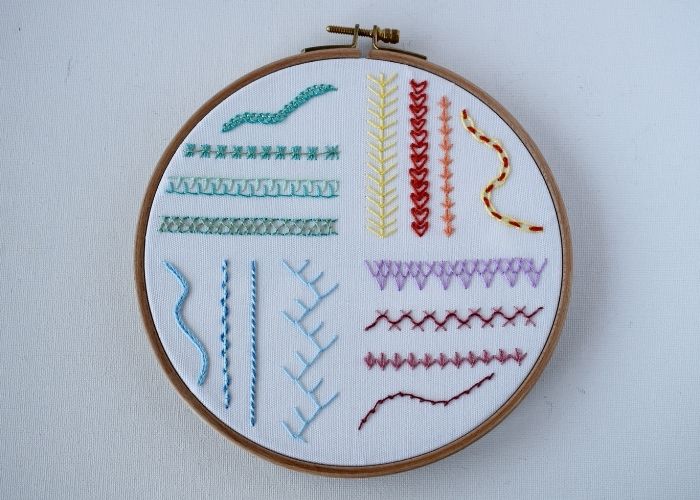
1. Download and print my free 15 Embroidery Stitches for Borders Hand Embroidery Sampler. Gather tools and materials for the project.
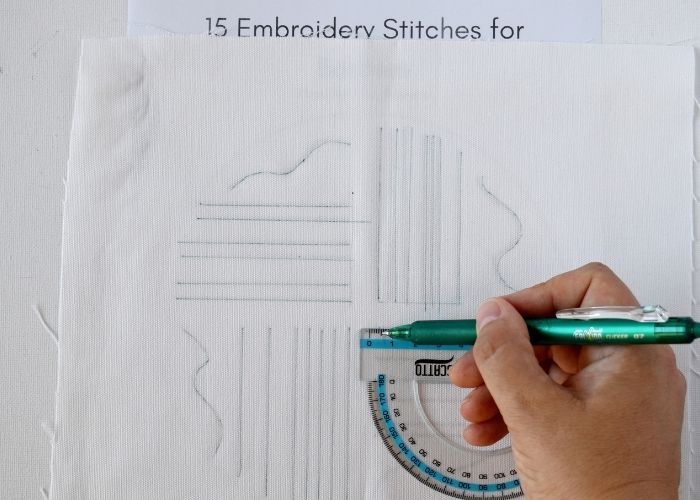
2. Transfer the pattern to the fabric. Use your favorite tracing method (to learn more – read the “How To Trace Pattern on Fabric: Five Methods For Fast And Easy Embroidery Pattern Transfer” article on this blog).
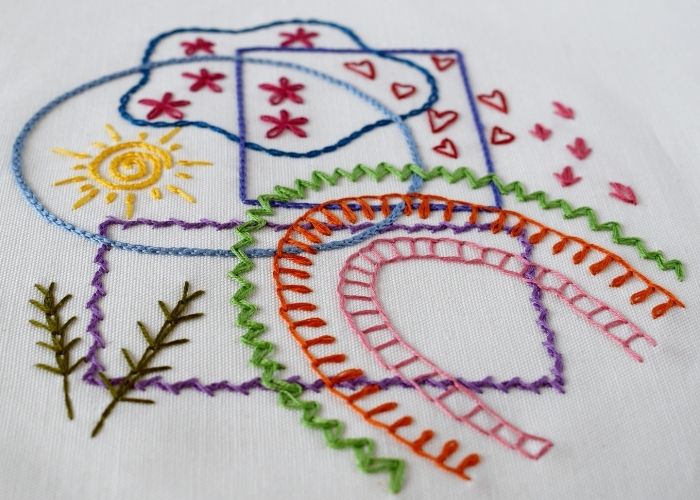
Blue quarter
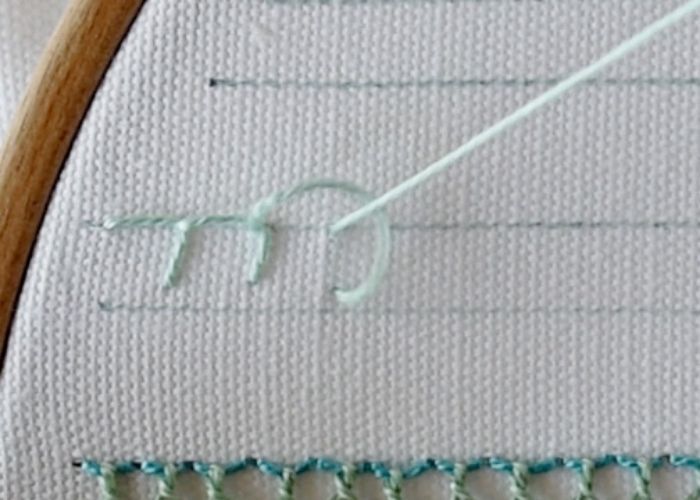
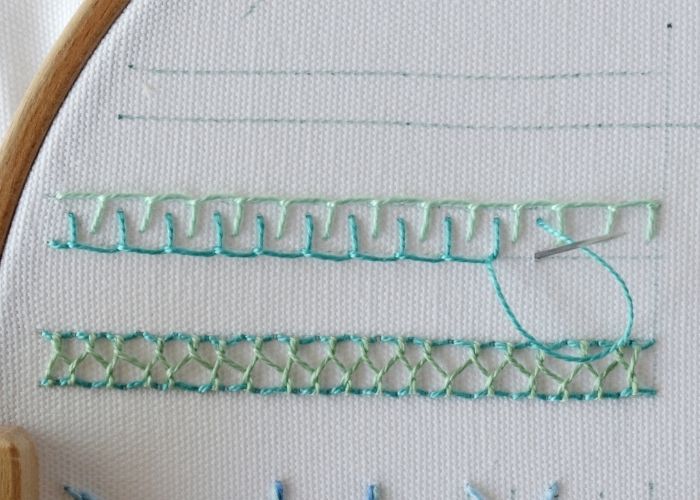
1. To embroider a decorative border with Double Feather Stitch, embroider equally distanced stitches on five parallel lines.
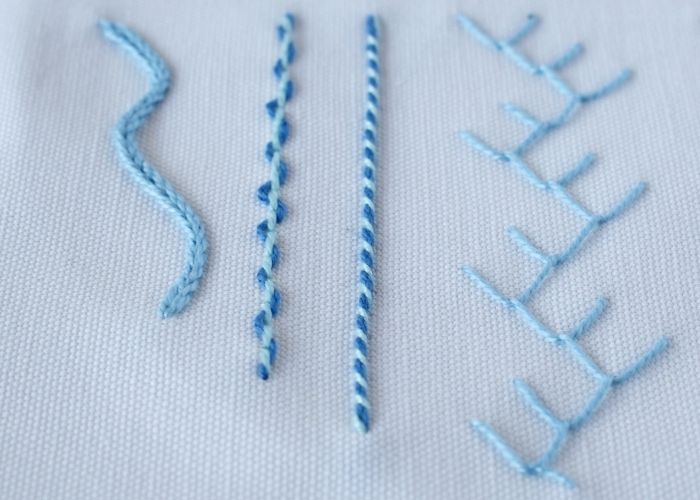
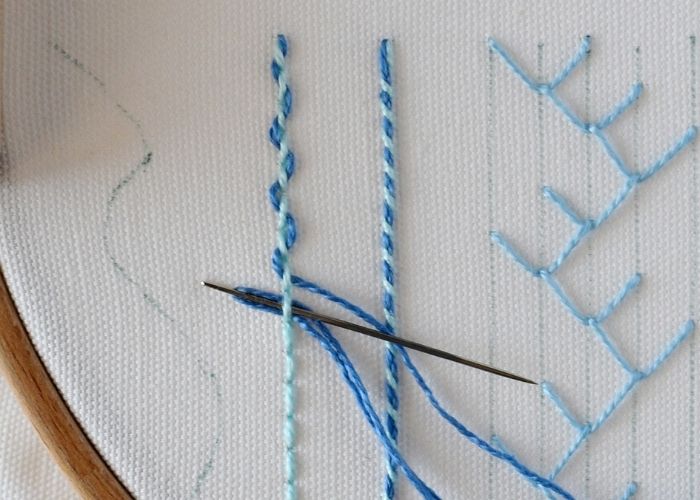
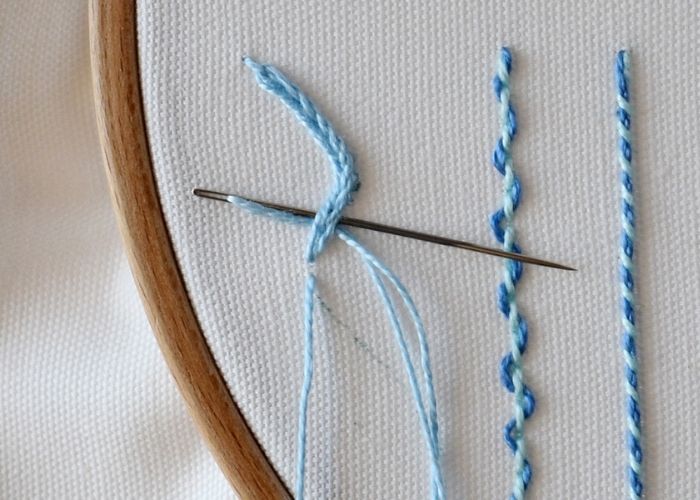
2. To embroider a simple borders with Whipped Stem Stitch, start with a line of Stem Stitch.
3. Then, add whipping stitch. Use a contrasting color thread for more decorative effect.
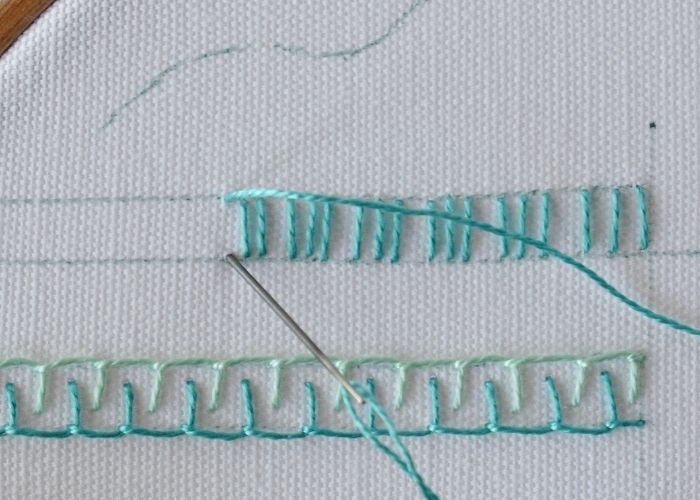
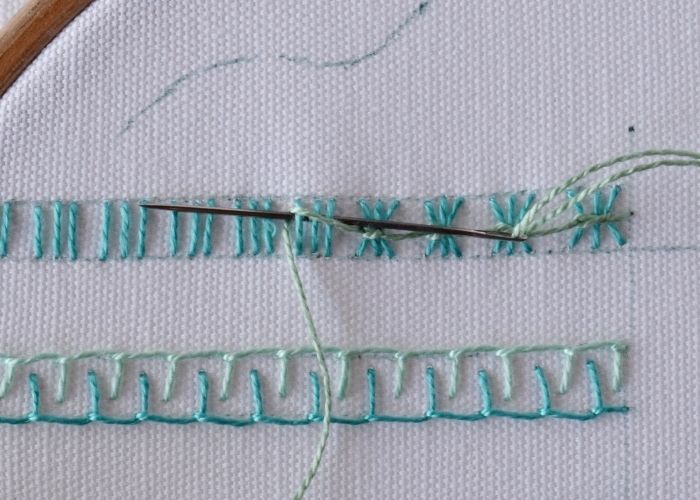
4. To embroider a border with Threaded Backstitch, start with a line of a Backstitch.
5. Then, add threading. You can regulate the tension of the lacing to make threading wider or more discrete.
6. To embroider Heavy Chain Stitch borders, use the Reverse Chain Stitch technique. In this case, the needle is passed not under the previous stitch but under the stitch before it.
Pink quarter
1. To embroider embellishments with Anklet Stitch, embroider on three lines. Make Plaited Fly stitches that are grouped to form an edgy line.
2. To embroider Laced Herringbone Stitch border, start with a line of Herringbone Stitch.
3. Then, add lacing. Pass the needle under every leg of Herringbone stitch, creating decorative lacing.
4. To embroider horizontal border with Tulip Stitch, embroider small tulips positioned between two lines.
5. To embroider a border with Scroll Stitch, position the knots equally on the marked line.
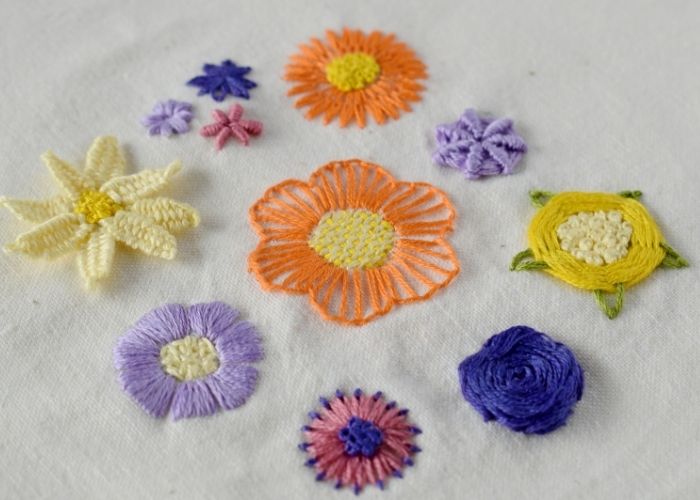
Yellow quarter

1. To embroider Fern Stitch border, start from the top and move downwards. Start with the central stitch and add two stitches on the sides.
2. To embroider Heart Stitch decorative border, stitch one heart shape above another one and fill entire line.
3. For a vertical Tulip Stitch border, position tiny floral motives one above another. Start from the top and move downwards, adding a flower after flower.
4. To embroider Threaded Lazy Daisy border design, start with a line of detached Chain Stitches.

5. Then, add double threading. Use the contrasting color thread for more decorative look.
Green quarter
1. To embroider Herringbone Ladder Stitch border, start with a line of Backstitch.
2. Then, add a parallel line of Backstitch. The stitches in the two rows are positioned in bricked order – the stitches are misaligned by half a stitch.
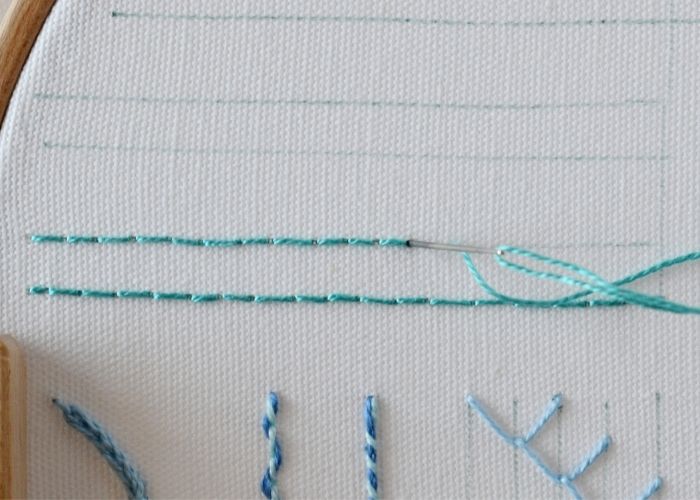
3. Add lacing. Pass the needle under every Backstitch, moving from top to bottom line and back.
4. To embroider Double Blanket Stitch decorative border, start with a line of Blanket Stitch on the top line of the border.
5. Then, add one more line of Blanket Stitch on the bottom line, with the legs positioned in between the legs from the previous row.
6. For a decorative border with a Butterfly Chain Stitch, start with the line of vertical Straight stitches, grouped by three.
7. Now, use the contrasting color thread to add a Chain Stitch that will tie Straight stitches, creating bow shapes.
8. To embroider Pekinese Stitch borders, embroider the line of Backstitch first.
9. Now, add lacing. First, pass the needle under the second backstitch from down upwards, then under the first stitch from up downwards. When you make loops, remember that the needle never goes through the fabric or over the backstitch. The lacing is made between the material and the backstitch.
Final steps
1. Wash and iron the sampler if needed. A hot iron will remove the tracing marks of the friction pen, while water will dissolve the soluble ink or stabilizer.
2. Frame the sampler of border stitches for display in the hoop or use it in a creative project, such as making a quilt, sewing a zipper pouch, or creating a stitch book.
Video tutorial – 15 Easy Hand Embroidery Stitches for Borders
Tools and materials I used for this sampler
Disclaimer. To cover the cost of creating free embroidery patterns and video tutorials for this blog, I do sometimes link to products. Please assume these links are affiliate links. If you choose to buy through my links then THANK YOU – it will make it possible for me to keep doing this.


Over to you
Congratulations! You’ve just explored 15 simple stitches for borders that can transform your hand embroidery projects with clean edges, decorative outlines, and intricate accents. Whether you chose the bold Heavy Chain Stitch, the delicate Tulip Stitch, or the playful Heart Stitch, each technique offers a unique way to frame and enhance your work.
Practicing these stitches helps build essential embroidery skills, from maintaining even tension to mastering curves and angles.
The best way to improve is by stitching regularly. Try combining different border stitches in a single project or experiment with thread colors and textures. Use your free sampler pattern to practice until you feel confident—then apply these stitches to napkins, garments, hoops, or even patches!
Don’t miss a thing!
Follow me on YouTube, Instagram, Facebook, Flipboard, Telegram and Pinterest. On the other hand, you can subscribe to the Practical Embroidery newsletter and get embroidery tips straight to your inbox every week!
Bonus: get the Ad-free, printable PDF tutorial!
Love this tutorial and want to keep it forever—without ads or distractions? Now you can!
I’ve created a beautifully formatted, ad-free PDF version of this 15 Simple Stitches for Borders guide, designed for easy reading, printing, and offline stitching.
Why get the PDF?
- Printable pattern, Stitch guide, embroidery instructions and Step-by-step of every stitch – all in one convenient PDF.
- Save it forever – no need to search for the tutorial again; download once and keep it on your device.
- Print & stitch anywhere – take it to your craft room, stitch on the go, or add it to your embroidery workbook.
- Clean, ad-free layout – focus on learning without distractions.
- Support future tutorials – your purchase helps me create more free content!
More embroidery tutorials for beginners
14 Chain Stitch Variations For Borders, Outlines, and Decoration
Beginner Flower Embroidery: Hand Embroidery Tutorial & Free PDF Pattern Download
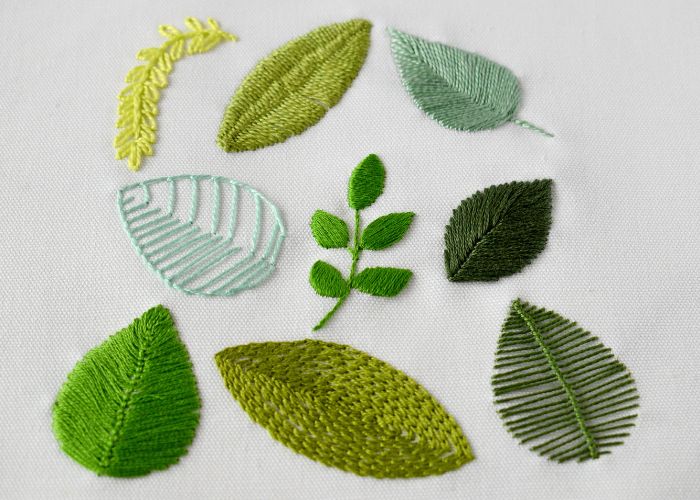
9 Ways To Embroider Leaves: Free PDF Pattern + Step-by-step Hand Embroidery Tutorial