
Embroidery Stitches For Edges: From Functional To Decorative Edging
Every piece of textile has edges — and what you do with them matters more than you might think. Whether you’re finishing the hem of an embellished garment, joining two fabric sections together, or simply adding a decorative border that makes the whole work feel complete, embroidery stitches for edges are one of the most practical and most satisfying areas of hand embroidery to explore.
There are two groups of edge stitches. First, there are functional stitches that finish and secure. They prevent fraying, neaten the raw edges, and hold fabric together. Decorative stitches, on the other hand, transform plain edges into something intentional and beautiful. Many stitches serve both purposes, making edging especially rewarding.
Let’s explore edge stitches in hand embroidery together! First, we’ll go through essential functional stitches every embroiderer should know, then explore joining techniques and decorative options for edges that turn borders into design features.
Understanding hand embroidery stitches for edges
Before starting, consider what you need your edge stitch to accomplish—because this answer shapes every later choice.
The two goals: Functional vs. decorative
Functional edge stitches have a job to do. They prevent woven fabric from fraying, neaten a raw hem, invisibly close an opening, or securely hold two pieces of fabric together. When you’re finishing the edge of an embroidered piece of clothing or home textile before using it, attaching an applique shape to a ground fabric, or joining two sections of a project, you’re working in functional territory. The stitch needs to be reliable and durable above all else.
Decorative edge stitches have a different scope. In this scenario, the fabric edge is part of the design. It draws the eye and adds texture. These stitches may also secure the fabric, but their primary purpose is visual. They invite you to think about color, rhythm, texture, and scale in the same way you would for any other part of an embroidery design.
In practice, the line between the two often blurs — and that’s one of the most appealing things about making edges by hand. A well-chosen Blanket Stitch variation can finish a raw edge beautifully, looking both intentional and decorative. As you work through this post, you’ll start to recognize which stitches lean strongly one way, and which serve both purposes equally well.
Fabric considerations
The fabric you’re working on has a significant influence on which edge stitches will serve you best.
Woven fabrics, such as linen, cotton, wool, and cotton-linen blends, often benefit from blanket stitch or overcast stitch to finish raw edges and prevent fraying. On a napkin edge, for example, blanket stitch wraps around the cut edge, while overcast stitch provides a simple, practical finish. Choose based on the amount of coverage needed.
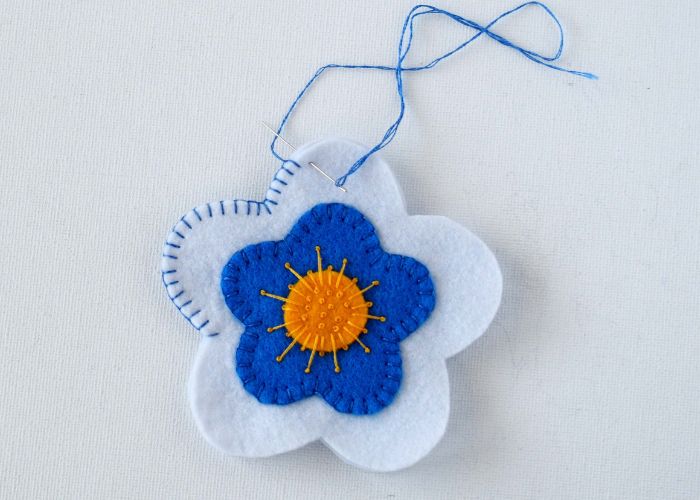
Felt behaves quite differently. Because it’s a non-woven material, felt doesn’t fray — which means you don’t need to worry about securing a raw edge against unraveling. This frees you up to use edge stitches purely for joining or decoration. Whip stitch and blanket stitch are both popular choices for sewing felt ornaments, giving a clean, visible finish along cut edges without any need to turn or fold the fabric first.
Stretchy fabrics like jersey present their own considerations. If you’re embroidering on a knit or stretch fabric and need to finish or join an edge by hand, you’ll want a stitch that has some elasticity — one that won’t pull tight and pucker, or snap under gentle stress. The catch stitch (also called herringbone stitch) is the traditional hand-sewn solution here: its diagonal, crossing structure moves with the fabric rather than fighting it.
Thread choices when stitching on the edge
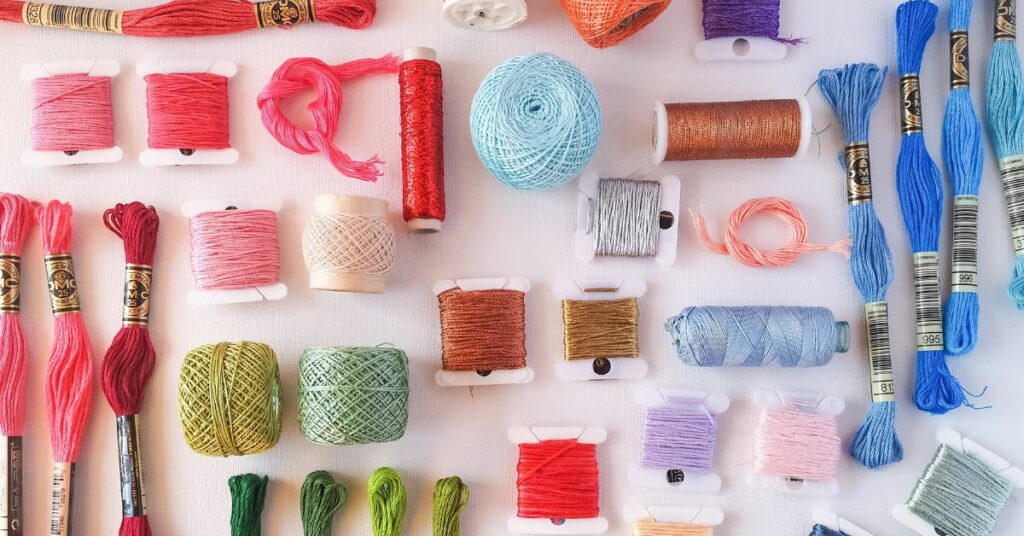
The thread you choose for edge stitches in hand embroidery affects both the practical outcome and the visual result.
Stranded cotton (floss) is the most versatile option. Working with more strands gives a bolder, more visible edge stitch, while fewer strands produce a finer, more subtle border. For decorative edging where you want the stitch to be a design feature, a common range is 2 to 4 strands.
Pearl cotton (coton perlé) is an excellent choice for edge stitches, as it is robust and durable, able to withstand greater friction and wear. Its twisted, non-divisible structure gives stitches a smooth, rounded appearance and a slight sheen — particularly beautiful in blanket stitch and its variations. Because it can’t be split into individual strands, you choose the weight by thread size: No. 5 for a bold, substantial edge; No. 8 or No. 12 for something finer.
Wool thread — whether tapestry or crewel wool — is well-suited to edge work on heavier fabrics such as wool, felt, or linen. It has a soft, matte texture that pairs naturally with blanket stitch on felt projects or appliqué work, and covers ground quickly.
As a general rule, match the weight of your thread to the weight of your fabric, and to how prominent you want the edge stitch to be. Besides the basic threads, consider decorative options such as metallic, variegated, or silk threads. When in doubt, work a small test sample on a spare piece of fabric before committing to the full edge.
Embroidery stitches for Functional edges
These are the stitches that earn their place through usefulness. Each one has a clear structural purpose — securing a raw edge, finishing a hem, or joining fabric pieces — and learning them gives you a reliable toolkit for finishing embroidery projects neatly and durably by hand.
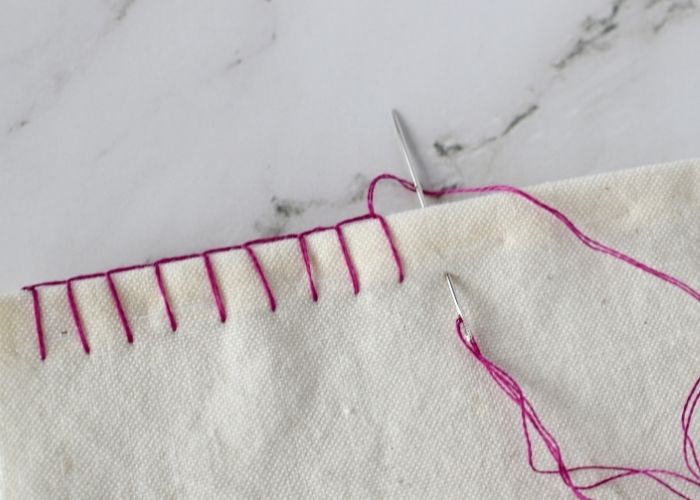
Whip Stitch
Whip Stitch is the simplest edge stitch there is, and its simplicity is precisely its strength. You bring the needle up through the fabric just below the edge, then pass the thread over the edge and repeat at regular intervals, creating a series of diagonal stitches that wrap around the fabric’s border.
Easiest to use on felt fabric, where there’s no fraying to worry about, and the clean, even wrapping sits beautifully against a cut edge. It’s also the natural choice when joining two pieces of fabric along their edges — holding the pieces side by side or back-to-back and working through both layers at once. The result is a firm, visible seam that lies flat and holds securely.
On woven fabrics, whip stitch can be used to overcast a raw edge and slow fraying, though it doesn’t fully encase the edge as blanket stitch does. Whip stitch, together with an overcast stitch and overhand stitch, are the bases of hand sewing. Sew Historically explains the difference between these very similar techniques.
Keep your stitch spacing even and your tension consistent — the regularity of the diagonal lines is what gives whip stitch its tidy appearance.
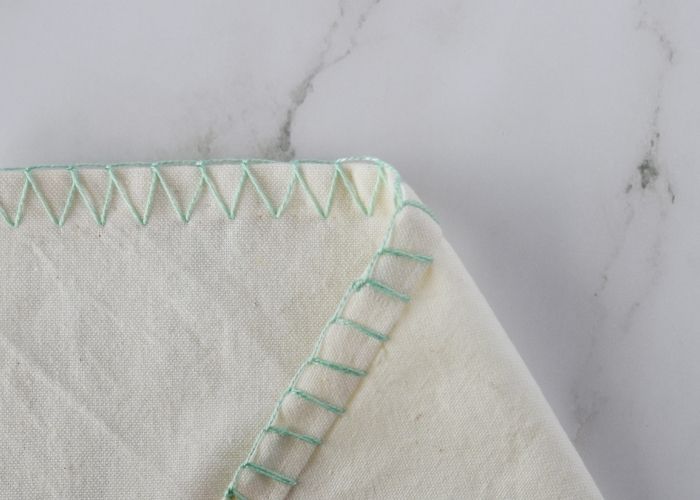
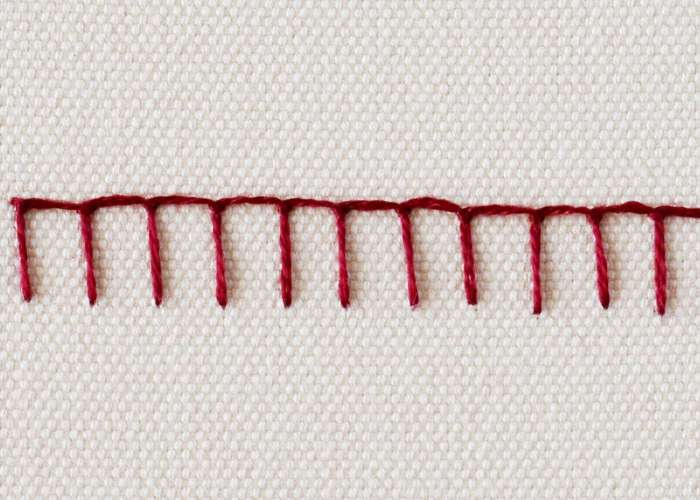
Blanket Stitch — and its variations
If there is one essential edge stitch in hand embroidery, it’s Blanket Stitch. It’s strong, versatile, adaptable to almost any fabric or project, and produces a finish that is both functional and genuinely attractive. Understanding the Blanket Stitch also provides a foundation for several important variations.
Blanket Stitch
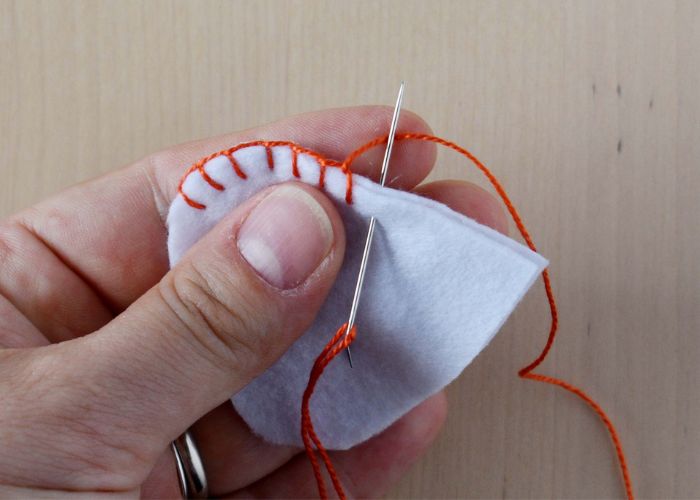
The basic Blanket Stitch creates a row of upright stitches along the edge, each anchored by a horizontal bar at the very edge of the fabric. You work from left to right, bringing the needle down through the fabric at a set distance from the edge, then back up at the edge itself, looping the thread under the needle tip before pulling it through. The result is a row of evenly spaced uprights connected by a continuous looped bar — neat, stable, and satisfying to work.
It reliably secures raw edges by encasing them within the looped bar, making it both a practical and a decorative finishing stitch. It’s equally useful for felt, woven fabric, and appliqué work, where it attaches a fabric shape to a ground fabric while neatening its cut edge. Varying the spacing and height of the uprights changes the rhythm and character of the stitch entirely.
Buttonhole Stitch

The Buttonhole Stitch is a sturdier, more stable cousin of the Blanket Stitch. This technique is traditionally used for hand-worked buttonholes — the tightly packed stitches resist fraying under repeated stress. In embroidery, it’s used wherever you want a durable edge: on appliqué shapes, along the border of a finished piece, or wherever the raw edge needs maximum protection. It’s slower to work than the Blanket Stitch, but the result is noticeably more polished and robust.
Overlock Stitch
The Overlock Stitch is a practical variation in which two threads wrap diagonally over the fabric edge — similar to whip stitch in structure — but with the addition of the blanket stitch loop that anchors each wrap at the fabric surface. This combination gives the stitch more grip than a simple whip stitch while covering the edge more thoroughly.
It’s a particularly useful stitch when working on woven fabrics that fray readily, as the wrapped structure holds the edge threads in place more securely than a Blanket stitch can. The process of making Overclock Stitch is slower, but the result is decorative and an excellent choice when durability is the priority.
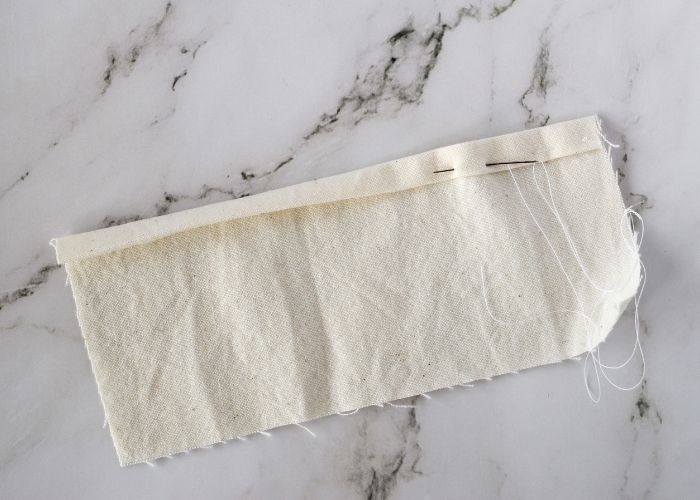
Hem Stitch and Ladder Hem Stitch
Hem stitch is a traditional hand-finishing technique for woven-fabric hems and one of the most elegant ways to finish a raw edge on linen or any fabric with a clear weave structure. Unlike the stitches above, it works with the fabric’s woven structure rather than simply covering the edge, which gives it a quality that no other finishing stitch quite replicates.
Hem Stitch
To work a hem stitch, you first withdraw one or more horizontal threads from the fabric along the line where the hem will sit, creating a narrow band of exposed vertical threads. You then fold and press the hem up to this line, and work along the drawn-thread band from the wrong side to form a decorative finish — grouping the exposed vertical threads into small bundles with each stitch and catching the folded hem edge at the same time.
The result is a hem that is firmly and precisely secured, with a delicate ladder-like pattern of grouped threads running along the fold line. On a fine linen, especially in a thread that matches the fabric, it is almost impossibly refined. If made with a contrasting-colored thread, the hem stitch becomes a visible decorative feature.
Ladder Hem Stitch
Ladder hem stitch takes the technique one step further. After withdrawing threads and working hem stitch along one side of the band, you turn the work and work a second row of hem stitch along the opposite side — grouping the same vertical threads into the same bundles. This aligns the groupings on both sides, creating the characteristic ladder effect: a series of evenly spaced rungs spanning the withdrawn-thread band.
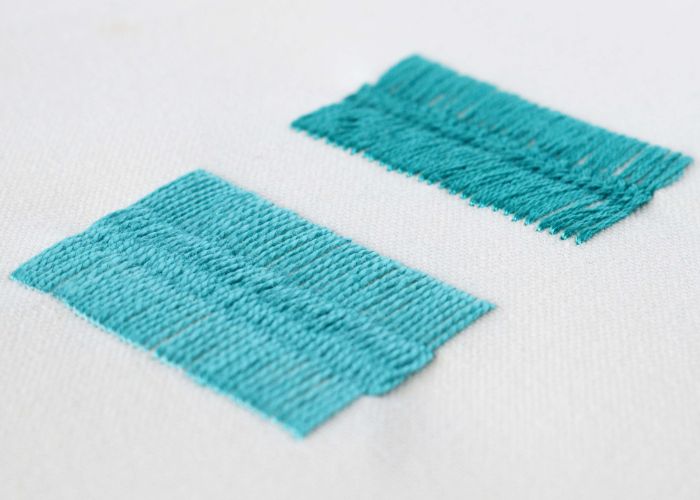
Hem Stitch with a self-fringing edge
Another way to use a Hem Stitch for edging is to use the drawn thread technique to secure only one side of the fabric, then remove the edge threads on the other side to intentionally create a fringe. This technique is mostly used for linen napkins and table runners.
It’s a more involved technique than the others in this section, and it does require a fabric with a sufficiently open, regular weave to draw threads from cleanly. But for finishing the edges of embroidered linen — a table runner, a napkin, a tray cloth — it produces results that are quietly exceptional, and entirely achievable with patience and a little practice.
Joining Two Pieces of Fabric at the Edge
Not all edge work is about finishing a single piece of fabric. Sometimes the task is bringing two pieces together — closing a stuffed ornament, attaching an appliqué shape, hemming a stretchy fabric, or joining sections of a project with a stitch that doubles as decoration. The stitches in this section are all about connection: holding fabric to fabric, cleanly and securely, by hand.
Slip Stitch and Ladder Stitch
These two stitches are closely related and share the same essential quality: when worked carefully, they become almost invisible. Both are used to close edges on the right side of the work, making them indispensable when you can’t access the wrong side to finish a seam.
Slip Stitch
This stitch is worked by sliding the needle through the folded edge of one fabric piece, then picking up a tiny amount of the fabric beneath, alternating between the two layers with small, even stitches. Because the thread travels mostly inside the fold rather than across the surface, very little of it is visible from the outside. It’s the classic stitch for closing a turned hem by hand, or for attaching a folded appliqué edge to a ground fabric so the join disappears.
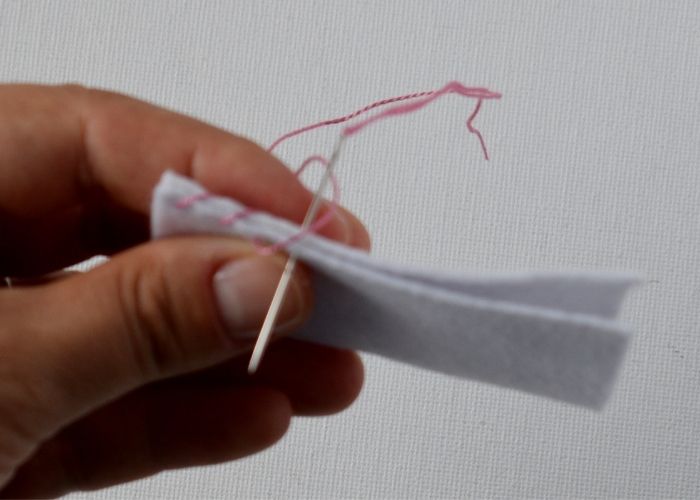
Ladder Stitch
This hand sewing technique, also known as Mattress Stitch, works on the same principle but is designed specifically for closing openings in two opposite folded edges — the kind of gap left when stuffing an embroidered ornament or pincushion before finishing. You work straight stitches alternately into each folded edge, parallel to the opening, like the rungs of a ladder. When you pull the thread gently, the two edges draw together, and the stitches sink neatly into the fold, leaving a clean, nearly seamless join. Pulled with steady, even tension — not too tight, not too loose — it closes completely without puckering.
Both stitches reward slow, careful working. The invisibility of the result depends entirely on keeping stitches small, maintaining even spacing, and keeping tension consistent throughout.
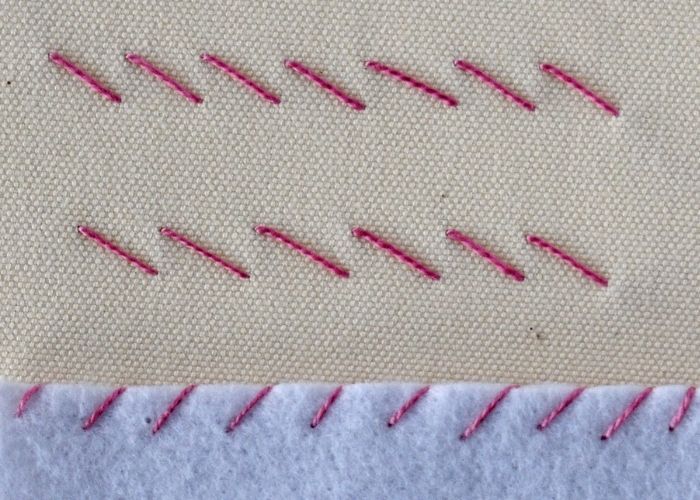
Catch Stitch, aka Herringbone Stitch
The catch stitch — known in hand embroidery as the Herringbone Stitch — is the traditional hand-sewn solution for hemming fabrics with some stretch or movement, such as jersey or other knit fabrics. Its characteristic crossing, diagonal structure gives it a natural flexibility that a straight hem stitch simply can’t offer.
You work from left to right with the needle pointing left, taking small horizontal stitches alternately in the hem edge and in the fabric above it, so the thread crosses back and forth in an X pattern between each stitch. No single thread runs straight across the hemline — the diagonal movement distributes tension across a wider area, so the stitch moves with the fabric rather than resisting it or snapping under stress.
On stretch fabrics, this flexibility is essential. On non-stretch woven fabrics, catch stitch is still a useful hemming option — particularly for heavier fabrics like wool, where its structure distributes the weight of the hem more evenly than a finer stitch would. The wrong-side appearance is the familiar herringbone crossing; on the right side, only small, inconspicuous stitches show through.
Appliqué Stitch
The appliqué stitch has only one task: attaching a fabric shape to a ground fabric as cleanly and invisibly as possible. Where blanket stitch appliqué makes a feature of the edge, the appliqué stitch tries to disappear into it.
The fabric shape is prepared first with its seam allowance turned under and pressed or tacked, so a clean, folded edge sits against the ground fabric. You then work small, almost vertical stitches that pick up just a thread or two from the folded edge of the appliqué piece and a similarly tiny amount of the ground fabric directly beneath. The thread travels diagonally between stitches but mostly on the wrong side, so from the right side, the join appears as a fine, barely visible line that follows the shape’s contour.
The result depends on matching your thread colour carefully to the appliqué fabric rather than to the ground — this is what makes the stitching sink into the edge rather than read as a separate line. Fine thread also helps: a single strand of stranded cotton, or a fine silk thread, will almost vanish against the folded edge. The appliqué stitch is slower and more exacting than blanket stitch appliqué, but for designs where a clean, smooth edge is the goal, it’s the right tool.
Palestrina Stitch
Palestrina Stitch is the exception in this section — the one joining stitch that makes no attempt to be invisible. Instead, it does something more ambitious: it joins two pieces of fabric at their edges while simultaneously creating a raised, knotted decorative line that sits right along the join. Structure and decoration arrive in a single operation.
The stitch is worked along the edge where two fabric pieces meet, with each stitch passing through both layers to hold them together, then looping back to form a double knot that sits on the surface. The knots are closely and evenly spaced, building up into a textured, rope-like ridge that runs the full length of the join. The effect is bold and tactile — the edge doesn’t just hold, it becomes a design element.
This makes Palestrina stitch particularly well suited to projects where the join itself is meant to be seen: joining the front and back of an embroidered cushion cover, assembling sections of an embroidered bag, or attaching a decorative border fabric to a main ground. It works beautifully in pearl cotton, where the twisted thread emphasizes the rounded, knotted character of the stitch, and in wool on heavier projects. If you’ve been looking for a stitch that finishes *and* decorates at the edge in a single pass, this is it.
Decorative Edge Stitches
Once the practical question of securing an edge is settled, a whole other conversation begins — one about texture, rhythm, color, and visual character. The stitches in this section are chosen for what they bring to the surface: each one transforms an ordinary edge into something worth looking at. Some can also secure or finish as they decorate; all of them invite you to treat the edge of your work as part of the design itself.
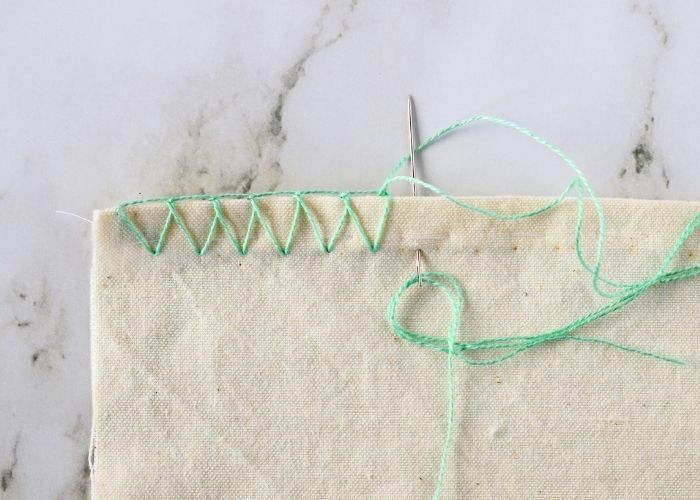
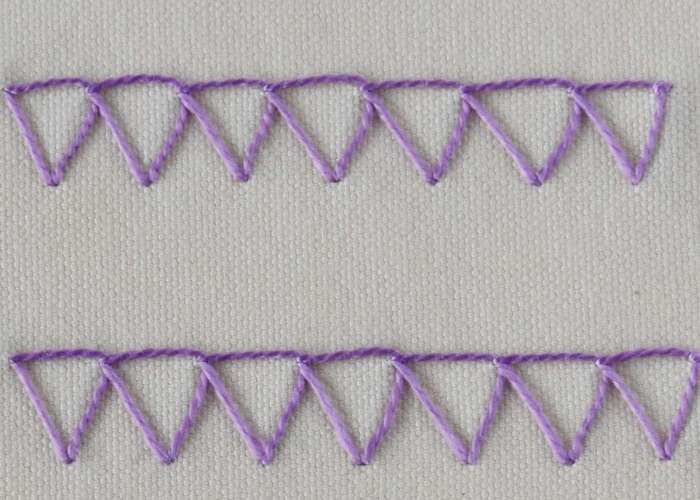
Decorative Blanket Stitch Variations

Blanket Stitch has already appeared in the functional section — but it’s worth returning to here, because its decorative potential goes far beyond the basic form. Once you understand the underlying structure of the stitch, an entire family of variations opens up, each producing a different visual character along the edge.
For example, a Closed Blanket stitch pairs the legs of the stitch into triangles, creating a geometric pattern. The Antwerp Edging Stitch adds a small knot at the edge, and the Long and Short Blanket Stitch alternates the height of the uprights to introduce rhythm and movement. Crossed and other decorative versions add complexity to the basic structure without fundamentally changing how it’s used.
Rather than cover every variation here, I’ve put together a dedicated article walking through 19 blanket stitch variations for edges — with illustrations and guidance on how to make and when to use each one. If blanket stitch is your starting point for decorative edging (and it’s an excellent one), that’s the place to go next: 19 Blanket Stitch Variations for Edges.
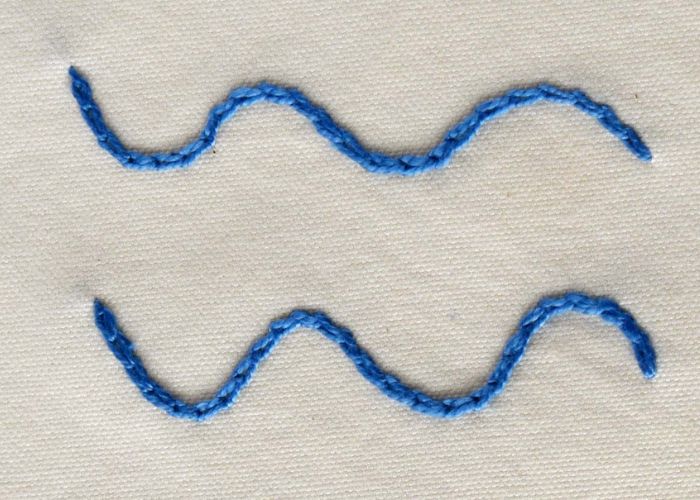
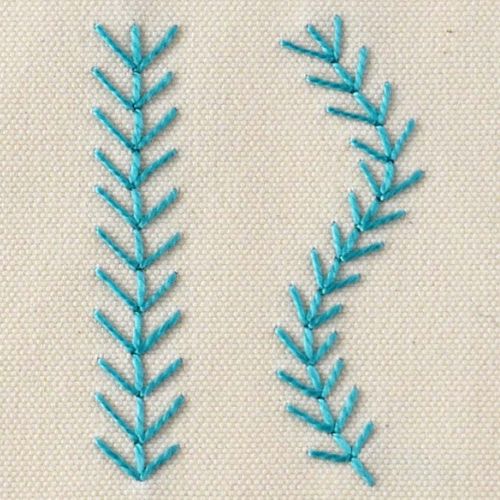
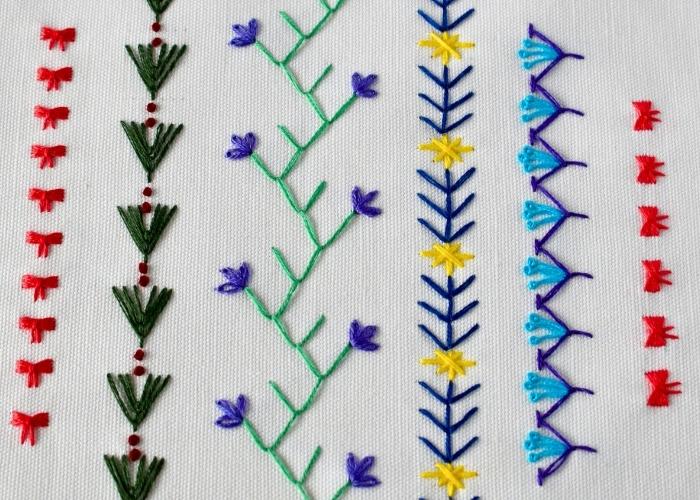
Feather Stitch
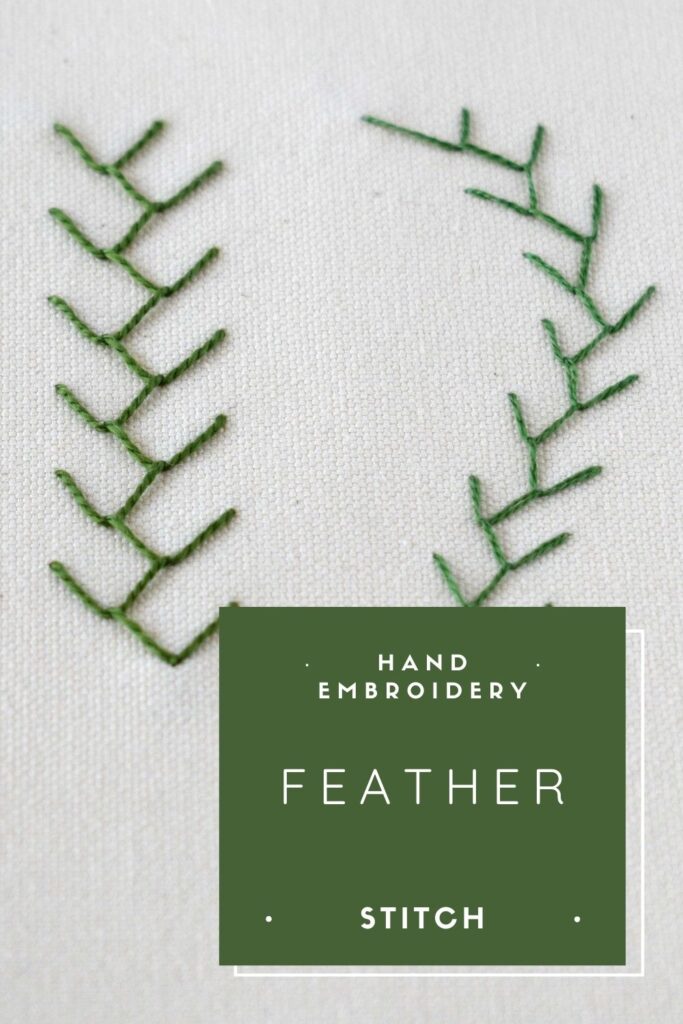
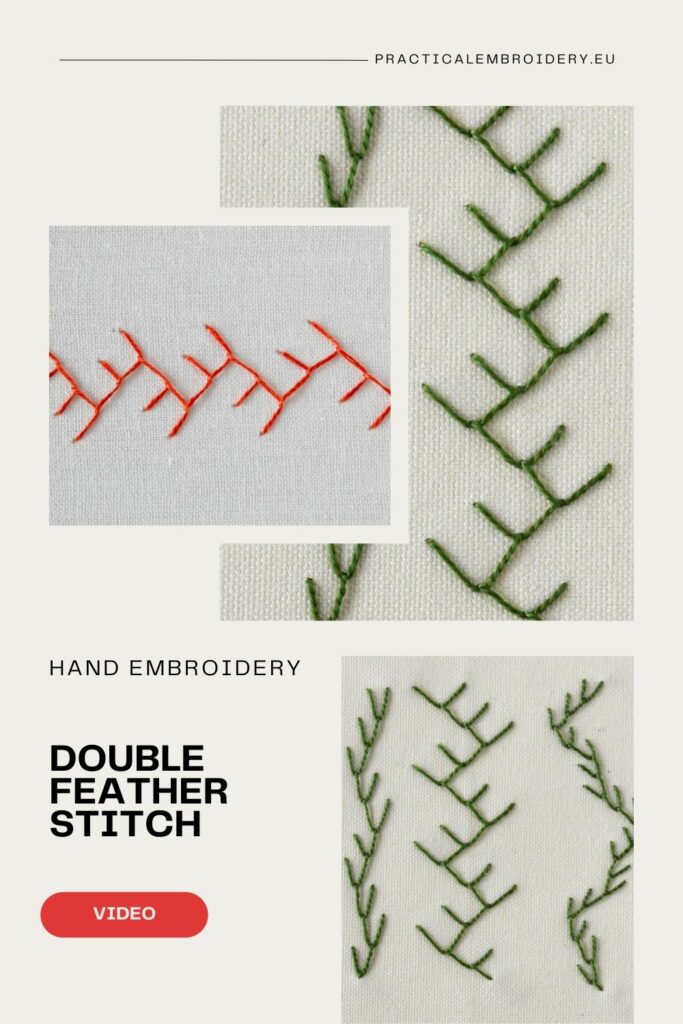
Feather Stitch is a naturally expressive edge stitch. Its branching, alternating structure gives it an organic, almost botanical quality — it looks less like a geometric border and more like something that grew there — making it one of the most natural choices for decorating edges with botanical or floral motifs.
This basic stitch creates a continuous, feathery chain of branching loops that sits beautifully along a hem, a seam, or the edge of an appliqué piece. It’s particularly beloved in the crazy patchwork tradition, where it was used extensively to decorate and conceal the seams between fabric patches — and it’s just as useful today for any project where a seam or edge needs to become a decorative feature rather than simply a join.
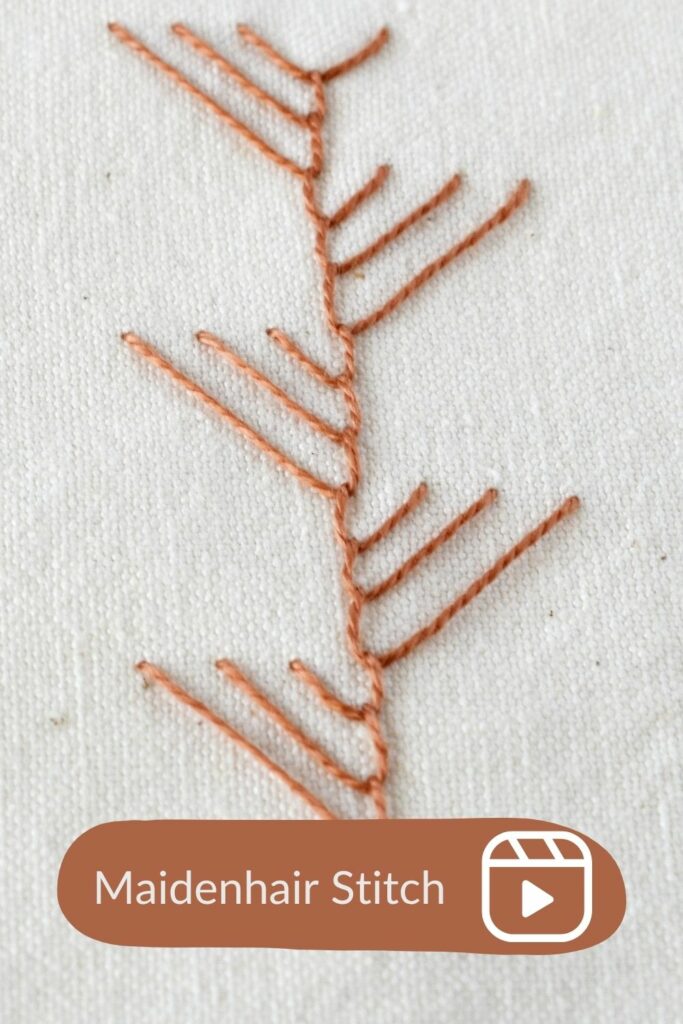
The Double Feather Stitch takes the branching further, making two or three stitches on each side before switching direction. The result is wider and more elaborate — a lush, spreading border that suits larger-scale work or heavier fabrics. Maidenhair Stitch is a related variation in which the branches end in small straight stitches rather than loops, giving a more delicate, graphic quality. Both are worth exploring once you’re comfortable with the basic form.
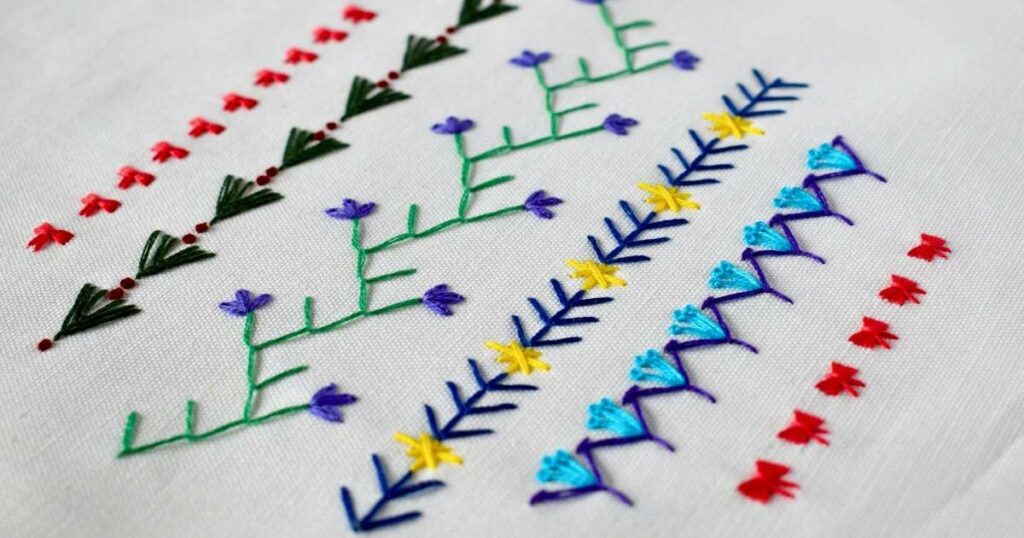
Another way to enhance a Feather Stitch is to combine it with isolated decorative stitches, such as Detached Chain Stitch or a French Knot. For example, in my Five Simple Border Embroidery Designs For Absolute Beginners sampler, I paired the Double Feather stitch with Detached Chain Stitch petals to create a floral border.
Chain Stitch and its variations
Chain Stitch is one of the basic stitches, great for both filling and outlining. When stitched along a folded hem or worked parallel to an edge, it becomes a modest and satisfying decorative border. Its linked, looped structure has a natural visual weight — more substantial than a single running line, less heavy than an elaborate band — and it takes color beautifully, making it a strong choice whenever you want the edge to carry real visual presence.
Worked directly on a folded hem edge, a row of basic Chain Stitch creates a clean, rounded border with a pleasing tactile quality. Worked in pearl cotton, the linked loops become particularly rounded and defined. It can also be worked in a contrasting color as a purely decorative band set slightly in from the edge, framing the border of a finished piece.
Feathered Chain Stitch combines the linked structure of chain stitch with the branching movement of feather stitch. The effect is more open and airy than plain chain stitch, and well-suited to seams and joins that need decorating without being overwhelmed.
Closed Chain Stitch (also called double chain stitch) creates two parallel lines of interlocked loops rather than a single chain, producing a wider, more substantial band. It’s particularly effective as a border stitch along a hem, giving a ladder-like structure with a strong, graphic character.
Butterfly Chain Stitch adds a whimsical, knotted accent along the border. It’s a more elaborate and decorative variation, suited to projects where the edge stitch is meant to be a focal point rather than a finishing detail.
You can dive deeper into Chain Stitch variations with my free sampler 14 Variations of Chain Stitch.
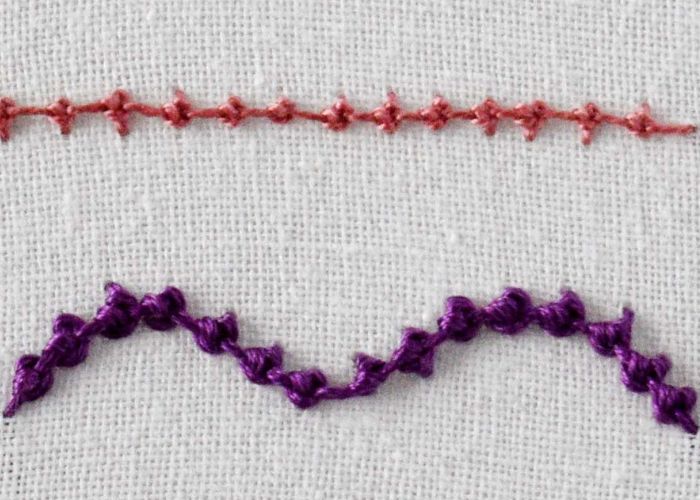
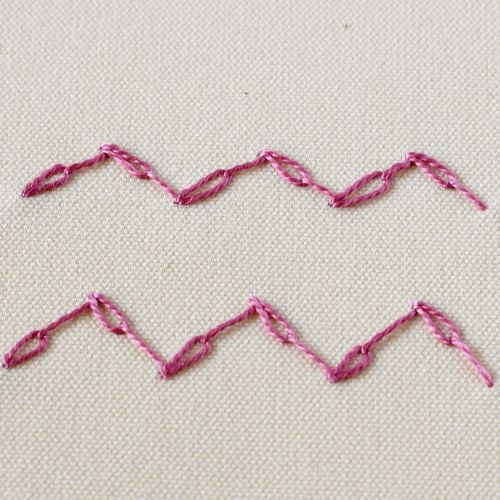
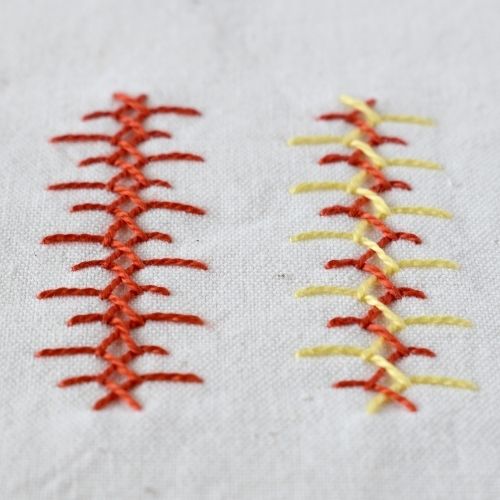
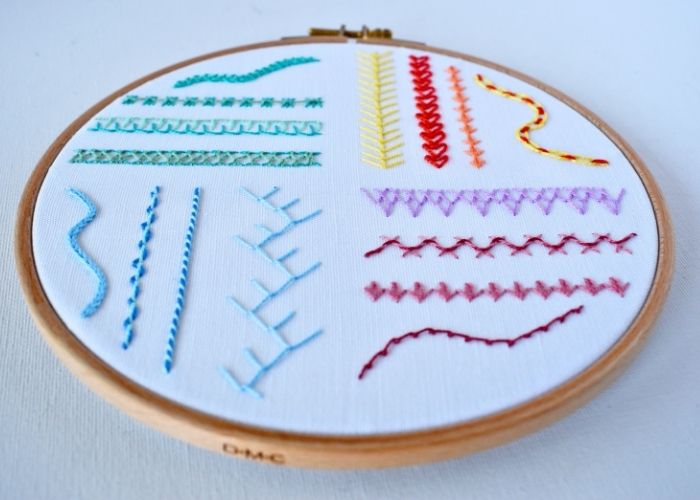
Coral Stitch and Scroll Stitch
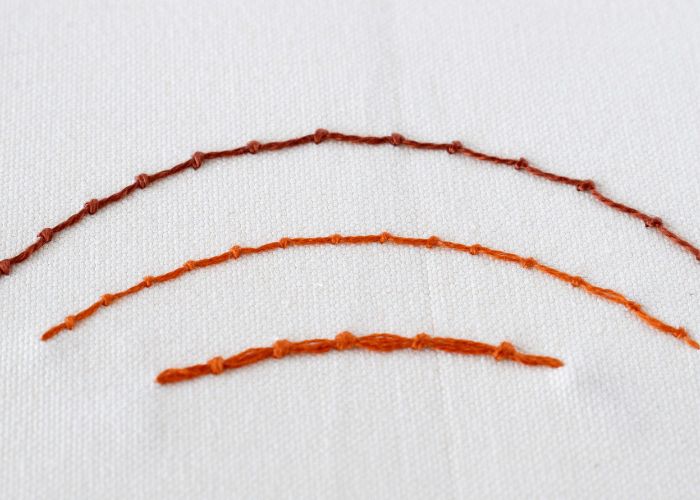
Both of these are knotted linear stitches — worked along a line rather than over an edge — and both produce a beautifully textured result that suits edge work particularly well.
Coral Stitch creates a continuous line with small, evenly spaced knots along it at regular intervals. Worked in a smooth pearl cotton, the knots have a rounded, bead-like quality; in a matte stranded thread, they’re subtler and more integrated into the line. As an edge stitch, coral stitch is run parallel to a folded hem or along the border of an appliqué piece, adding texture and definition without bulk.
The Scroll Stitch produces a similar knotted line but with a slightly different character. The knot in scroll stitch is a more open, flowing knot that gives the line a soft, undulating quality. Where coral stitch reads as crisp and precise, scroll stitch feels looser and more relaxed. Both are excellent choices for borders and edge decoration; the choice between them is largely one of mood and scale.
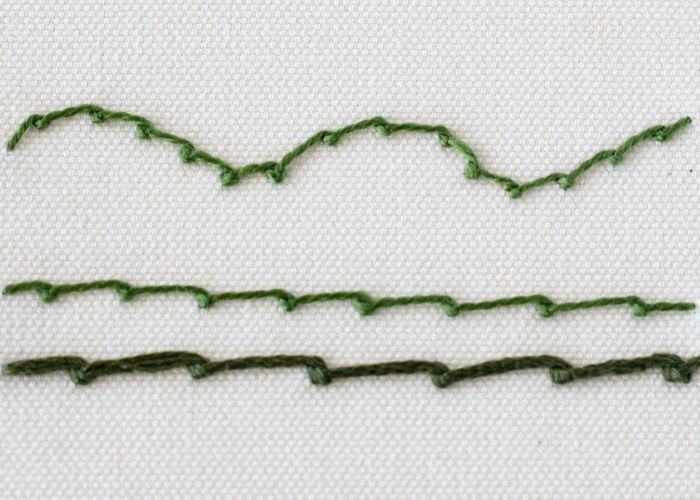
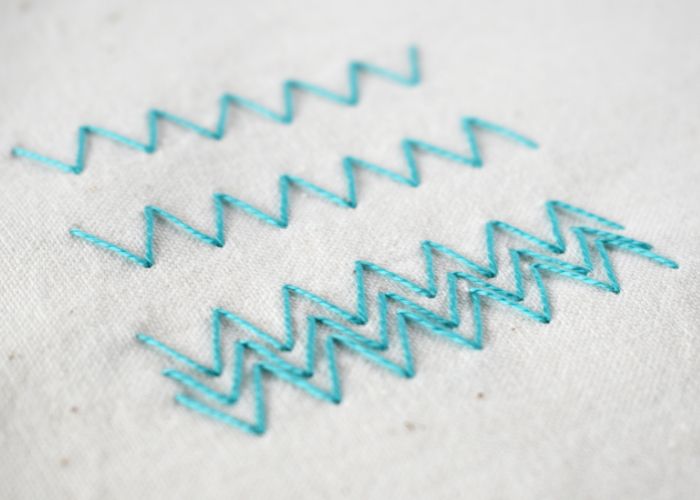
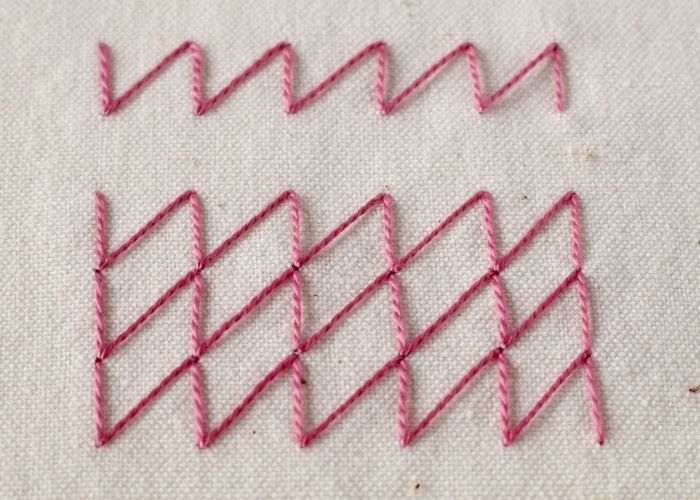
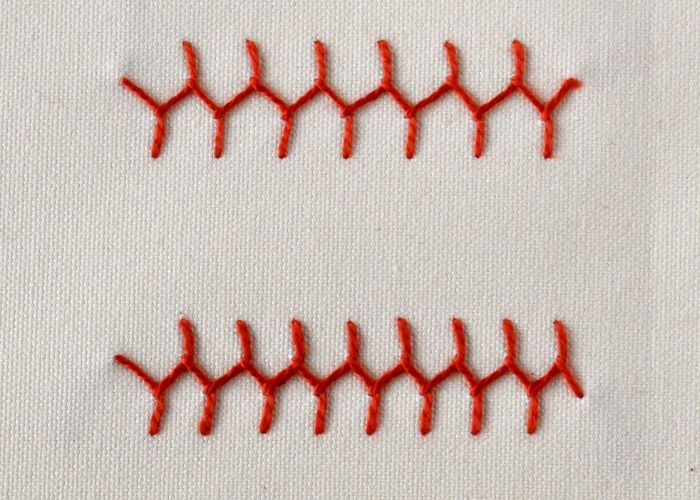
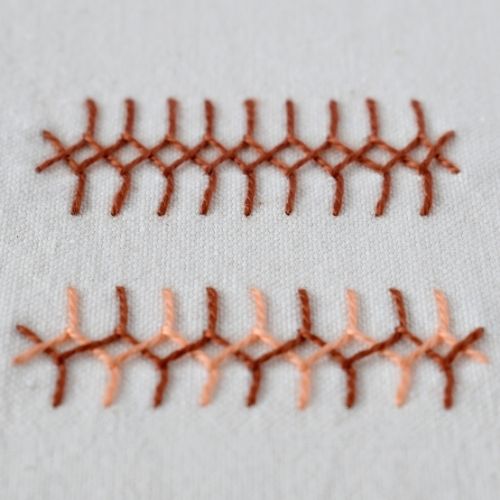
Chevron Stitch and its variations
Chevron Stitch is a geometric border stitch worked in a zigzag path between two parallel lines, making it naturally suited to running along an edge or hem. Each stitch travels diagonally upward or downward, with a small horizontal stitch at each turning point that creates the characteristic V-shapes — or chevrons — that give the stitch its name.
As an edge stitch, it’s typically worked with the lower line sitting at or very near the hem or fold, so the zigzag rhythm reads clearly against the edge. It works particularly well in bold, contrasting thread where the geometry can be read clearly, and in stranded cotton where you can adjust the weight by varying the number of strands.
Double Chevron Stitch adds a second interlocking row worked between the first, filling the spaces between the original V-shapes with a second set of points in the opposite direction. The result is a richer, more complex diamond-and-zigzag pattern that makes a more substantial border. It takes longer to work but rewards the effort with a border that has real visual weight — well-suited to the edges of larger embroidered pieces, cushion borders, or any project where the edge is meant to make an impression.
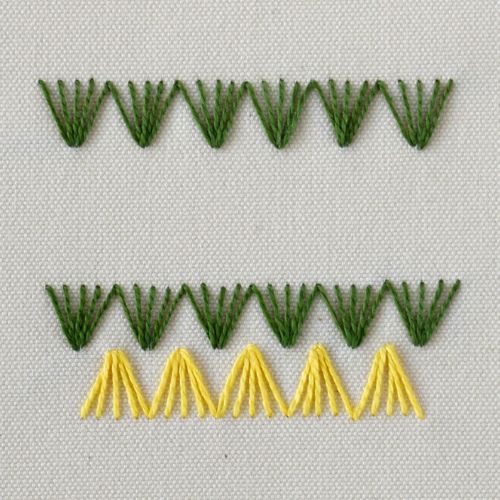
Half Chevron Stitch is another variation you can use for edges. This option has only one side with horizontal stitches parallel to the hem, and the other side ends with spikes, similar to the Cretan Stitch.
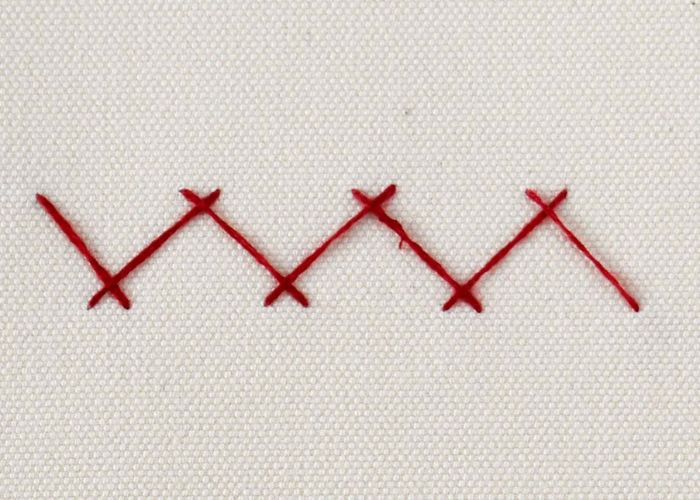
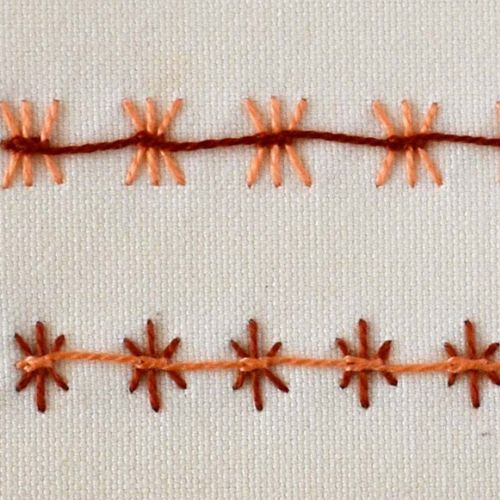
Arrowhead Stitch and other straight stitches
Arrowhead Stitch is simple in construction and striking in effect. Each unit consists of two straight stitches meeting at a point to form a small V or arrowhead — worked repeatedly along a line, forming a clean, rhythmic border of pointed forms that marches confidently along an edge.
It’s worked between two parallel lines: one stitch travels diagonally down to the point, the other mirrors it from the opposite side, and together they form the completed arrowhead. Spacing the units evenly is key to the stitch’s appeal — it’s a geometric stitch, and its beauty depends on regularity.
You can use other stitches from the straight stitch family like Bosnian Stitch, Radiating Stitch, Triangular Turkish Stitch or Fern Stitch the same way. They decorate the edges with simple stitching, yet impressive results.
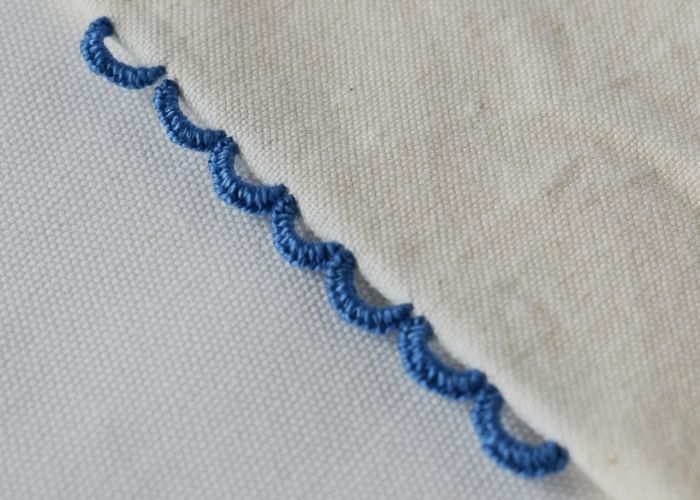
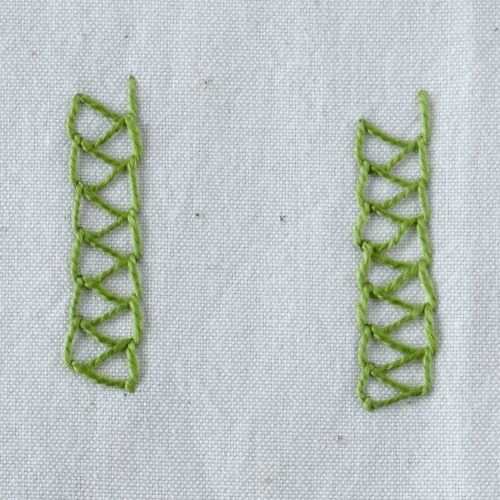
Cretan Stitch
Cretan Stitch is one of the most versatile and visually interesting stitches for decorating edges and seams. This stitch simultaneously covers a band of fabric and creates a central ridge of interlocking loops — making it excellent for decorating seams, covering joins, and embellishing edges where you want something with real visual complexity. Worked openly with generous spacing, it has an airy, branching quality similar to that of the feather stitch. If you position the stitches closely, the centre plait becomes denser and more prominent, and the stitch takes on a heavier, more textural quality.
For a bolder visual effect, consider variations of the Long and Short Cretan Stitch or the Double Cretan Stitch.
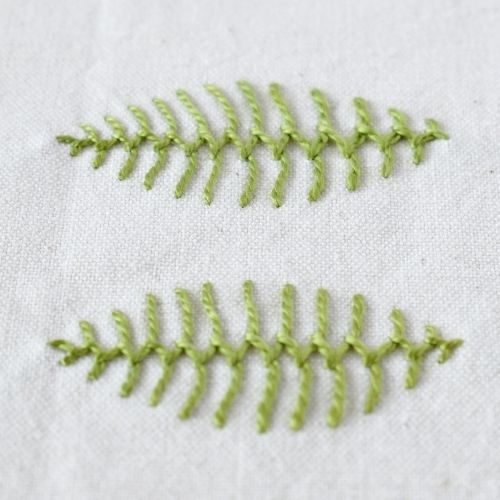
Cretan Stitch rewards experimentation with thread weight and color — and once learned, it becomes one of the most satisfying stitches to reach for whenever an edge calls for something genuinely beautiful.
Finding Your Edge
The stitches in this article cover a wide range of purposes and personalities — from the quiet invisibility of slip stitch to the bold knotted ridge of Palestrina Stitch, from the tidy practicality of Blanket Stitch to the bold statement of Double Feather Stitch. But underneath that variety, the same simple question runs through all of it: what does this edge actually need?
When the answer is purely practical — a raw edge that must be secured, a hem that needs to hold, two pieces of fabric that need to come together cleanly — the functional stitches will serve you reliably. Whip stitch and blanket stitch for felt and woven edges, Hem Stitch for a refined linen finish, Catch Stitch where there’s stretch involved. These are stitches you can trust, and once you learn them, you’ll reach for them instinctively.
If your goal is more ambitious and the edge has to contribute to the design, carry color, texture, and rhythm — that’s where the decorative stitches come into use. And here, the range of choices is genuinely wide: geometric options like Chevron and Arrowhead, organic ones like Feather Stitch and Cretan Stitch, knotted lines like Coral and Scroll Stitch, and the entire extended family of Chain Stitch variations. Each one brings a different quality to the edge, and part of the pleasure of embroidery is discovering which of those qualities speaks to you and to the particular piece you’re working on.
If you’re not sure where to start with decorative edging, Blanket Stitch is the obvious and honest answer. It’s forgiving to learn, immediately useful, and it contains within it an entire vocabulary of decorative possibilities that can keep you exploring for a long time. Master the basic form first, then let the variations lead you forward one at a time.
Keep Exploring
The best way to really learn edge stitches is to stitch them — ideally in sampler form, where you can try multiple variations side by side and see how they compare. If you’d like to take these stitches further with guided practice, these posts will help:
Five Simple Border Embroidery Designs for Absolute Beginners
A gentle starting point if you’re new to border and edge work, with simple designs you can stitch right away.
Chain Stitch Variations for Borders, Outlines and Decoration
A deeper dive into the Chain Stitch family, with tutorials for the variations mentioned in this post and even more options.
Simple Stitches for Borders: Embroidery Tutorial
A hands-on tutorial working through fifteen embroidery stitches you can use for edges, with a step-by-step guide on spacing, tension, and thread choice.
Pick up your needle, find a spare piece of fabric, and start at the edge!