
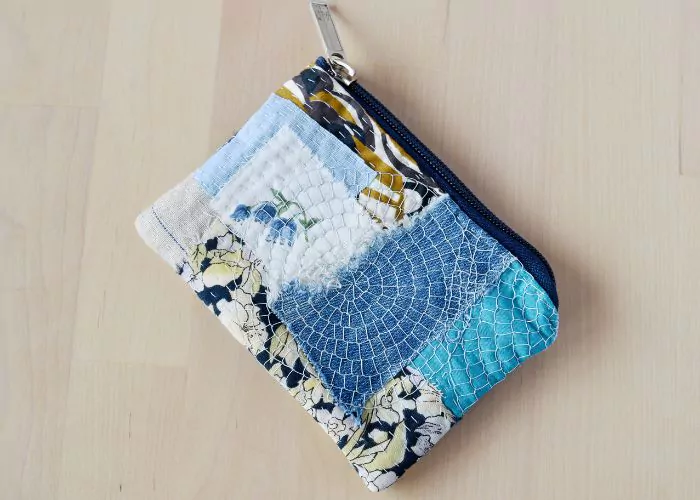
Hand embroidered zipper pouch from fabric scraps. DIY Tutorial
Learn how to embroider and sew a zipper pouch from fabric remnants
Are you a sewist, quilter, or crafter, or do you have anything to do with making, altering, or mending clothes? Then, I’m sure you have many fabric scraps, cut-offs, and leftovers at home. Also, I’m sure you have this question in mind: ‘What can I do with scraps and cut-offs of fabric?’
I know this feeling. Many pieces of fabric are too small to create something but too cute and pleasing to throw away. They accumulate, occupy your craft room, and make you feel guilty for not using them.
You are in the right place if you want to use these excellent materials and create something you’ll love. Follow this step-by-step tutorial, and let’s sew a zipper pouch together!
Pouches are great for storing small objects around the house – from pens and pencils, headbands, cosmetics, sewing supplies, and crafting tools and threads. Besides that, hand made zipper pouch could be a great gift for any occasion.
Materials you will need for this Zipper pouch tutorial:

- Fabric scraps. No matter if big or small. Of the same color or of different colors. Of the same material or mixed. Everything can go here.
- A zipper. The size of the zipper will define the length of your pouch. You can use a new zipper or reuse one sewn into the garment you want to recycle.
- Fabric for lining. Two pieces the size of the pouch.
- Fabric for the base. Two pieces the size of the pouch. You can repurpose any unwanted cloth here. It can even have a stain or a slight hole – you will cover it with fabric scraps.
- Scissors. Embroidery scissors and sewing shears.
- Some pins.
- Sewing thread and sewing needle (for basting).
- Sewing machine (optional). You can sew your zipper pouch by hand.
- Embroidery threads and embroidery needles. Choose one embroidery floss color or mix all the colors you like. Choose the needle size depending on the thread and fabric you will use.
Step-by-step Zipper pouch tutorial
Measure and cut the fabric

- Measure and cut the fabric for the base and for the lining. The length of your zipper will determine the size of the material for this zipper pouch. The width of the bag, however, can be as wide as you want. You can make your zipper pouch square or very deep if you wish.
- Cut the base fabric and the fabric for lining in the same size. The length = the length of the zipper, including the tails. The width – you decide.
Create a design

- Assemble the scraps and create your unique design. Place both pieces of the base fabric on the table and place the fabric scraps above. Move the pieces to create the design you like. The borders of the parts have to overlay, so the base fabric is not visible at the end.
- When you are happy with your design, pin all the scraps to the base fabric and baste them. It is easier and safer to embroider over the basted pieces, not pinned ones.
Embroider

- Embroider above the fabric scraps. The embroidery will secure the fabric pieces together and create a unique design for your zipper pouch. This is part of the zipped pouch creation I like the most!
- What embroidery stitches to use? Well, it will depend on the design you want to create.
- You can use a Running stitch to create long straight lines. This stitch is straightforward and fast and will secure the layers of the fabric well.
- Also, you can opt for the Blanket stitch. I like to make circular shapes of the Blanket stitch filling to create an extra decorative layer over the fabric.
- Mix the stitches together if you want to play with hand embroidery stitches more. First, you can emphasize some fabric designs with one stitch and then – fill the rest of the space with another type of embroidery stitch.
In case you are unfamiliar with the embroidery stitches mentioned above, these video tutorials might be helpful:
- The running stitch video tutorial
- Blanket stitch filling video tutorial
- Blanket stitch filling in a circle video tutorial
Do you need more inspiration on hand embroidery stitches? Then, head to the tab Video lessons on this blog and choose from the list of stitches!
Prepare for sewing

- Take out the basting threads. Be careful not to snag the embroidery! If you used some tracing tool, wash the pieces to remove the residue of tracing signs. You can read more about eliminating tracing marks on the Practical Embroidery blog.
- Also, iron embroidered pieces of the zipper pouch. It is always easier to sew if the fabric is not wrinkled.
Sewing the pouch

- Sew in the zipper. Sandwich a zipper between the embroidered piece and the lining and sew them together.
- Fold the sewn pieces so the zipper is outside. Then, sandwich the other side of the zipper between the second embroidered piece and the second piece of the lining fabric. Sew them together.

- Sew the parts together. Place the embroidered fabric and lining pieces together and sew all around, leaving a gap in the lining fabric.

- Then, cut off the angles of the material on the corners.

- Turn the zipper pouch inside out, and straighten the angles. Close the gap in the lining fabric.
Finishing touches

- Embroider the running stitch around the border. This will ensure that the lining fabric is secure from being caught by the zipper when you open and close the purse.
Sewing tips
I’m not a professional sewist, so the sewing part of this tutorial might need to be revised. My advice here is to follow the tutorial of a sewing professional!
I recommend these tutorials:
- Detailed Zipper pouch tutorial by Suzy Quilts.
- If you prefer a video format – watch this video tutorial by Made Everyday on YouTube.
- And, if you want to sew by hand – follow this video tutorial.
Zipper pouch Video tutorial
If you are a visual learner, I also made a short video lesson to add to this DIY tutorial. You can watch it below or on the Practical Embroidery YouTube channel.
More DIY tutorials from the blog:


