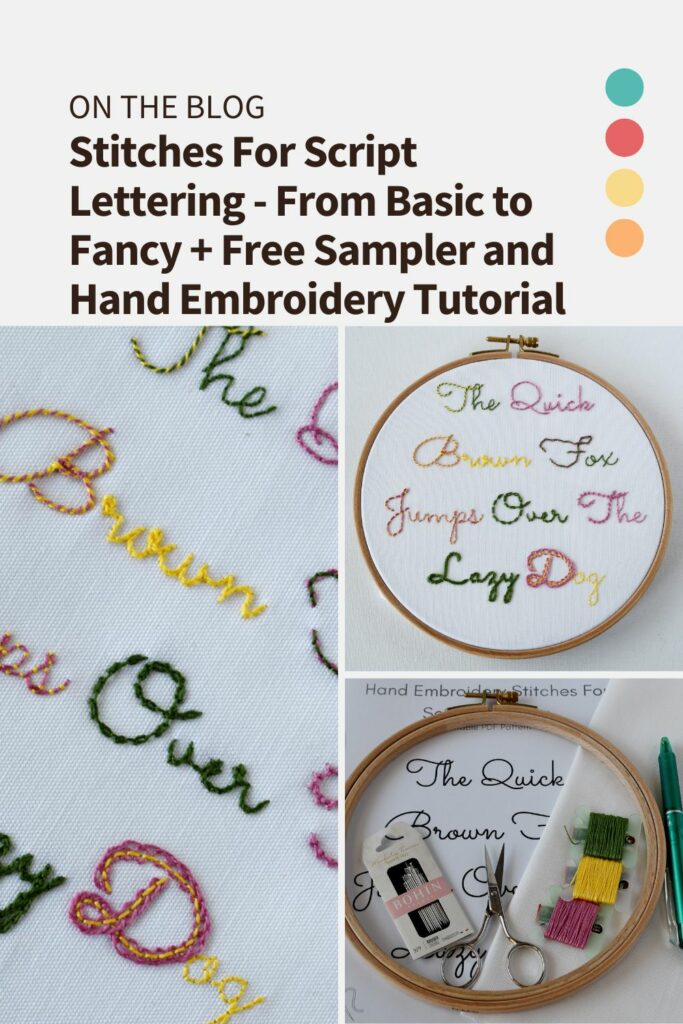
Stitches For Script Lettering – From Basic to Fancy + Free Sampler and Hand Embroidery Tutorial
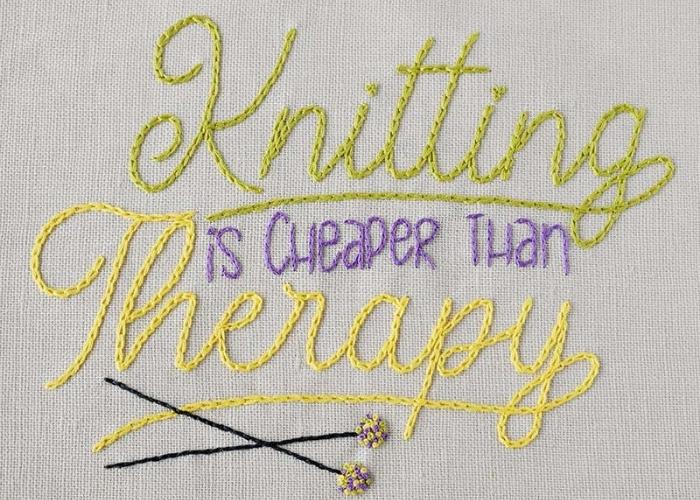
Script lettering has a timeless elegance that instantly elevates any embroidery project. Unlike block fonts, script fonts mimic the flow and rhythm of natural handwriting, giving your stitched lettering a personal, artistic touch. This organic movement is even more charming when embroidered by hand, as each stitch follows the gentle curves and loops of the lettering, making the final result feel warm, intimate, and entirely unique.
One of the main reasons script embroidery is so loved is its ability to make projects deeply personal. Whether you’re stitching a name, a favorite quote, or a special date, using embroidery stitches for script lettering allows you to create keepsakes that carry emotional value.
Script fonts are especially well-suited for:
- Wedding gifts like hand-stitched vows or monograms
- Baby items such as embroidered names on blankets or onesies
- Home decor like custom hoop art with quotes or affirmations
- Gifts with personal messages or initials
The graceful curves of script lettering make these pieces look polished and heartfelt, even when done with simple stitches. It’s this mix of elegance and meaning that keeps script embroidery so loved by hobbyists and professionals alike.
Want to learn some hand embroidery stitches that are great for script lettering? Grab this free PDF sampler and stitch along with me!
Choosing the right embroidery stitches for script lettering
What makes a stitch suitable for embroidering script fonts?
When working with script fonts in embroidery, not all stitches are created equal. Because script letters are typically curved, flowing, and often connected, the best embroidery stitches for script lettering are those that can smoothly follow these natural movements.
The ideal stitch for script embroidery should:
- Follow curves with ease: Stitches like Stem Stitch and Split Stitch are excellent at tracing rounded letterforms without creating harsh angles.
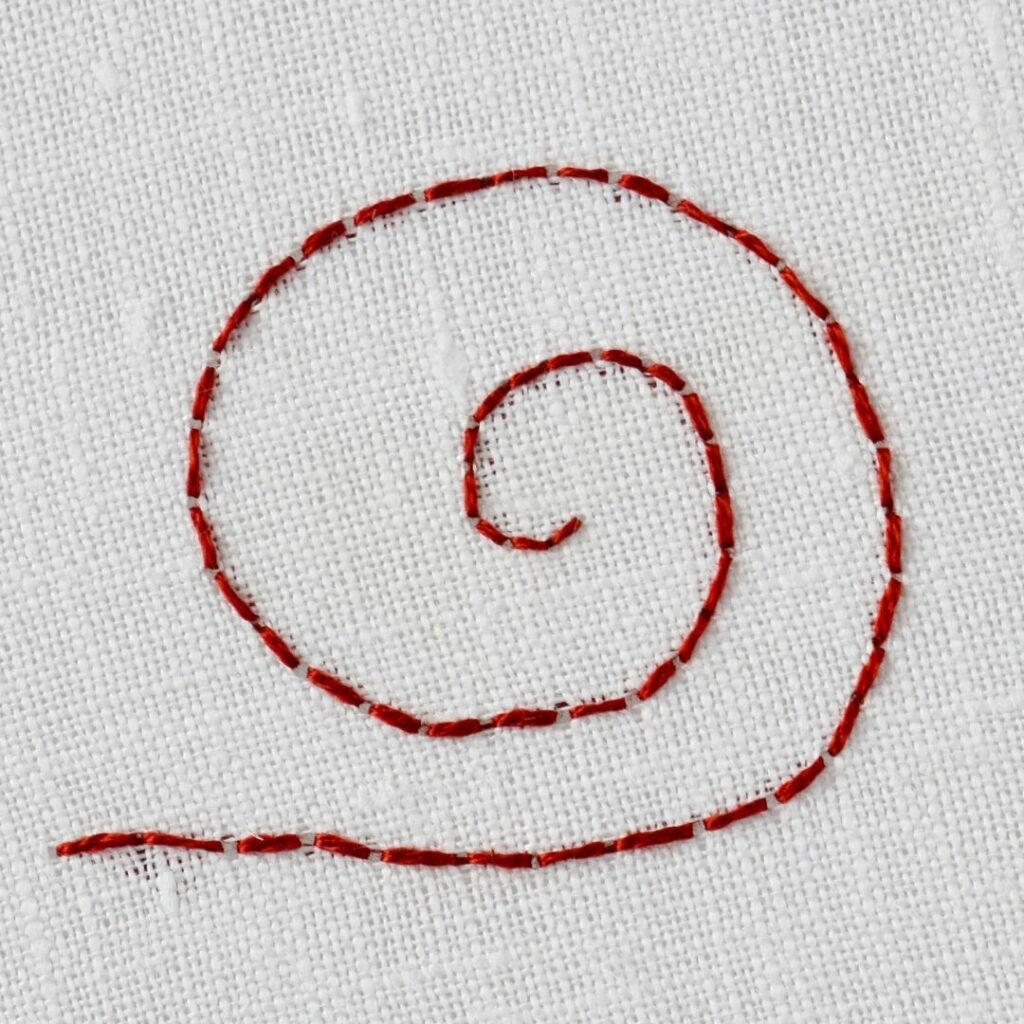
- Maintain a consistent line width: Script fonts often rely on smooth, even lines. Stitches that provide a continuous, clean look—like the Back Stitch or Chain Stitch—help achieve that.
- Adapt to varied letter thickness: Some script fonts feature transitions between thick and thin strokes. Using stitches like Backstitch or Stem Stitch can help you build up the line in thicker areas for a calligraphy-like effect.
Ultimately, the best stitches are those that allow you to mirror the rhythm of handwriting, creating elegant lettering with a handcrafted touch.
Factors to consider: fabric, thread, font size
Choosing the right stitch also depends on practical factors beyond just aesthetics. Before you start stitching, consider these critical elements:
Fabric type
- Tightly woven fabrics (like linen or cotton) are best for delicate stitches that need clear definition, such as Split Backstitch or Stem Stitch.
- Looser weaves may require bolder stitches, like Chain Stitch, to remain visible and stable.
Thread type and thickness
- Six-strand embroidery floss gives you flexibility—you can separate strands to create fine lines or use them all for a thicker look.
- Pearl cotton offers a smoother finish and slight sheen, ideal for a more polished script style.
- Consider doubling the number of strands in the needle or using a double thread for fonts that feature bold strokes or for more highlighted capital letters.
Font size and detail
- Small fonts require stitches that can handle tight curves, like Backstitch or Stem Stitch.
- Larger fonts allow for more decorative options, such as Cable Chain Stitch, Palestrina Stitch, or Pekinese Stitch, that add texture and visual interest.
- The smaller and more detailed your script font, the more control and precision you’ll need in your stitch choice.
Balancing these elements ensures that your lettering not only looks good but also retains its quality over time. The right combination of stitch, thread, and fabric will make your script embroidery beautiful and durable.
Top hand embroidery stitches for script lettering
When working with script fonts, choosing the right stitch can make all the difference. The best embroidery stitches for script lettering are those that flow naturally with the curves and loops of the text, resulting in a smooth, handwritten appearance. Below are some of the most effective and popular stitches used by embroidery artists to bring script lettering to life, each offering its own unique finish and feel.
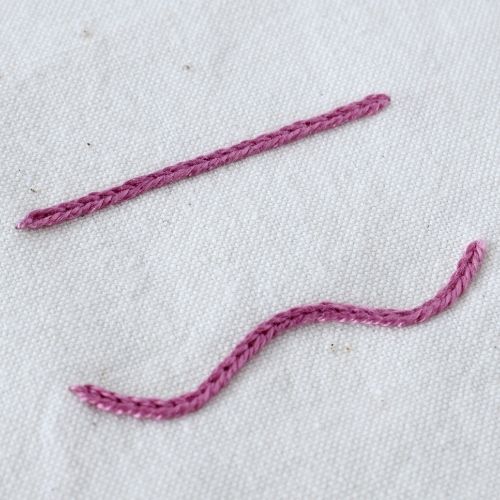
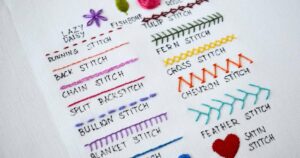
Back Stitch – clean and classic
The Back Stitch is the most straightforward option for lettering. It’s simple to execute and creates a crisp, continuous line that works beautifully with small or delicate script fonts. This technique works with even the most elaborate script fonts, including those with loops and curves. Besides that, you can double the stitching to mimic bolder parts of the letters.
Best for:
- Small to medium font sizes
- Clean, readable lines
- Quick and straightforward script embroidery
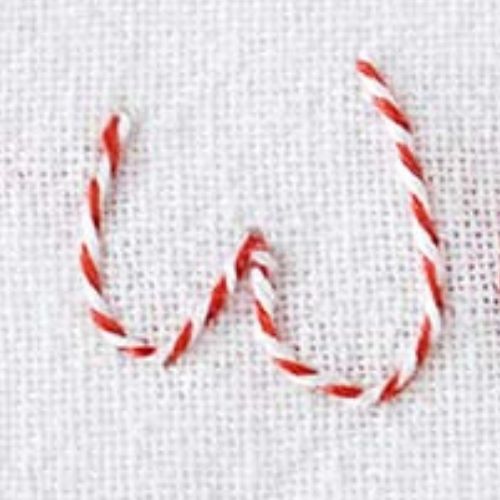
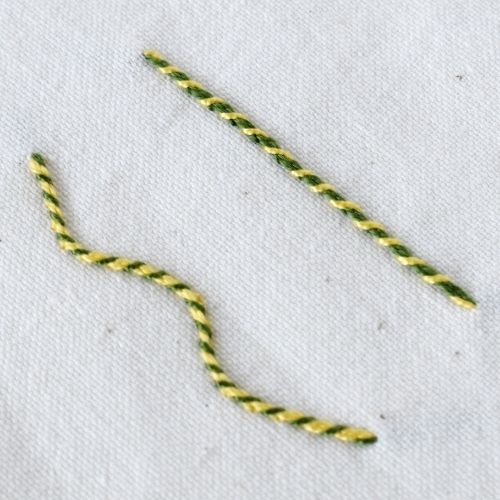
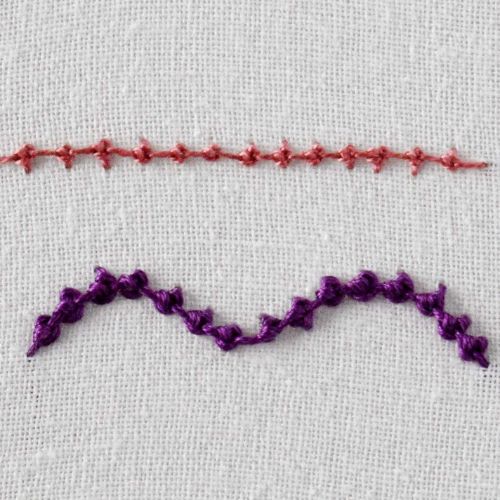
Whipped Backstitch – decorative technique with a twist
The Whipped Backstitch adds a decorative twist to the classic back stitch by wrapping another thread around the stitched line. This creates a rope-like, slightly raised effect that looks both polished and dimensional, perfect for adding flair to more elegant or whimsical script fonts. It can be stitched in one color for a dimensional effect or in two colors for a decorative, twisted look.
Best for:
- Medium to large script
- Decorative projects
- Adding a pop of color or contrast
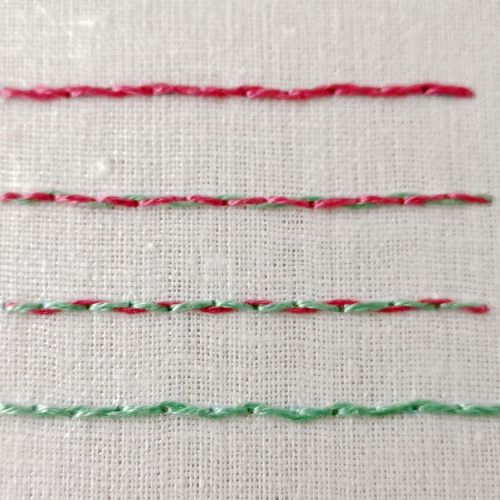
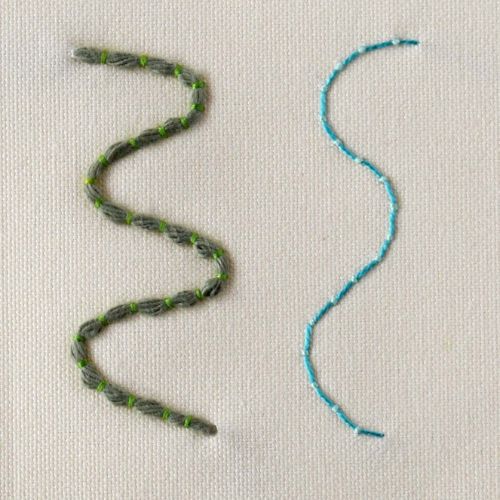
Split Backstitch – soft and smooth sook
A variation of the Backstitch, the Split Backstitch creates a soft, rope-like effect. It involves splitting the previous stitch with your needle, which adds texture while maintaining a smooth appearance. This stitch is great when you want your lettering to have a slightly more relaxed, handmade look.
Best for:
- Casual or rustic script styles
- Medium to large lettering
- Soft, blended outlines
Threaded Backstitch
This stitch builds on a basic Back Stitch by threading a contrasting color through the stitched line. Threaded Backstitch adds a woven look and works well when you want to highlight or decorate a simple script outline.
Best for:
- Embellished lettering
- Multicolor designs
- Lettering that needs visual depth
Pekinese Stitch
The Pekinese Stitch combines a Backstitch base with laced loops, creating a bold, laced look. It’s exceptionally decorative and gives your script lettering a soft, ornamental flair.
Best for:
- Elegant script styles when the font is rather big
- Formal or vintage-themed embroidery
- Lettering accents, when you want to highlight one letter or word
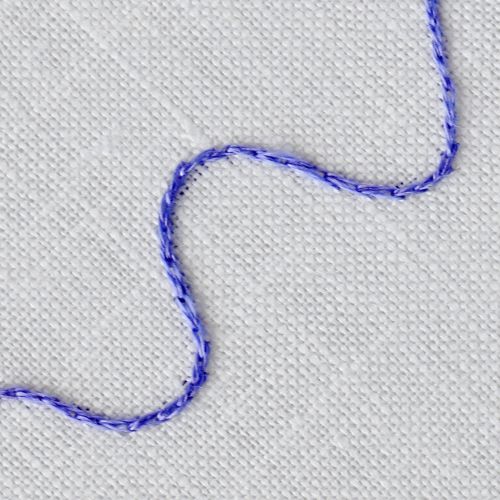
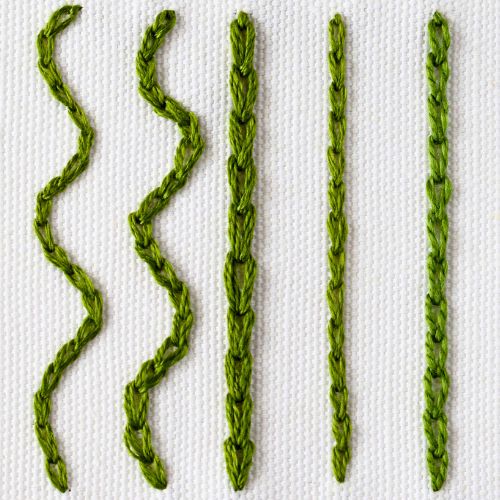
Stem Stitch – perfect for curves
The Stem Stitch is often considered the ideal stitch for script embroidery because of its natural ability to follow curves. It’s slightly twisted line adds a subtle texture that enhances the handwritten feel of script fonts. It’s handy for words with lots of loops and rounded shapes.

Best for:
- Flowing, cursive fonts
- Smooth, curved letters
- Decorative monograms or quotes
Whipped Stem Stitch
A decorative twist on the classic Stem Stitch – Whipped Stem Stitch. This version involves wrapping a second thread around the stitch to enhance texture and definition. It’s excellent for stylized or playful script fonts that require more emphasis.
Best for:
- Medium to large script fonts
- Adding contrast or color variation
- Script designs with lots of curves
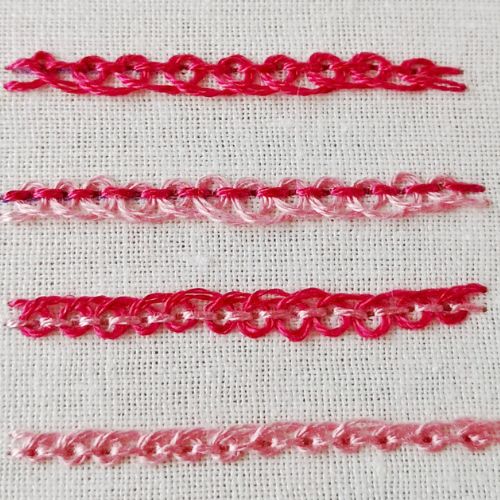
Chain Stitch – bold and decorative
The Chain Stitch forms a series of looped links that create a thick, textured line—perfect for bold or larger script fonts. This decorative stitch not only stands out visually but also adds dimension to your lettering. It’s eye-catching and ideal for projects where the text is the focal point.
Best for:
- Large, stylized script
- Decorative pieces and wall art
- Lettering that needs visual weight
Heavy Chain Stitch
This denser version of the regular Chain Stitch – Heavy Chain Stitch, offering a thick, bold line, is ideal for oversized script fonts or titles in hoop art. The added weight makes your lettering stand out with a dramatic effect.
Best for:
- Statement words or quotes
- High-contrast script styles
- Large embroidery designs
Cable Chain Stitch
A variation of the Chain Stitch, the Cable Chain Stitch adds structure and boldness to your lettering. It holds up beautifully in larger fonts or highly stylized script designs.

Best for:
- Bold calligraphic script in larger fonts
- Decorative projects
- Adding heavy texture to letterforms
Palestrina Stitch
This knotted technique named Palestrina Stitch, creates a bumpy, textured line that adds a rustic or folk-art feel to script lettering. It’s more decorative than traditional line stitches and works well for fancy lettering in handmade projects.
Best for:
- Whimsical or folk-style fonts
- Textured lines in large script
- Decorative flourishes in lettering
Couching
Couching Stitch is a technique rather than a stitch, where a thicker thread or cord is laid down on the fabric and stitched over with smaller stitches to hold it in place. It’s perfect for script fonts that are flowy and follow a single continuous line. This embroidery technique is versatile and lends itself to a wide range of projects.
Best for:
- Calligraphy styles with a continuous line
- Playful lettering
- Making a bold statement with your text
Each of these stitches has its strengths depending on your design, font size, and the overall style you’re going for. Try them all with a step-by-step tutorial below to see which one you like best. In my opinion, mixing and matching various fonts yields the best results.
Embroidering script lettering by hand: Free pattern and step-by-step tutorial
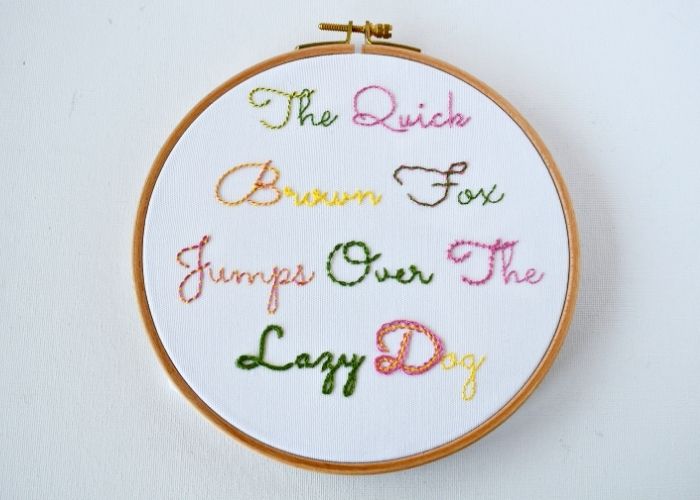
Hand embroidery is a skill that requires constant practice and exercise. And what can be a better exercise to learn stitches for script lettering than stitching a sampler of script lettering?
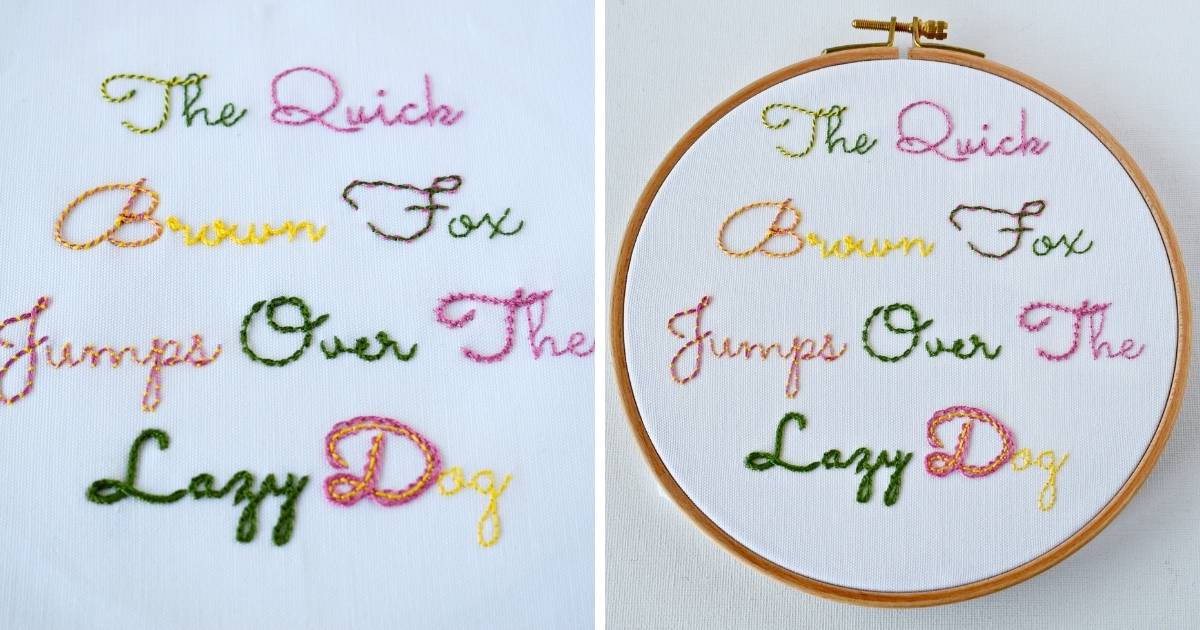
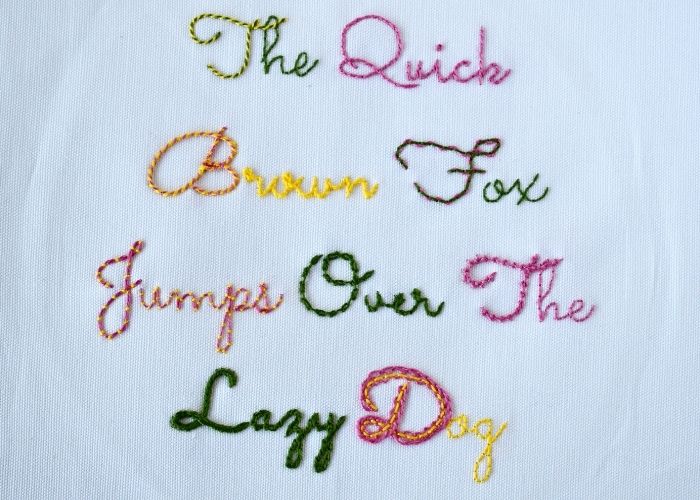
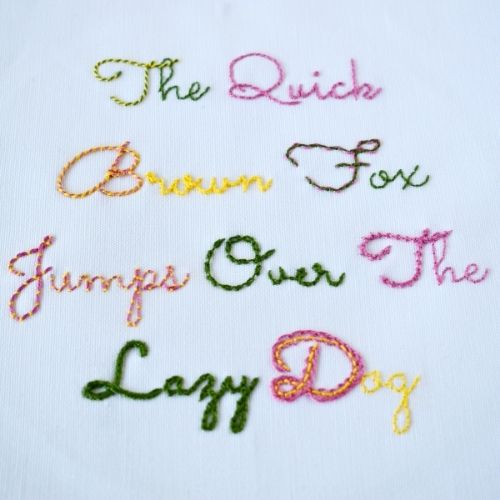
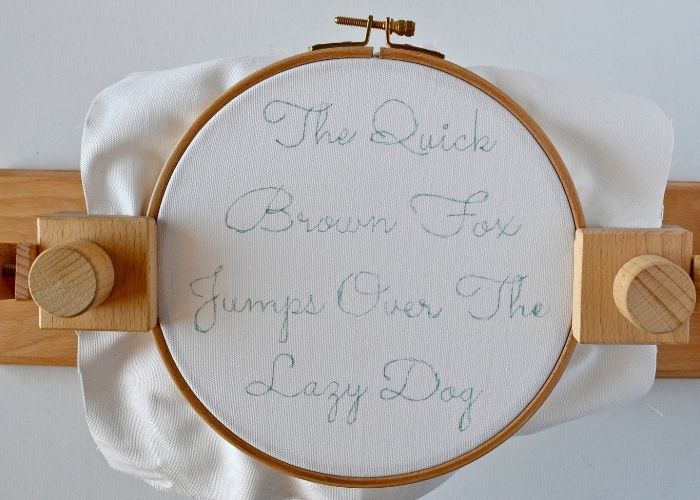
I created this free downloadable PDF pattern that says “The Quick Brown Fox Jumps Over The Lazy Dog”, so you can try out various hand embroidery stitches for lettering in one sampler. Did you know that this phrase is often used to test web and typography fonts, as it includes all the letters of the Latin alphabet?
Stitches For Script Lettering: Step-by-step
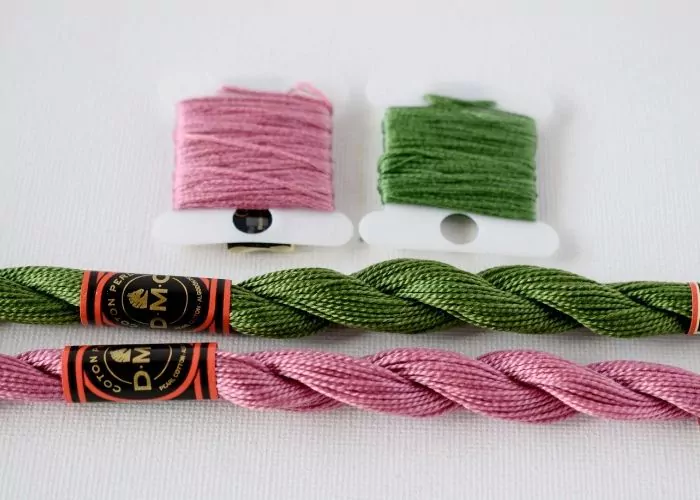
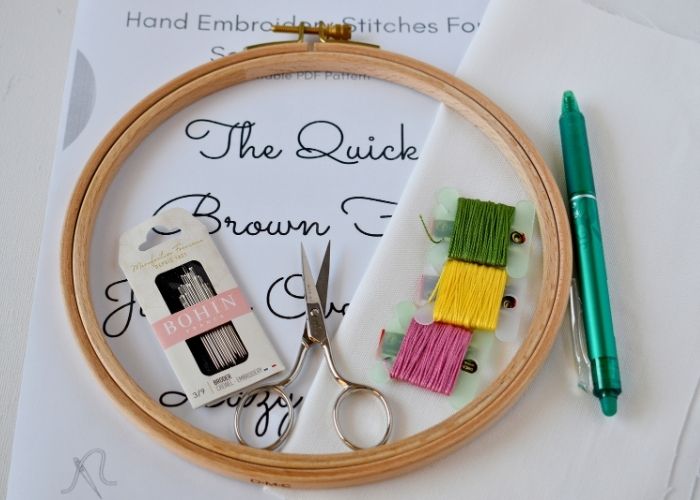
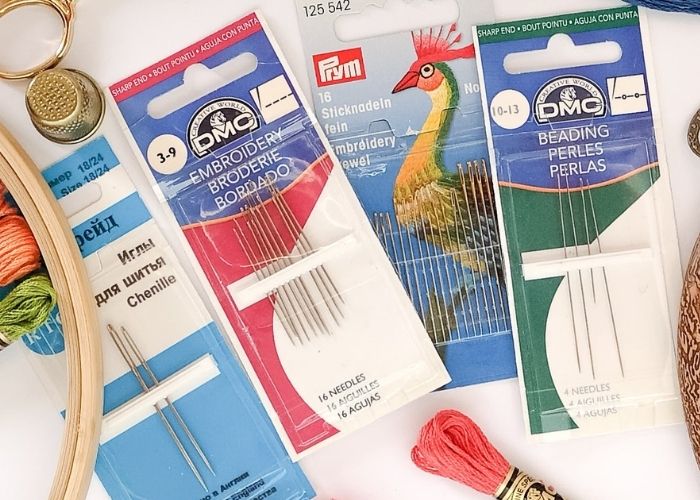
Tolls and materials
- PDF pattern. Download and print this Free PDF sampler to learn script lettering.
- Fabric. I used a white linen-cotton blend.
- A hoop. Mine is 18 cm.
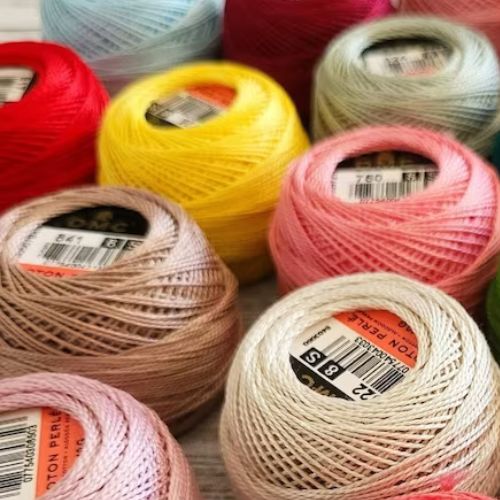
- Embroidery thread or floss. I used DMC Perle Cotton No. 8, which is equivalent to three strands of embroidery floss.
- Sharp embroidery needle and blunt cross-stitch needle for lacing and whipping stitches.
- Scissors.
- Friction pen for pattern transfer.
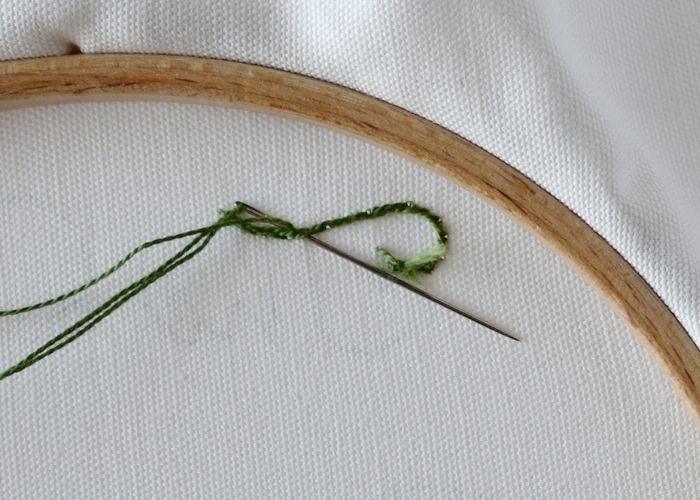
Preparation
1. Download and print the pattern page of my free Hand Embroidery Stitches for Script Lettering sampler. Gather tools and materials.
2. Transfer the pattern to the fabric. I used a friction pen and the window as the light source. Still, you can choose your preferred method to trace the pattern onto the fabric (see the guide “How To Trace Pattern on Fabric: Five Methods For Fast And Easy Embroidery Pattern Transfer” for options).
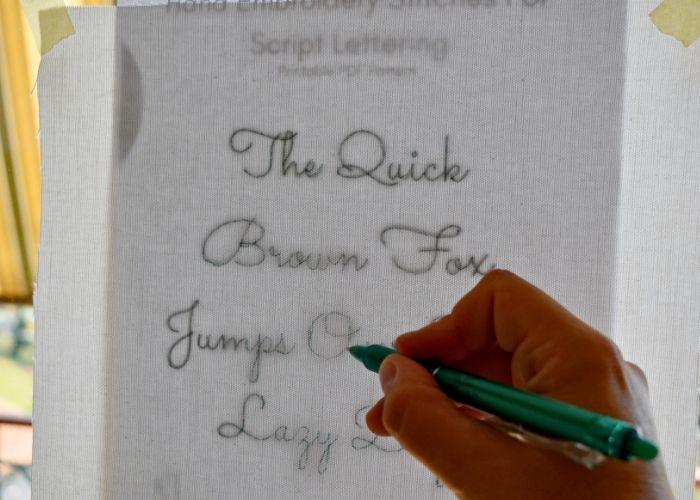
3. Stretch the fabric in the hoop and tighten the screw. You can use a hoop stand for more stability and convenience.
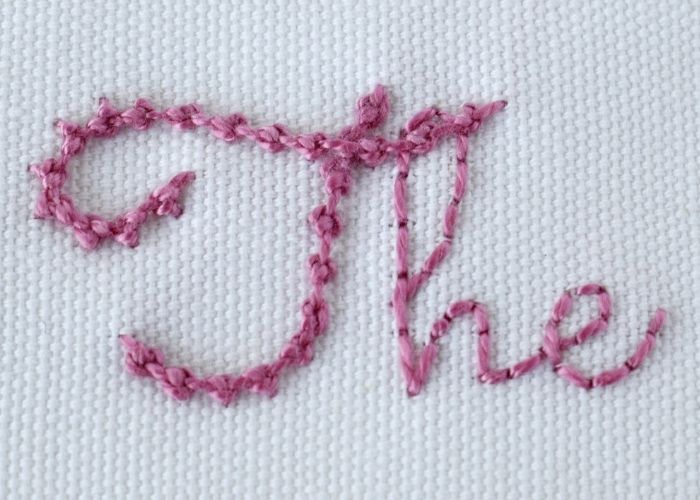
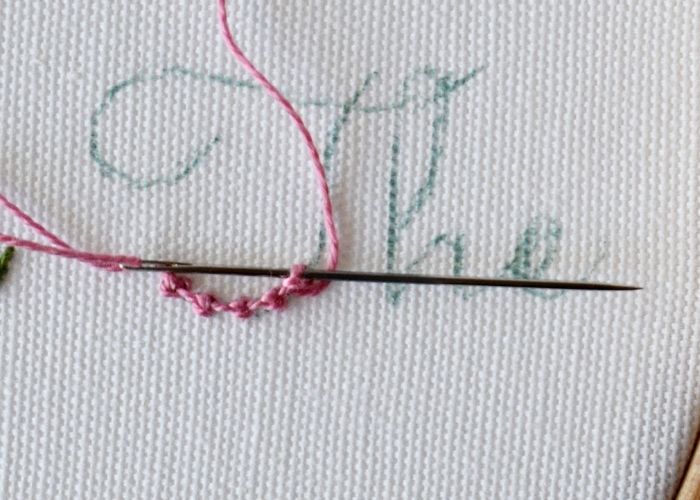
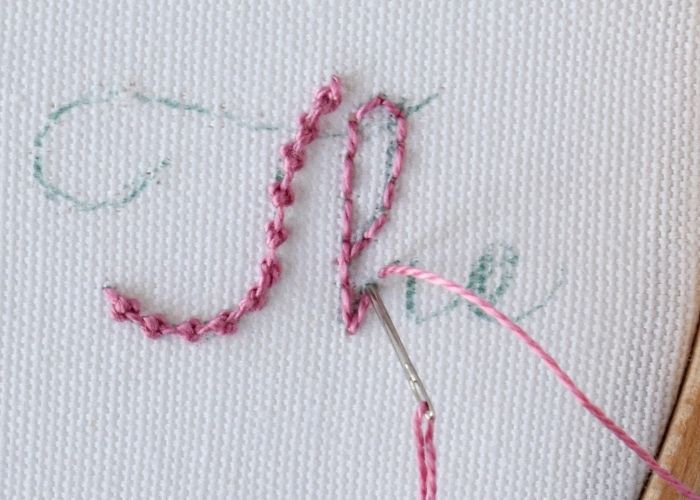
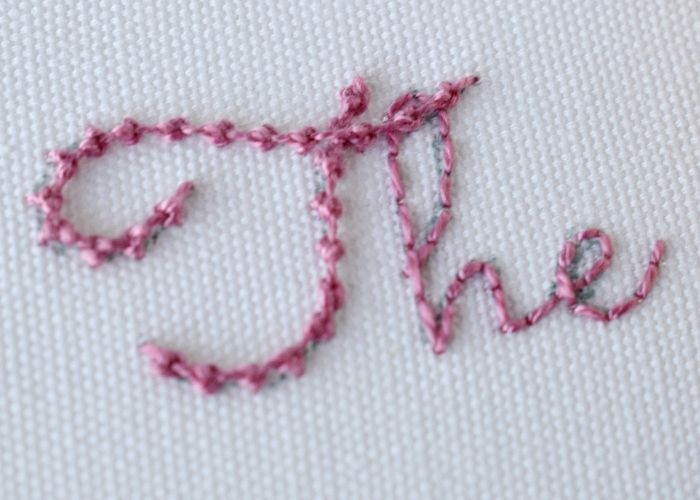
THE – Whipped Backstitch + Backstitch
1. To embroider the first word of this sampler, we will use a combination of the Backstitch and Whipped Backstitch (for the capital letter).
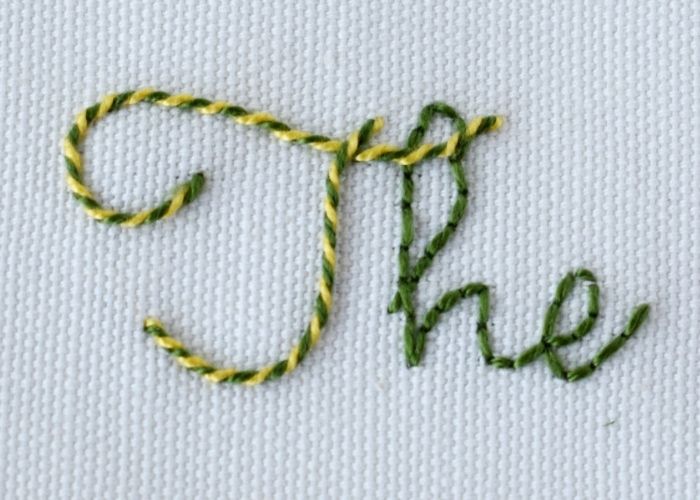
2. Start with a Backstitch.
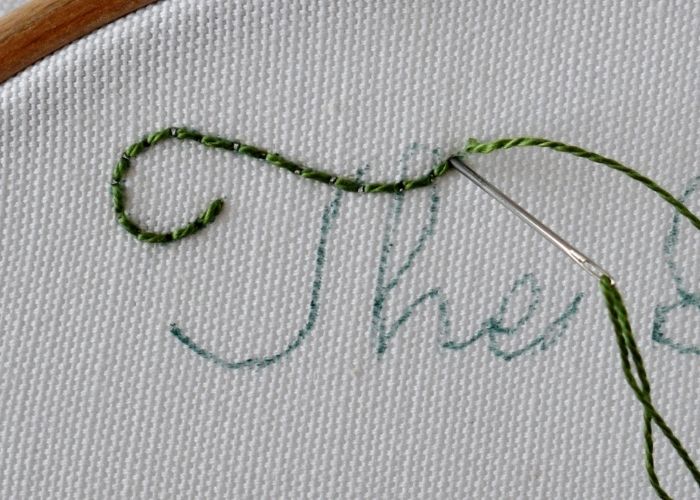
3. To avoid jumping threads on the back side of your embroidery, anchor your working thread under the sections of the stitches and embroider the next section.
4. Embroider the entire capital letter with Backstitch.
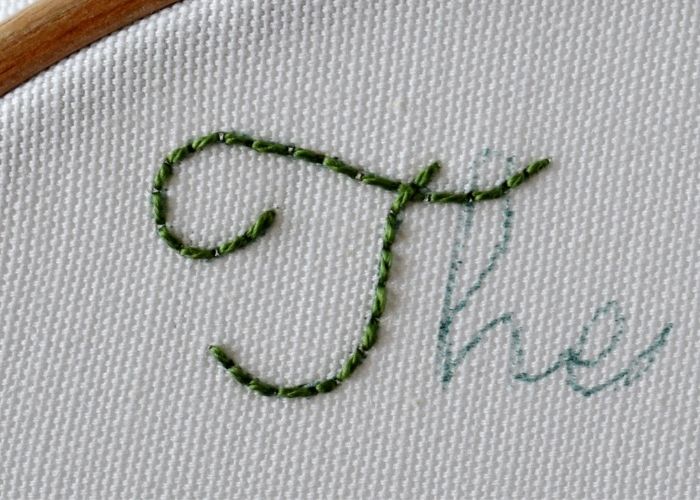
5. Add whipping. Use a contrasting color thread for a more decorative look.
6. Embroider the rest of the letters with a Backstitch.

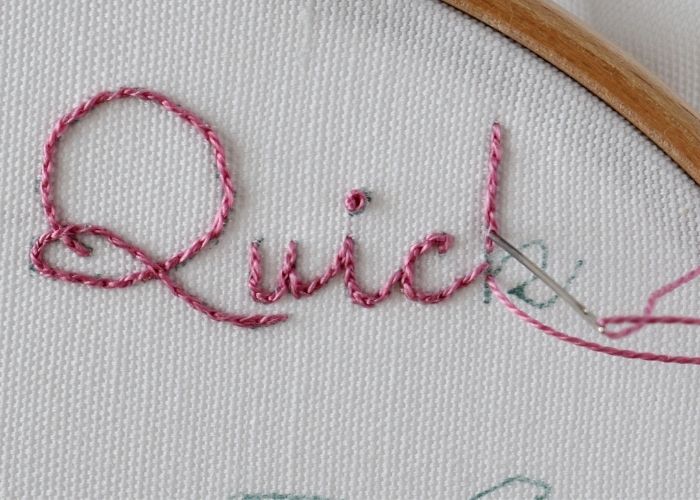
QUICK – Split Backstitch + French knot
1. To embroider this word, I used a Split Backstitch and one French knot for a dot on the letter “i”.
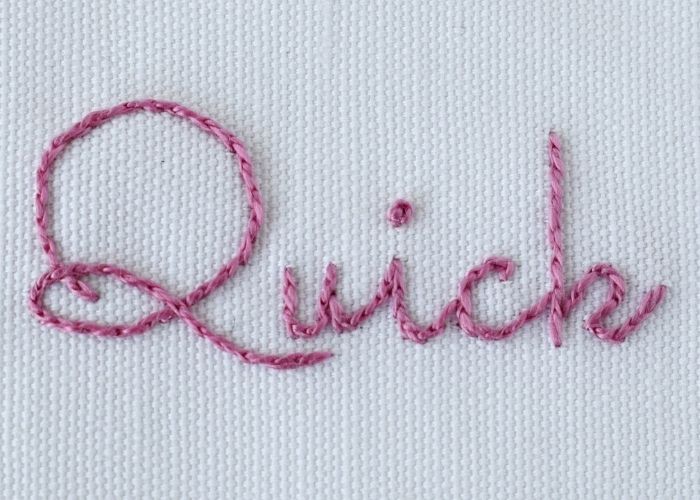
2. Start by outlining the first letter with Split Backstitch.
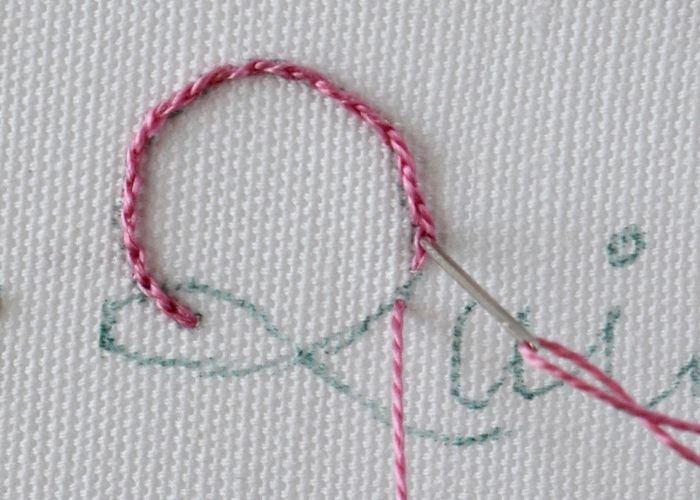
3. Follow the handwriting direction and stitch all the letters. To take curves more smoothly, make the stitches smaller on the straight sections.
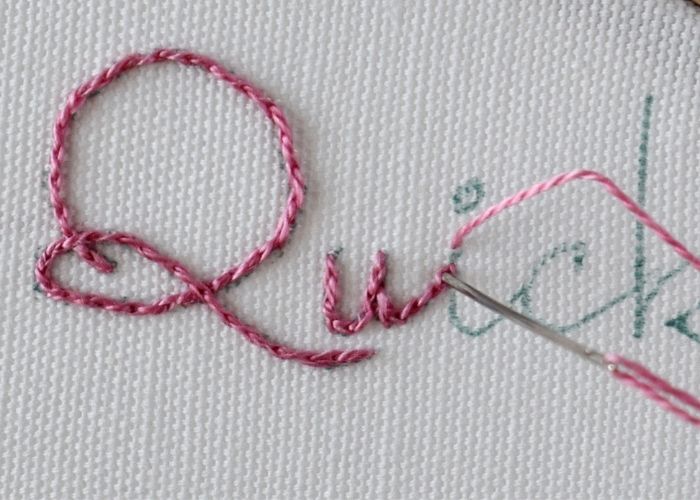
4. Use a French Knot to depict a dot on the letter “i”.
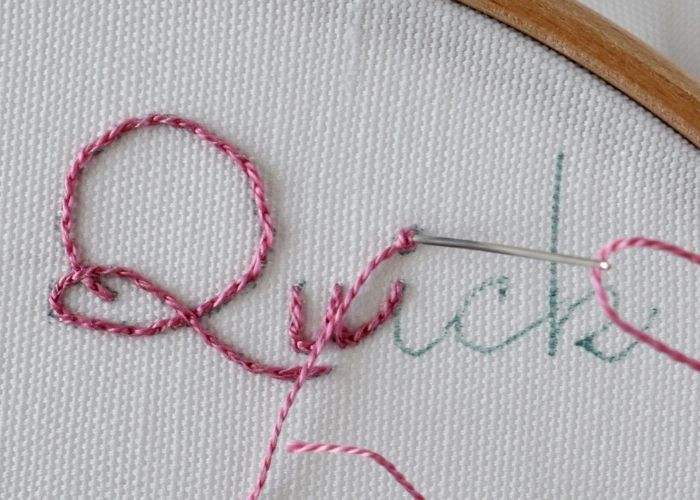
5. Get back to Split Backstitch and finish stitching the entire word.
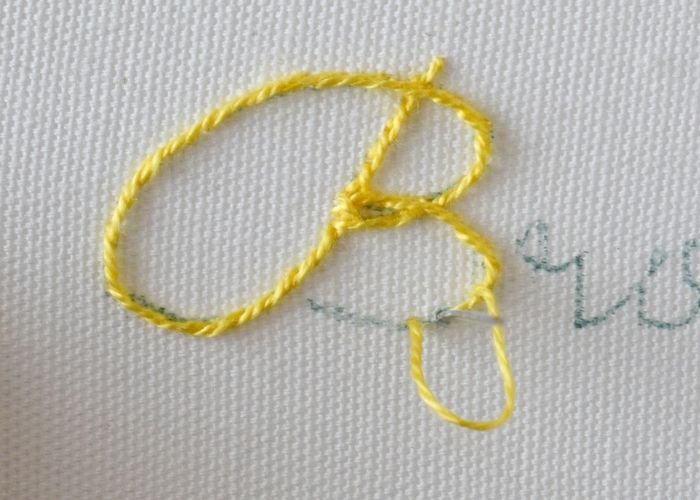
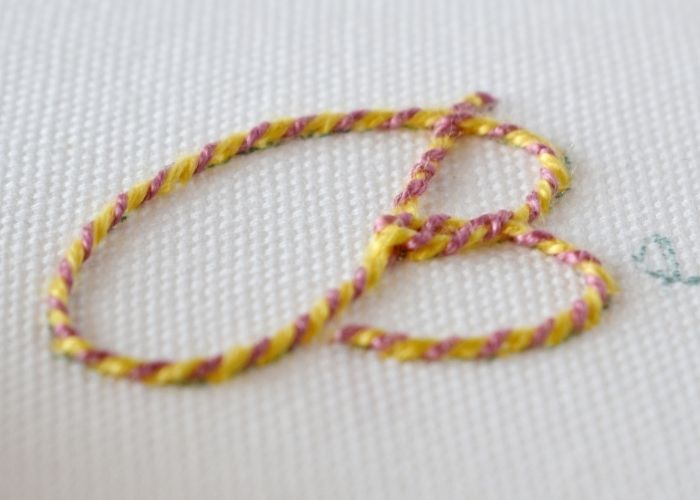
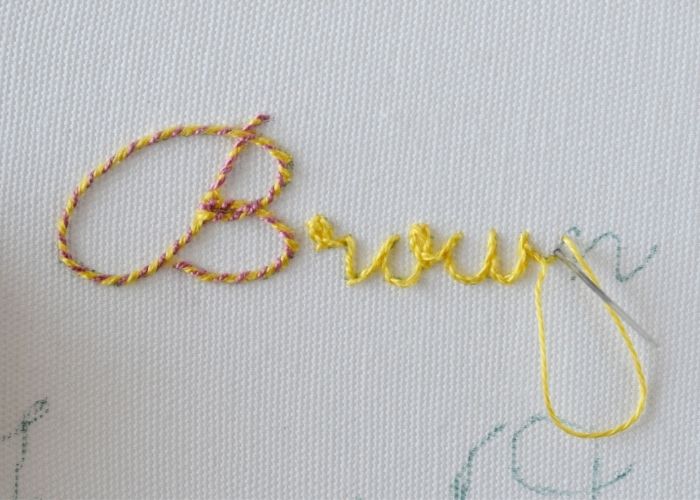
BROWN – Whipped Stem Stitch + Stem Stitch
1. I combined Stem Stitch and more decorative Whipped Stem Stitch to embroider this word.
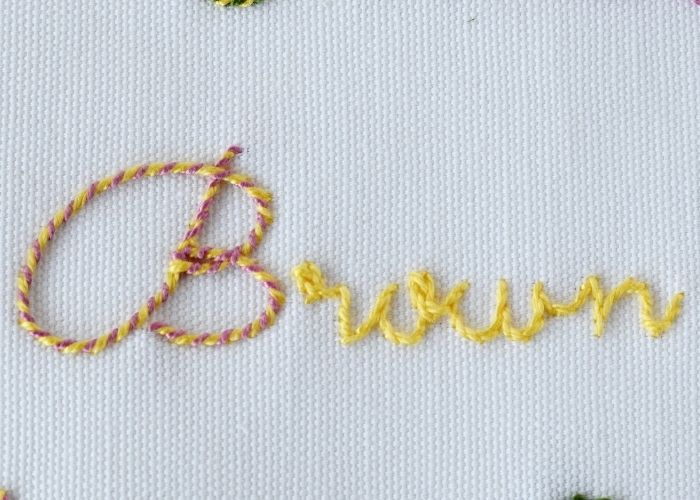
2. Start with a Stem Stitch outline on the capital letter.
3. Add whipping with a thread of the contrasting color.
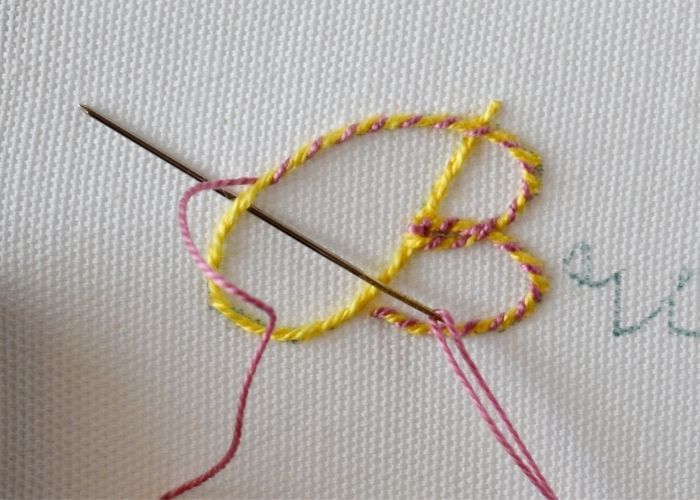
4. The letter will appear raised and structural, with a decorative, twisted rope effect.
5. Embroider the rest of the letters with Stem Stitch. Make the stitches shorter on the curves to achieve a smoother line and nicer-looking lettering.
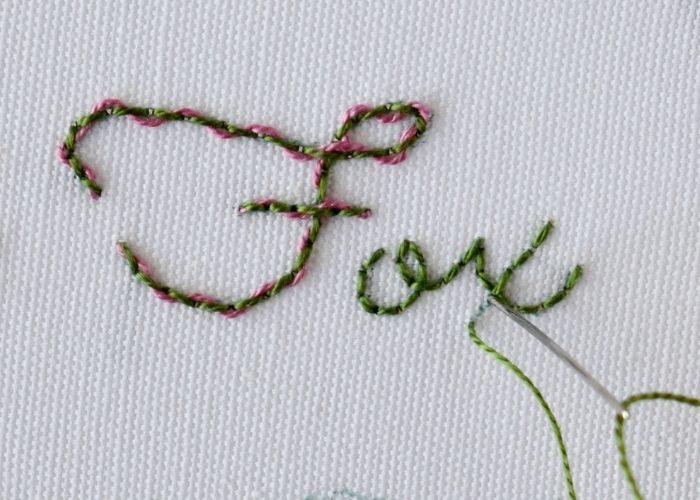
FOX – Threaded Backstitch + Backstitch
1. To embroider this word, I use a combination of the Threaded Backstitch for the capital letter and basic Backstitch for the remaining letters.
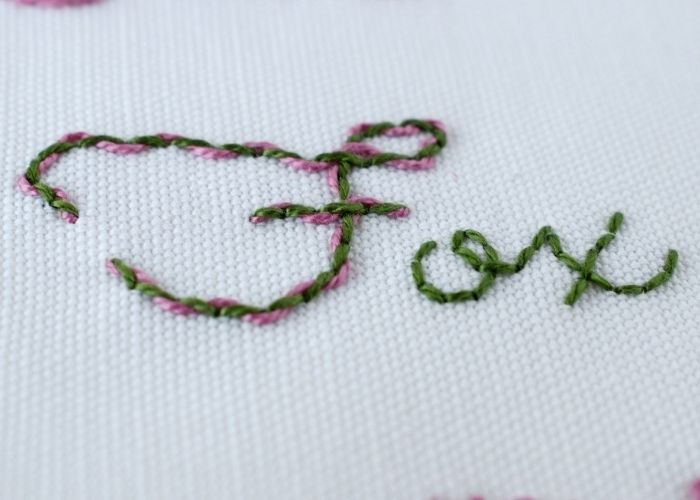
2. Start with a Backstitch and embroider the central part of the letter “F”.
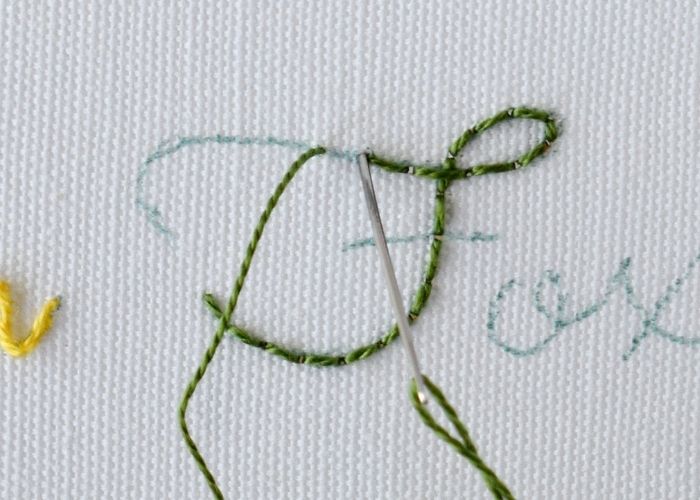
3. Leave a horizontal stroke undone and add threading to the Backstitch. Use a contrasting color thread for a decorative look.
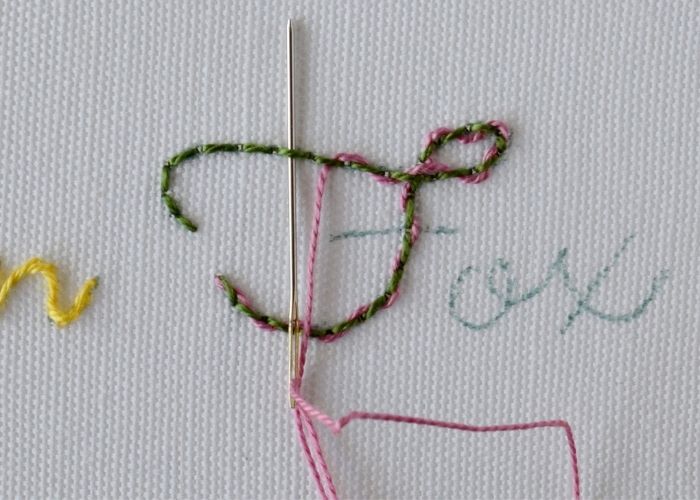
4. Now, add a horizontal stroke on the letter. First, embroider the Backstitch, and then add decorative threading.
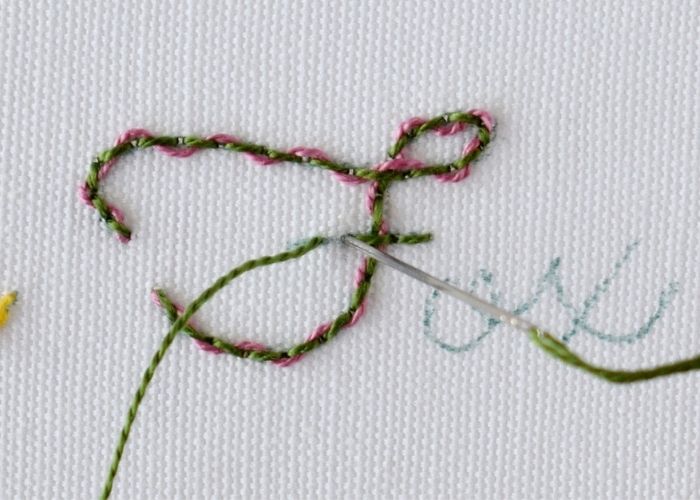
5. Finally, embroider the remaining letters with the Backstitch.
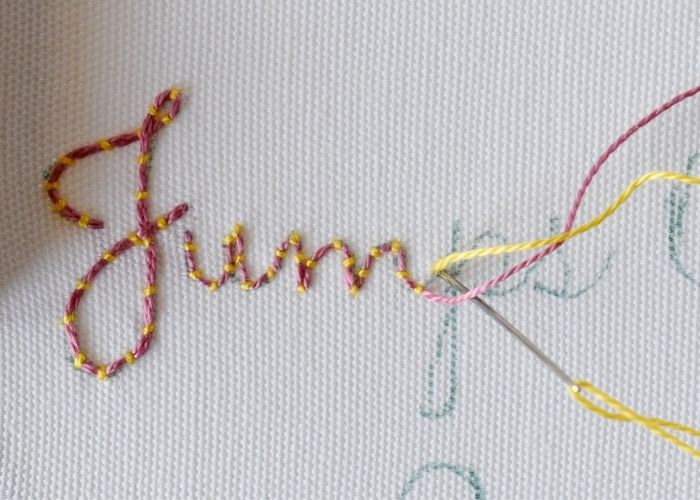
JUMPS – Couching Stitch
1. I embroidered this word with a Couching Stitch technique. I use a double pearl cotton thread couched with a single pearl cotton thread for a capital letter to make it bolder. For the rest of the lettering, I used a single pearl cotton thread as both laid thread and couching thread.
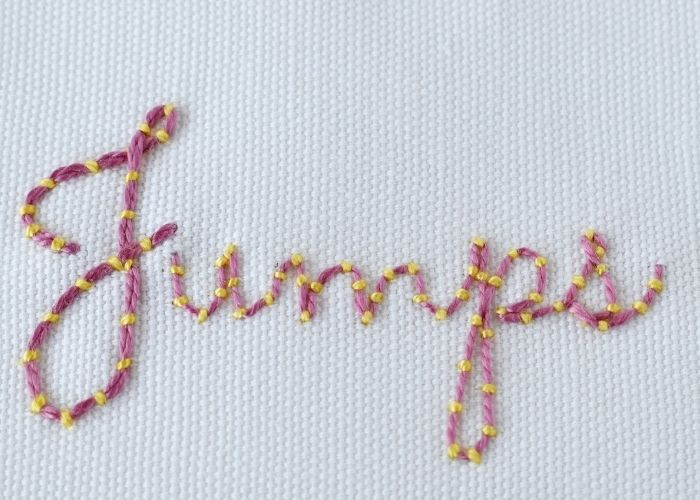
2. Start with couching double thread following the lines of the letter J. Use contrasting color threads for a more embellished look.
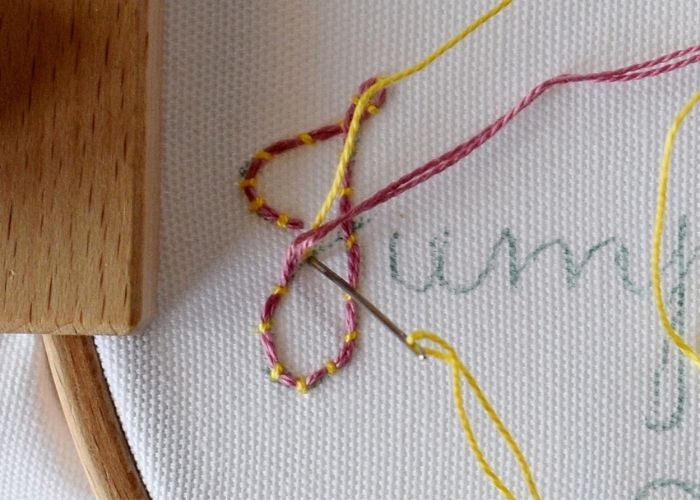
3. Now, add couching to the rest of the lettering. Follow the line of the script font and add stitches on a continuous line.
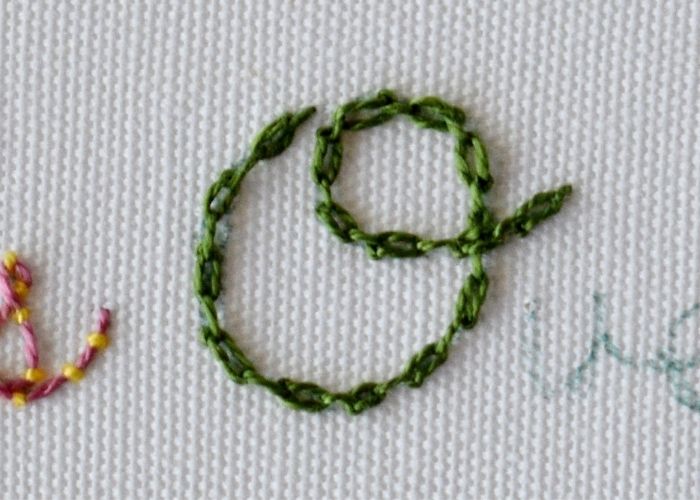
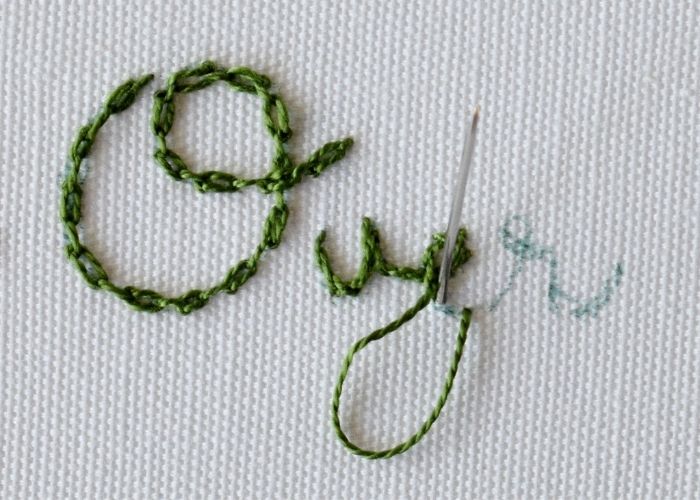
OVER – Cable Chain Stitch + Stem Stitch
1. To embroider this word, I combined a decorative Cable Chain Stitch and Stem Stitch.
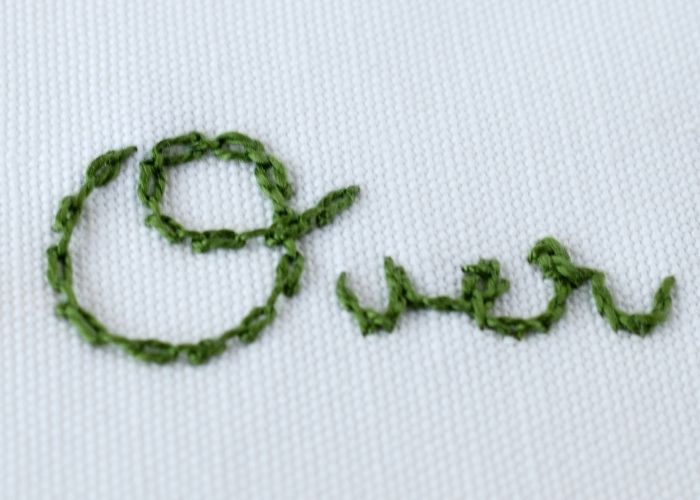
2. Start with a capital letter and embroider the outline of it with a Cable Chain Stitch.
3. Then, embroider the rest of the lettering with a Stem Stitch.
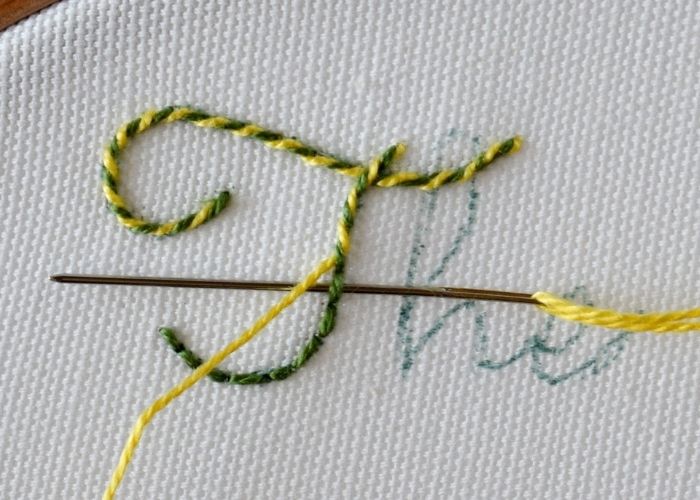
THE – Palestrina stitch + Backstitch
1. To embroider this short word, I combined a decorative Palestrina stitch for a capital letter and simple Backstitch for the remaining letters.
2. Start with a vertical line of the letter T. Embroider it with Palestrina stitch.
3. Now, embroider the rest of the letters with a Backstitch.
4. Finally, add the horizontal part of the capital letter. Use Palestrina stitch for a decorative effect.
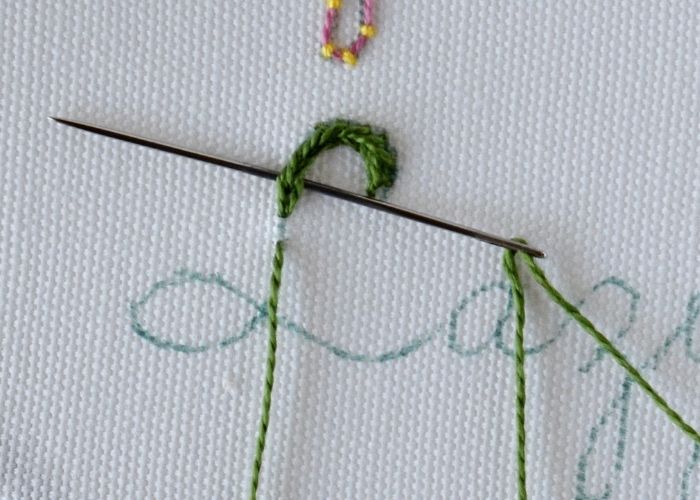
LAZY – Heavy Chain Stitch + Chain Stitch
1. To embroider this word, I combined a Chain Stitch with a bolder variation of the same stitch – Heavy Chain Stitch.
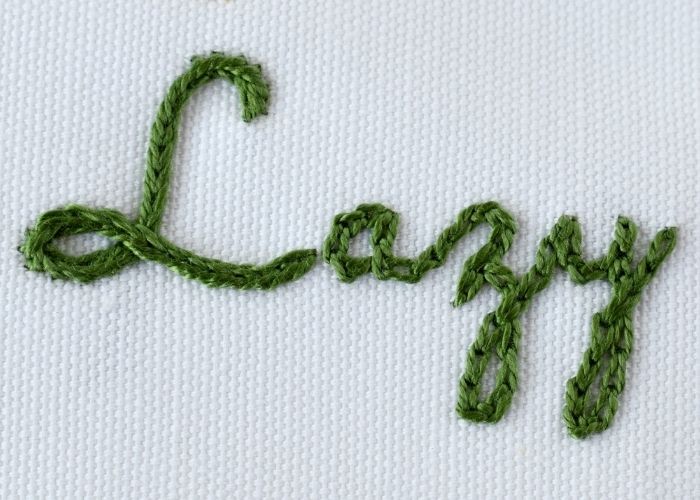
2. Start with a capital letter L and embroider it with a Heavy Chain Stitch. Start from the top of the letter, so you can finish at the connecting point and proceed with the rest of the lettering.
3. To embroider the remaining letters, use a Chain Stitch.
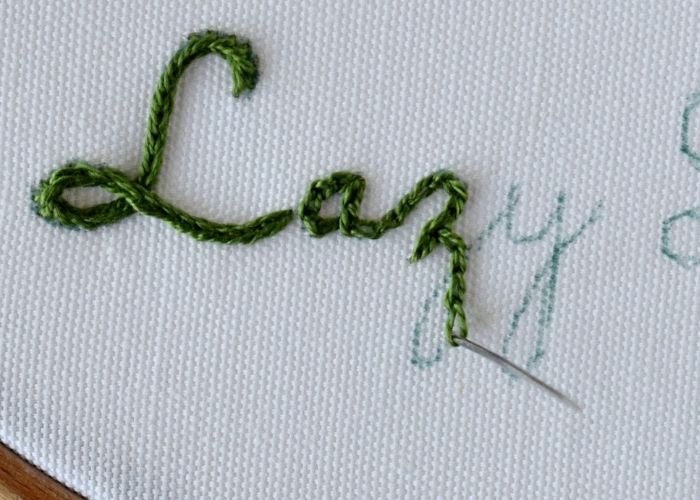
4. To create nice-looking, sharp angles, you will need to anchor the Chain Stitch and start a new one that follows a changed direction of the stitching.
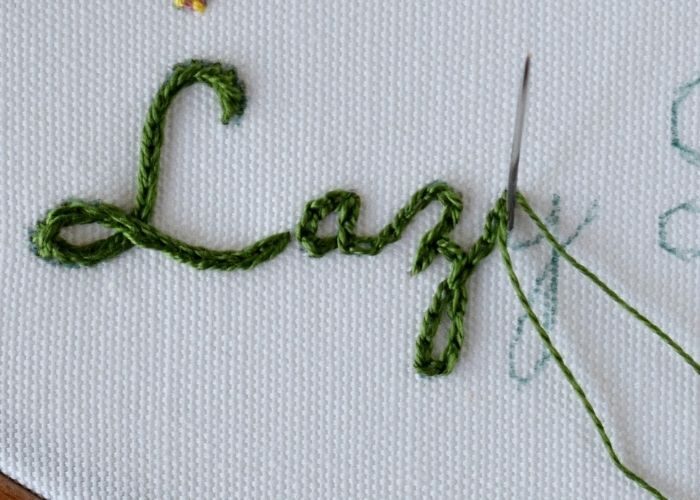
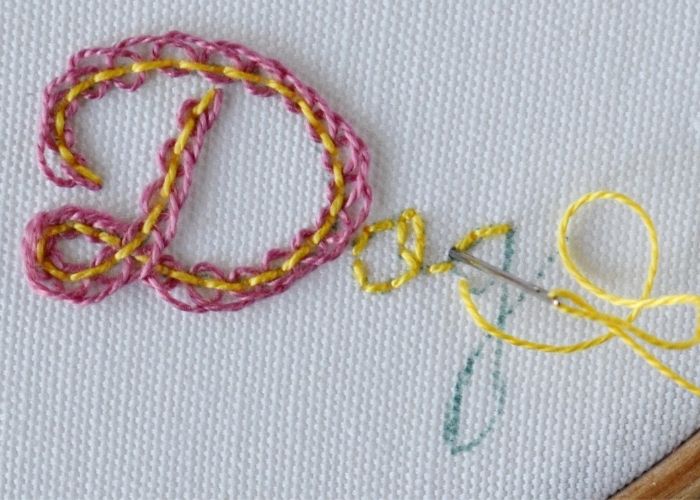
DOG – Pekinese Stitch + Backstitch
1. To embroider this decorative lettering, I combined two stitches from the Backstitch family: the Pekinese Stitch for the embellished capital letter and the basic Backstitch for the rest of the letters.
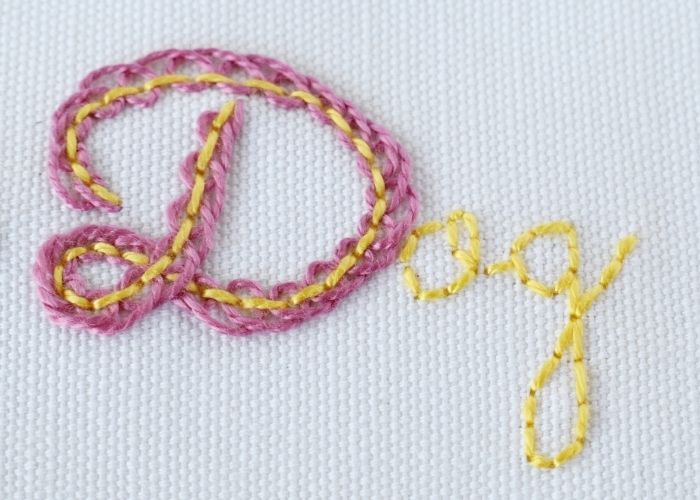
2. Start with an outline of the Backstitch.
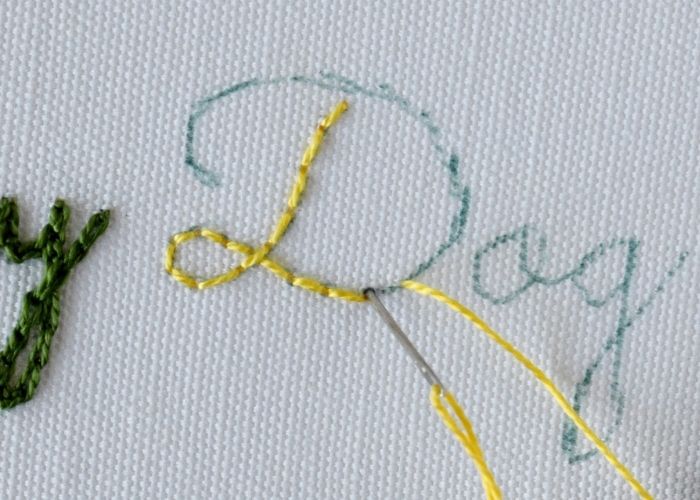
3. Add Pekinese Stitch lacing. To make it, the needle never passes over the Backstitch, but under two stitches, forming this looped lacing.

3. Finish the rest of the lettering with a Backstitch outline.
Video Tutorial: How to Stitch Script Lettering by Hand
Tools and materials I used for this sampler
Disclaimer. To cover the cost of creating free embroidery patterns and video tutorials for this blog, I do sometimes link to products. Please assume these links are affiliate links. If you choose to buy through my links then THANK YOU – it will make it possible for me to keep doing this.


Tips for perfect script embroidery every time
Embroidering lettering in script fonts may look effortless, but achieving smooth, polished results takes practice and attention to detail. Whether you’re working with a simple Backstitch or a more decorative embroidery stitch for script lettering, the following tips will help ensure your work looks clean, elegant, and professional every time.
Keep your tension consistent
One of the most common issues in stitching letters is uneven stitch tension. If your stitches are pulled too tightly, the fabric can pucker, and your letters may look distorted. If they’re too loose, the lines may appear wobbly or uneven.
Tips for consistent tension:
- Use a hoop to keep your fabric taut while stitching. Stretch your fabric well and tighten the hoop.
- Pull your thread just enough to lay flat without warping the fabric.
- Check your stitches every few letters to maintain even pressure.
Consistent tension is essential for script fonts, as any irregularity stands out against the smooth, flowing lines.
Practice on a scrap piece first
Before jumping into your final piece with good fabric, take the time to test your chosen stitches and lettering style on a scrap piece. This gives you a chance to:
- See how your chosen stitch works with the curves of the font.
- Test thread thickness and color.
- Make adjustments to size, spacing, or technique without the pressure of perfection.
Practicing also helps you develop muscle memory, especially for curves and loops, so your finished piece feels more fluid and intentional.
Use the right needle and thread type
The tools you choose can significantly impact the final look of your script embroidery. Not all needles or threads are created equal when it comes to fine, curved lettering.
Needle tips:
- Use an embroidery needle (also known as a crewel needle) with a sharp point and an eye large enough to accommodate your thread.
- For fine script, choose a smaller needle (sizes 7–9) to maintain precision.
- Use the blunt cross-stitch needle for whipping or threading. This will save your stitches from snagging and your fingers from stabbing, which often happens when you use the back of your needle for whipping.
Thread tips:
- Use 2–3 strands of embroidery floss to embroider small to medium-sized script letters.
- Consider pearl cotton for a smoother finish.
- For decorative stitches like couching or whipped stitches, mix textures or colors to enhance visual interest.
Matching your needle and thread to your project’s style and scale helps ensure that each stitch lies smoothly and complements the lettering.
Over to you
Knowing how to stitch script letters with simple and decorative stitches is a valuable skill you can use in various hand embroidery projects – from practical labeling of the garments to artistic expression and creation of decorative home decor objects.
Download a free sampler and follow this step-by-step tutorial to create script embroidery that not only looks beautiful but also appears refined and cohesive. The more you practice, the more confident and consistent your stitches will become.
Looking for more elaborate letters for monogramming? Check out the article “Hand Embroidered Monograms – The Best Way To Personalize Gifts,” where I gathered a variety of fonts and patterns for monogramming.
Which embroidery stitch is your favorite for lettering? Please share with us in the comments!
Don’t miss a thing!
Follow me on YouTube, Instagram, Facebook, Flipboard, Telegram and Pinterest. On the other hand, you can subscribe to the Practical Embroidery newsletter and get embroidery tips straight to your inbox every week!
More samplers on this Blog
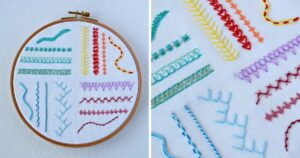
Simple Stitches For Borders: Hand Embroidery Tutorial For Beginners
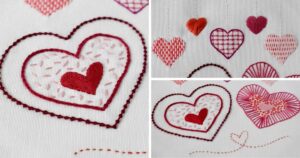
How to Embroider Hearts: 13 Ways to Stitch a Heart
Basic embroidery stitches for beginners: 18 basic hand embroidery stitches to start stitching like a pro
Can you tell me what font you used here? Would love to be able to use the same one!
This one is Sacramento font on Canva.