
Visible Mending Ideas, Techniques and Inspiration to Transform Your Clothes
mending and sustainability
In today’s fast-paced world, the fear of losing our personal touch in the maze of mass-produced fashion is real and growing. This article about mending ideas, mending techniques, and mending inspiration offers not only a solution but a creative rebellion against the impersonal nature of the modern wardrobe. This concept isn’t just about fixing a tear or a hole; it’s about reclaiming the stories embedded in our garments and expressing our individuality.
As we embrace mending ideas, we confront our concerns about sustainability, waste, and the loss of personal identity in fashion. Mending techniques allow us to creatively repair our garments while preserving their stories and uniqueness. Mending inspiration drives us to transform these fears into a powerful statement of style and sustainability. With each stitch, we’re not only repairing our beloved garments but also mending the broken link between our clothing and our personal narratives.
Join me in exploring how to fix mending ideas that are more than mere fixes—they are statements of resilience, creativity, and personal flair.
Disclaimer: To cover the cost of creating free embroidery patterns and video tutorials for this blog, I do sometimes link to products. Please assume these links are affiliate links. If you choose to buy through my links then THANK YOU – it will make it possible for me to keep doing this.
Preparation for Visible mending
Before jumping to the fun part – embroidering- we need to address a couple of things. Let’s see all the steps to take for the best mending results.

Assessing the Damage
Firstly, understanding the extent and type of damage is crucial for choosing the most suitable mending technique. Examine the garment closely in a well-lit area, stretching the fabric to see its full extent. Check for holes, thinned and worn-out fabric, and stains. Place a safety pin to mark the mending area.
This should be done before gathering materials to ensure you have everything needed for the specific type of repair.
Gathering Materials

Subsequently, having suitable materials ensures a durable and aesthetically pleasing mend. Select materials based on the garment’s fabric and the desired visual effect, either matching or contrasting. Collect these materials after assessing the damage and deciding on the mending approach, sourcing them from craft stores, online, or repurposing from old clothes.
I shortlisted some of my favorite mending supplies in the article “Mending tools and materials. What you need to get started with visible mending“.
Planning Your Design
Lastly, in the preparation phase, planning helps create a functional and visually appealing mend. Consider the garment’s style and color, and decide how visible you want the mend to be. Sketching can help visualize the end result.
Choosing Mending Techniques
Patching

Patching is ideal for covering larger holes or worn areas, adding strength and visual interest. Choose a patch material, cut it to size, and sew it onto the garment using appropriate stitches. This technique is suitable for large tears, holes, or areas with significant wear and should be done on a flat surface with ample space. Blanket Stitch is the most common embroidery stitch to use for patching. If your patch is giant, consider adding some decorative stitches to keep both layers of fabric together. Running Stitch will work great for this task.
Instead of simple patches, you can decorate your garment with appliques. Tell a story and add exciting details to your piece of clothing.

Besides traditional patches and applique, you can opt for inner patches. With this method, the patch fabric is applied from the inside of the garment, and only small pieces are visual. Interested to try this patching technique? Read the tutorial “How to mend holes in jeans by hand. A simple method with running stitch embroidery” and apply this method to your garments.
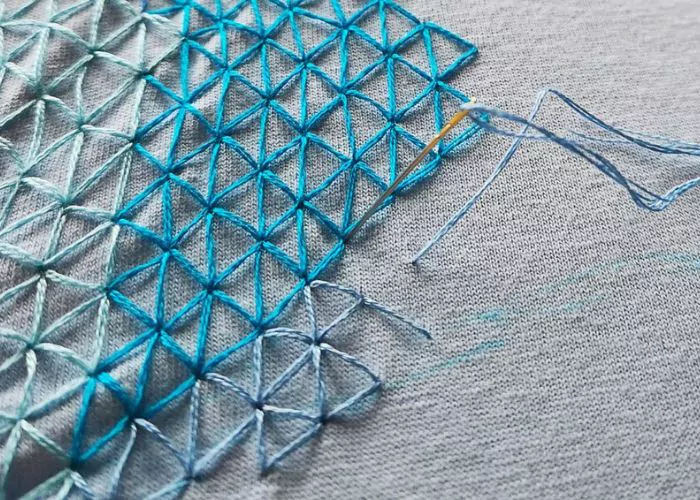
Darning
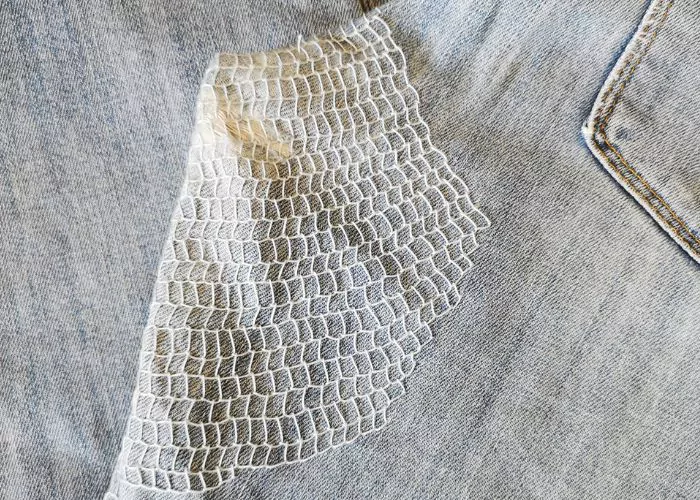
Darning reinforces fabric by interweaving threads. This method is ideal for small holes or thinning areas. Using a needle and thread to weave over the damaged area creates a grid-like pattern. This method is best for smaller holes or areas where retaining flexibility is essential. Keep in mind that this method can be time-consuming.
Darning Stitch and Kogin Stitch were born for this task. Besides that, you can opt for Blanket Stitch Filling, Herringbone Stitch, and other filling stitches. In the article “Hand embroidery stitches for mending,” you will find more hand embroidery stitches and visible mending ideas.

Choose Scotch Darning Stitch or Duplicate Stitch if you need to darn knitwear. Learn more about mending knits in the article “Visible Mending Knitwear: A Creative and Sustainable Approach” on this blog.
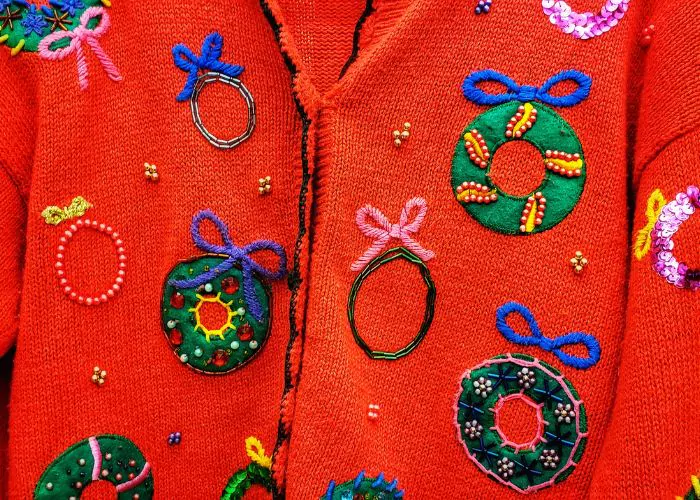
Embroidery
Embroidery adds decorative elements while covering or reinforcing damaged areas. Use various embroidery stitches to create designs over or around the damaged area. This technique is ideal for adding decorative flair to your mend.

With hand embroidery, your options are almost unlimited. From botanical designs to cosmic bodies, from abstract geometrical forms to animals and birds. All options are possible; just choose the design, gather embroidery supplies, and start stitching.
Preparation of the Garment
Cleaning the Garment
Begin by washing the garment to remove dirt and oils and pre-shrinking the fabric to prevent distortion after mending. Some stains may go out, and you will not need to cover them with stitches. On the other hand, more damage can become visible after cleaning the item.
Preparing the Area for mending

Next, trim and stabilize frayed edges to prevent further damage and make mending easier. Carefully trim frayed threads and apply fabric glue if needed.
Check if the seams need to be reinforced. If so, address it before embroidery.
Check the small holes that you plan to embroider above. In many scenarios, closing the hole before embroidering above it is better.
Pattern Transfer

For simple guiding lines, use the ruler and a Water-soluble pen, Friction pen, or Chalk pen for drawing. If you need to transfer a more complex design – consider using a water-soluble stabilizer.
There are various methods to transfer embroidery patterns or guidelines to the garment.
Learn more about tools and methods for pattern transfer in these articles:
- How to transfer embroidery pattern to the fabric
- The Ultimate Guide to Water Soluble Stabilizers for Hand Embroidery
Finishing Touches
Securing the Threads
Ensure the durability of the mend by properly securing threads. Tie off and cut threads close to the fabric without leaving loose ends. You can learn about various techniques for this task in the article “How to start and end embroidery stitches“.
Removing tracing marks and basting

Inspect the mend closely, checking for missed areas or loose threads. If all the mending part is finished, remove the tracing marks, basting threads, and any residue of the stabilizers. If you are unsure how to clean transferring marks, the article “How to clean pattern transfer marks from fabric” might be helpful.
Pressing the Garment
Finally, iron the mended area for a neat, finished appearance. Use an iron on a setting suitable for the fabric, taking care not to apply too much heat. Cotton embroidery floss is heat resistant, but other threads and fabrics can shrink if the iron is too hot.
Washing and Care

Proper care extends the life of both the garment and the mend. Hand wash or use gentle machine cycles, avoiding harsh detergents. This should be done as needed, following the same care as before mending. Hand embroidery and mending stitches applied with high-quality embroidery threads can be washed in a washing machine.
Additional Tips
Experimenting with Materials

Sometimes, great visible mending ideas come when we explore and experiment with unconventional materials. Different materials can add unique textures and visual appeal to your mend. Try using unexpected materials like metallic threads, contrasting fabric patches, leather or fur patches. Explore craft stores, charity shops, or online resources for inspiration and materials.
Being Creative

Visible mending is an opportunity to express creativity and personal style. Incorporate personal touches like beads or sequins or combine different mending techniques during the design planning phase and while executing the mend. You can combine patching with darning and embroidery in one mending project and create an original one-of-a-kind garment that will best reflect your personality.
Visible Mending Inspiration and Learning
Researching
Research provides inspiration and ideas for unique mends. Look for inspiration on Pinterest, social media, or books on visible mending before starting your mending project.
- Take a look at my Pinterest account – I have created boards “Visible mending, fixing and darning clothes“, “Embroidery on clothes” and “Embroidery on knitwear” where I save all the visible mending ideas that inspire me.
- Explore these hashtags on Instagram: #visiblemending, and #embroideredclothing.
My favorite books on visible mending:
- Mending Matters: Stitch, Patch, and Repair Your Favorite Denim & More by Katrina Rodabaugh
- Modern Mending: How to minimize waste and maximize style by Erin Lewis-Fitzgerald
- Visible Mending: A Modern Guide to Darning, Stitching and Patching the Clothes You Love by Arounna Khounnoraj
- Creative Mending: Beautiful Darning, Patching and Stitching Techniques by Hikaru Noguchi
Practicing
Practicing hones your skills and builds confidence. Practice on scrap fabric or the garments you use only at home before working on valuable clothing items.

Learning New Techniques
Lastly, learning expands your repertoire of mending techniques. Watch tutorials, read books, or attend workshops in your free time or when looking to improve your skills. These resources can be found on online platforms, local community centers, or craft stores offering classes.
Over to You

As we conclude our journey through “Visible Mending Ideas, Techniques & Inspiration,” we’ve traversed the landscape of mending from practical necessities to creative expressions. We’ve explored how visible mending transcends simple repairs, becoming a powerful statement against the disposable fashion culture, a celebration of sustainability, and a deeply personal reflection of our unique stories and styles.
Now, over to you. Armed with knowledge, inspiration, and a call to creative action, it’s your turn to embark on your visible mending journey. Whether it’s a small tear in your favorite jeans or a worn-out elbow in a cherished sweater, see each imperfection as a canvas for your creativity. Embrace visible mending not just as a technique but as a philosophy – a way to mend our relationship with our clothes, environment, and ourselves.
I invite you to pick up your needle and thread, choose a garment that speaks to you, and begin your visible mending project. Share your stories and creations, join the growing community of menders, and inspire others with your work. Remember, every stitch is a step towards a more sustainable and personal wardrobe. So, take this inspiration, these techniques, and make them your own. The thread of change is in your hands – how will you weave it into your world?
More about visible mending on this Blog

Hand embroidery for mending. Decorative mending techniques and stitches

Visible Mending Knitwear: A Creative and Sustainable Approach

Mending tools and materials. What you need to get started with visible mending
