

DIY a Perfect Gift For Your Mom: Mother’s Day Embroidery Ideas and Projects
A handmade gift says something a bought one simply cannot. It says, “I thought about you.” I set aside time for you. I made something with my hands, specifically for you.
Hand embroidery is one of the oldest ways to create and make gifts. Every stitch is a small, careful action, and the person who gets the finished piece can feel that, even if they can’t say why.
Embroidery is especially fitting for Mother’s Day because it offers so many options. You might embroider something for display, like wall art, or something practical, like a bookmark or a tote she’ll use daily. Projects can be quick or more involved, and each can be customized with her name, birth flower, or a design significant to your relationship.
In this post, you’ll find six Mother’s Day embroidery ideas – from a classic floral hoop to a hand embroidered card – each with links to tutorials and suggested patterns so you have everything you need to get started. Whether you’ve been embroidering for years or you’re picking up a needle for the first time, there’s something here for you.
The most important part of creating a meaningful Mother’s Day gift is choosing a project that suits your mom and making it thoughtfully. The care and intention behind your handmade work are what make the gift special.
Hand Embroidered Floral Hoop Art


Framed hoop art is a classic gift to embroider for Mother’s Day. It is versatile and works with any home style. You can hang it on a wall, place it on a shelf, or lean it against a stack of books on a bedside table. And because you made it yourself, it carries something no shop-bought print ever could: your time, your hands, and your care.
Floral hoop art is one of the most beloved embroidery gift ideas for Mother’s Day – and for good reason. Flowers are endlessly versatile: you can go bold and lush with a full bloom wreath, delicate and minimalist with a single sprig of lavender, or personal and meaningful by embroidering her birth flower. Whatever you choose, the result is a piece she can keep and display for years.
What makes it such a good gift
Hoop art works as a Mother’s Day gift for almost any recipient, because it adapts so easily to the person you’re making it for. If your mum loves a maximalist, cottage-style home, fill the hoop with layered roses, daisies, and trailing greenery. If she prefers clean, modern interiors, a single botanical stem on natural linen will suit her perfectly. You can even personalize it further by adding her name or a short message in embroidered lettering — more on that below.
It’s also a gift that fits your skill level. A beginner can make something lovely with a few simple stitches. Someone with more experience can try shading, thread painting, or detailed 3D plant designs. The hoop is easy to work with, and the finished piece always looks intentional.
Choosing your design
Design it yourself. Sketch or trace a simple floral motif onto your fabric using a transfer pen and a light source. Single blooms, small bouquets, or a simple wreath shape all work beautifully in a round hoop. Make sure the design fits the hoop – for a 15–18 cm hoop, a design that fills about two-thirds of the space usually looks best.
Use a pattern or kit. If you want to skip the design and focus on stitching, an embroidery pattern or kit is a great place to start. Etsy offers many floral hoop art patterns and kits — from fabric with the design already printed to full kits with thread, a needle, and a hoop.


If you want to add a name, date, or short message to the hoop – a lovely touch for Mother’s Day – check out my tutorial on stitches for script lettering. It shows the best stitches for smooth text and includes a free sample so you can practice before starting your final piece.
Finishing and presenting the hoop
Once your embroidery is complete, there are a couple of ways to finish it:
Frame it in the hoop. This is the easiest and most popular way. Add a ribbon loop at the top, and it’s ready to hang. In my blog post “How to Frame Embroidery in a Hoop: Six Methods of finishing the back of the hoop,” you’ll find different ways to frame your embroidery, cover the back, and add a personal touch to your gift.
Use special display frames for hoop art. If you feel that your hand embroidery deserves more than a simple hoop, explore specialized frames for displaying hoop art. From simple wooden frames to impressive, colorful displays, these frames will adapt to any interior style.


For gifting, wrap the hoop in tissue paper, and tie it with ribbon for a simple, beautiful look. If you’re giving it as a surprise, a small gift tag is all it needs.
Personalized embroidered handkerchief – small, intimate, and made to last
Some gifts feel truly personal – not because they cost a lot or are fancy, but because they show you thought about the person getting them. An embroidered handkerchief is just that kind of gift. It’s small enough to carry in a pocket or purse, pretty enough to keep in a drawer for years, and personal enough to use on special days.
Handkerchiefs have a long history in embroidery. In many European cultures, an embroidered handkerchief was one of the most meaningful gifts someone could give—and it still is today. What makes this gift great for Mother’s Day is precisely its intimacy. You’re not giving something to hang on a wall; you’re giving something she can hold in her hands.
What to embroider on it
This is where the gift becomes truly hers. A few ideas, depending on how much time you have and how well you know her taste:
Monogram or initials. A classic and always elegant choice. A single initial stitched with satin stitch in the corner of the handkerchief is one of the most timeless embroidery traditions. You can keep it simple with clean, straight letters or choose a fancy script style. My tutorial on stitches for script lettering shows you which stitches work best for smooth, beautiful text.
Her birth flower. Each month has a traditional birth flower, and stitching it on a handkerchief is a quietly personal touch that many find surprisingly meaningful. January’s snowdrop, May’s lily of the valley, September’s aster – a small, delicate design in one corner is all you need.
A small, meaningful motif. It doesn’t have to be a flower. A tiny bee, a sprig of her favorite herb, a heart, a small star — whatever feels like her. Keep the design small and placed in one corner for a classic, refined look.
Initials plus a motif. Combine both for something that feels complete and considered. A small floral spray framing a monogram, for example, is a stunning result and more achievable than it looks.
Choosing the right handkerchief
The fabric matters more here than in most embroidery projects because a handkerchief needs to be soft, washable, and comfortable against the skin.
Linen is the traditional choice. It has a beautiful natural texture, holds stitches well, and softens with every wash. Look for a finely woven linen in white, ivory, or a soft natural color.
Cotton lawn or batiste is softer and more delicate, with a finer weave, making it great for a more elegant, feminine look.
You can stitch on a ready-made handkerchief. It saves time and has clean, finished edges. Or you can cut and hem your own from good linen. This gives you more control over size and fabric quality and lets you finish the edges with a pretty Hem Stitch.


A note on scale
The biggest mistake when embroidering a handkerchief is making the design too big. Handkerchiefs are small, so the embroidery should be in balance — a quiet detail, not a bold statement. For a standard handkerchief (about 30 × 30 cm), a corner design of 4–6 cm usually looks just right. Don’t fill too much space; keeping it simple makes the gift feel elegant.
Finishing and presenting it
If you made your own handkerchief, finish the edges with a neat hem stitch – it’s both functional and beautiful, and keeps everything looking handmade in the best way.
To present it, fold the finished handkerchief into quarters and put it in a small envelope or wrap it in tissue paper. Adding a sprig of dried lavender is a nice touch. Or roll it up and tie it with a thin satin ribbon – simple, elegant, and ready to give.
Embroidered tote bag – a gift she’ll use every single day

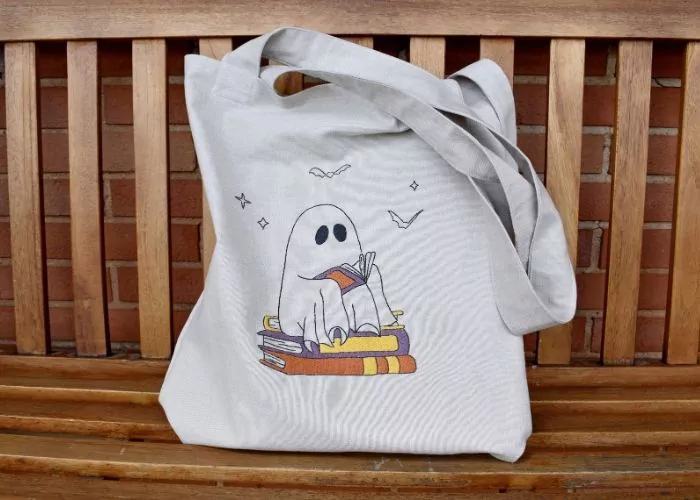
Some gifts are pretty but stay in a drawer. An embroidered tote bag is not like that. It goes to the market, the library, the beach, and the farmers’ market on Saturday mornings. Every time she uses it, she’ll think of you – and people will ask where she got it.
That’s the particular pleasure of this gift. It lives in the world rather than on a wall, and it carries your work with it wherever it goes.
Embroidering a tote bag is also one of the most rewarding projects because it looks impressive even with simple stitching. A bold flower design in the center of a natural canvas tote, or a name in elegant script at the bottom – either can be finished in a weekend and look like something from a boutique costing four times as much.
Choosing your design
The design you choose will shape the whole feel of the finished bag, so it’s worth spending a few minutes thinking about what suits the person you’re making it for.
A botanical or floral motif
Flowers and vegetables are the most versatile choices for a tote bag. A single big flower — like a peony, poppy, or sunflower — in the center of the bag makes a bold, confident statement. A trailing branch of leaves and berries feels softer and autumn-like. A loose wreath looks great if you want something festive and full. Different vegetables are also a good choice for a shopping bag.
Her name or initials
Lettering on a tote bag looks clean and modern, feeling personal without being fancy. A name in flowing script, centered on the front, is simple and elegant.
Check out the blog post “Hand Embroidered Monograms – The Best Way To Personalize Gifts” for inspiration and monogram patterns in various styles, or use your hand drawing to create truly personal lettering.
A favorite quote or short phrase
Something that means a lot to her – a line from a book she loves, a word in another language, a small private joke between you two. Keep it short and pick a stitch that stands out: stem stitch for a fine, elegant line, or chain stitch for something bolder.
Here are some design options to consider:


Choosing the right tote bag
Not all tote bags are good for hand embroidery, and the fabric greatly affects how your stitching looks and feels.
Natural canvas is the best choice. It’s firm enough to hold stitches well, easy to sew through, and has a warm, natural feel that suits embroidery. Look for medium-weight canvas (about 8–10 oz). It’s heavy enough to keep its shape but light enough to sew comfortably.
Linen tote bags are a more elegant choice. The weave is finer, the fabric drapes more softly, and the result looks stylish and artisan. They’re a bit harder to work on because linen can shift more than canvas, but the result is worth it.
Avoid bags that are shiny, heavily coated, or made of synthetic materials. These are hard to sew through, and the thread doesn’t lie as neatly on the surface.
If you buy a ready-made tote to embroider, choose one with a flat front panel big enough for your design. A bag about 35 × 40 cm gives you enough space to work. If you plan to sew your own tote, consider patterns with interior pockets or zippers for more comfortable use.
Here are some good options:


Scale and placement
Because a tote bag is larger than a hoop or a handkerchief, placement and scale matter more. A motif that’s too small will look lost on a big expanse of canvas. The design that’s slightly larger than feels comfortable on paper will often look exactly right on the finished bag.
As a general rule, for a standard tote bag front, a centered design 12–18 cm wide usually works best. If you add lettering, place it in the lower third of the front panel – this keeps the design visible even when the bag is full and rounded.
Finishing and presenting it
After stitching, wash the bag to remove any pattern marks, and gently press the embroidery from the back (always face down on a folded towel to protect the stitches). If this is your first project, you might want to read “How to clean pattern transfer marks from fabric” for more guidance and tips.
A finished embroidered tote needs little packaging – the bag is the wrapping. Fill it with small things she’ll like: favorite chocolate, nice soap, a small plant cutting, or a handwritten note. The gift becomes the container, and the container becomes the gift.
Embroidered bookmark – a small gift with a lot of heart


Some of the most loved gifts fit in the palm of your hand. An embroidered bookmark is just that! It’s small, carefully made, and used so often it becomes part of her daily routine. Every time she reads, it’s there.
What makes a bookmark a great embroidery gift is the combination of intimacy and usefulness. It isn’t decorative in the way of hoop art – it has a purpose. But because you made it by hand, it has a warmth no printed bookmark can match. For a mom who reads, this is one of the most personal gifts you can give.
It’s also a project that’s very enjoyable to make. The small size encourages you to slow down, work carefully, and notice details you might miss on bigger projects. The result is often some of the best embroidery people make because the size requires it.
Bookmark styles to consider
There are more types of embroidered bookmarks than you might think. Before choosing a design, it’s good to think about which style fits your skills and her reading habits.
Corner bookmarks slip over the corner of a page rather than sitting flat between the pages. They’re satisfying to make and delightful to use — and because they grip the page, they never fall out when the book is closed. I have a full tutorial on my blog that walks you through making a hand-embroidered corner bookmark from start to finish, including embroidery and finishing.
Magnetic bookmarks are another great choice, especially for paperback readers. Two small magnets clip gently over the page and hold it firmly without hurting the book. My DIY magnetic bookmark tutorial shows you how to make one with an embroidered front — it’s a quick and satisfying project.
Flat ribbon or linen bookmarks are the most traditional type — a long, narrow strip of fabric or ribbon with embroidery along it. They’re simple to make, easy to personalize, and look beautiful when finished with a tassel or tied end.
Choosing your design
The small format of a bookmark is one of its great pleasures as an embroidery project, but it does require careful consideration of scale. Every element needs to earn its place.
Floral motifs work beautifully on bookmarks. A single bloom, a small bunch of flowers, or a sprig of her favorite herb. Keep the design tight and leave space around it. Check out my Beginner Flower Embroidery and Six Bullion Stitch Flowers tutorials for ideas and free patterns.
Initials or a short word. A single embroidered initial has a quiet elegance that never dates. A meaningful word – read, dream, her name – worked in fine stem stitch or split stitch can be the whole design, and it’s all the better for that restraint.
If you prefer to use a ready-made design, there are beautiful bookmark embroidery patterns on Etsy that save you the planning and let you start stitching right away.


A note on working small
If you haven’t embroidered small projects before, know that it takes more time than you think – not because it’s big, but because the work is precise. Small stitches need more care than big ones, and it’s best not to rush. Give yourself a quiet evening, good light, and no distractions. The result will show it.
The second thing to know is that finishing is just as important as the stitching. A beautifully stitched bookmark with rough or uneven edges loses some charm. Take as much care with the construction as you do with stitching, and the finished piece will feel truly handmade. Both tutorials above – the corner and magnetic bookmarks – include detailed finishing steps showing how to sew with the Blanket Stitch, so you won’t have to guess.
Presenting it
A bookmark needs very little wrapping to feel special. Wrap it in a small piece of tissue paper or slip it between the pages of a book you’re giving her. To make the gift feel more complete, tuck it inside a nice edition of a book she’s wanted to read. This way, the bookmark becomes part of the gift, and she can start enjoying it right away.
Embroidered pouches and sachets


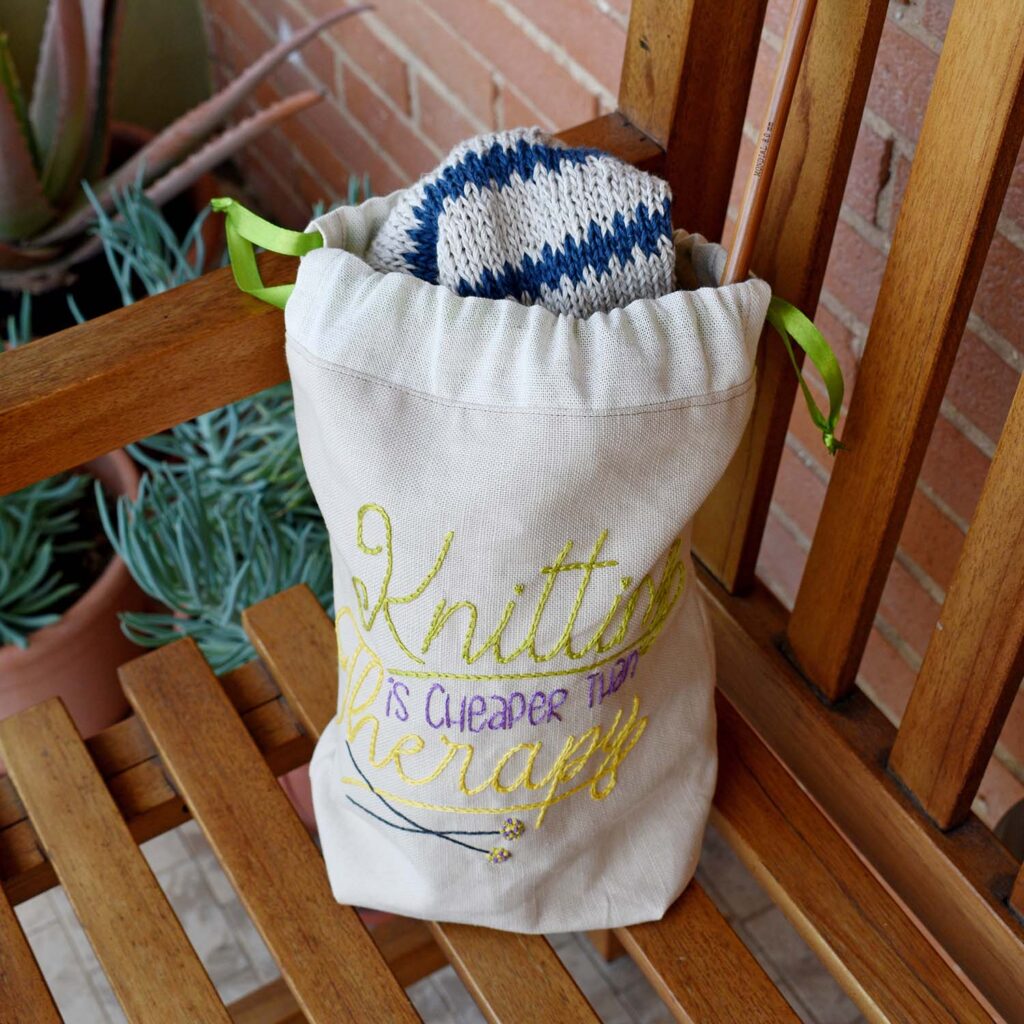
An embroidered pouch, sachet, or project bag is the kind of gift that sits quietly in a drawer, on a bedside table, or in a closet — and every time she sees it, it gives her a small, simple moment of joy.
What makes this gift great for Mother’s Day is its layers. The embroidery is the gift, but the item is also useful, and you can fill it with something special: dried lavender to make a scented sachet, some small chocolates, or a piece of jewelry. The pouch is both the wrapping and the gift, and that mix of handmade beauty and practical thoughtfulness is hard to beat. A project bag can hold her knitting, crochet, or other crafts.
It’s also a very flexible project. A small lavender sachet is an easy, gentle project for a beginner. A fully lined zippered pouch with detailed embroidery on the front is a bigger project that an experienced stitcher will really enjoy. Both are beautiful. Both are gifts she’ll keep.
Various directions to take this gift
Before you start, it helps to think about which style fits the person you’re making it for — and how much time you have.
Sachets
These are small, flat pouches you can use as gift packages or scented bags. The embroidery is on the front, usually a small, delicate design that matches what’s inside: a sprig of lavender, a small rose, a bee, or a simple flower border.
To make a scented gift, fill it with dried plants – usually lavender, but also rose petals or chamomile. They can be left open at the top with a ribbon tie or sewn closed with a loop for hanging in a closet. I have a full tutorial on the blog that shows you how to make scented sachets with flower embroidery from start to finish. It includes a free flower embroidery design, how to make it, and how to fill and close it nicely.
Zippered pouches
It can be a useful cosmetic bag, pencil case, or general pouch with embroidery on the outside. This gives you a bigger space to work on, and the finished item is something she can use every day. A pouch like this, filled with small treats – nice hand cream, favorite lip balm, a small notebook – becomes a thoughtful gift that feels both personal and useful.
My tutorial on making a hand-embroidered zippered pouch from fabric scraps covers the whole process and has the extra benefit of being a truly eco-friendly project — a nice quality for a Mother’s Day gift.
Project bags
Another embroidery option is project bags for knitting, crochet, or other crafts. If your mom likes crafting, stitch something fun and useful for her to use every day. For example, I use my Knitting Is Cheaper Than Therapy project bag whenever I take my knitting on road trips.
Embroidery and swing patterns to consider:


The gift-within-a-gift
This is worth dwelling on for a moment, because it’s what makes the pouch or sachet format so particularly well suited to Mother’s Day.
A finished sachet in a small box with fresh lavender and a handwritten note is a complete, thoughtful gift. A finished zippered pouch filled with things she loves – her favorite hand cream, a nice chocolate bar, a small notebook – becomes something she’ll remember. The embroidery shows you made it by hand. What’s inside shows you know her.
That combination – the handmade and the personal, the beautiful and the useful – is what turns a craft project into a gift that genuinely matters.
Presenting it
Sachets look nice displayed openly, rather than wrapped, in a small ceramic dish, wooden bowl, or shallow basket with some dried flowers. If you want to wrap it, a square of tissue paper loosely tied with linen twine is enough.
A zippered pouch is best presented filled. Nestle the contents inside, zip it closed, and either leave it as it is – it’s already beautiful – or wrap the whole thing in a square of tissue and tie it with ribbon. A small tag noting what’s inside is a nice touch, especially if the filling includes something with a scent.
Embroidered card – when the card itself is the gift


Most Mother’s Day cards are read once, smiled at, and then recycled. An embroidered card is kept. It goes on the mantel, leans against the bedroom mirror, or ends up in a box of things too special to throw away. It is, quite simply, a card she’ll keep.
The beauty of an embroidered card as a gift is how much it gives for so little. No building, no sewing, no lining or finishing. Just a piece of card with holes punched, a needle, some thread, and your own hands. The result looks much more impressive than it seems, which is one of the quiet joys of this craft.
It’s also the easiest project on this list. Someone who has never used an embroidery needle can make a truly beautiful embroidered card in one evening. And someone with lots of stitching experience can make it intricate and special. The format can be as simple or complex as you like.
What you can create
The range of designs possible on an embroidered card is broader than most people expect. Simple geometric patterns – stars, hearts, sunbursts – translate perfectly into the punched-hole format and give a graphic, modern result. Floral motifs work beautifully too, especially delicate outlines and simple shapes. Text is another strong option: short words or initials that carry the whole emotional weight of the card in just a few stitches.
The technique is straightforward: a design is transferred onto a card, holes are punched along the lines with a needle or awl, and thread is then stitched through the holes to recreate the design. The back of the card is usually covered with a second layer of paper for a clean finish, and the result is a card that is also, unmistakably, a small work of art.
For a full walk through of the technique and design ideas, my tutorial on hand embroidered cards covers everything you need to get started — including how to transfer designs, which threads and cards work best, and how to finish the back neatly.
If you’d like to work from a ready-made design, there are some lovely embroidery on paper patterns available on Etsy that take all the planning out of the process and let you focus entirely on the stitching.


Why does it work so well as a Mother’s Day gift?
An embroidered card does something none of the other gifts do so clearly: it says, without doubt, “I made this for you.” There’s no product inside, no filling, nothing bought. It is completely and clearly handmade, and that honesty is part of what makes it so touching to get.
It also pairs beautifully with any of the other projects in this post. An embroidered card alongside a handkerchief, a bookmark, or a small sachet turns a single handmade gift into a set – and a set feels like a considered, generous gesture in a way that one item alone sometimes doesn’t.
Give it on its own or alongside something else. Either way, it won’t end up in the recycling.
Make something with your hands this Mother’s Day
There’s a reason handmade gifts are remembered long after bought ones are forgotten. They carry something intangible – a quality of attention, of care, of time given freely. A hand-embroidered gift, however small, communicates all of that without a single word.
Whether you stitch a flower hoop to hang on her wall, embroider her initials on a linen handkerchief, or make her a card she’ll keep on the mantel for years, the meaning is the same. You made something. For her. And she will know it.
If you don’t know where to start, pick one of the Mother’s Day embroidery ideas that feels easiest and begin there. A finished bookmark made with care is worth much more than a big hoop left unfinished. Start small, stitch slowly, and trust the process.
I’d love to know which project you’re working on this year – leave a comment below and tell me. And if you share your finished piece or progress photos on Instagram, tag me so I can see it. There is nothing I enjoy more than seeing these projects made by real hands, for real people.
If you’d like more embroidery tutorials, project ideas, and practical guidance delivered straight to your inbox, you’re warmly welcome to join the Practical Embroidery newsletter.
Happy stitching – and happy Mother’s Day!
More gift making ideas on this Blog

Mini Hoop Pendant Tutorial + Free Heart Embroidery Pattern: Create Stunning Gifts!

Spice Up Your Kitchen With Veggie Embroidery: Tutorial & Free PDF Pattern Download

Hand Embroidered Corner Bookmark: A Step-by-Step Guide to Crafting a heartfelt gift for a book lover
