Beginner Flower Embroidery: Hand Embroidery Tutorial & Free PDF Pattern Download
In a fast-paced world, slowing down to thread a needle and try beginner flower embroidery can feel like an act of quiet rebellion. It invites focus, patience, and a bit of playfulness.
Floral designs are soft, familiar, and full of variety – each petal, each leaf, can be a little different and still look beautiful.
That’s why flower embroidery is the perfect starting point. It’s forgiving, expressive, and endlessly adaptable. Whether decorating garments or simply exploring the movement of thread through cloth, flowers offer a gentle way for beginners to bloom.
Beginner flower embroidery tutorial
This beginner flower embroidery tutorial is a perfect way to start learning hand embroidery. Floral designs are timeless, versatile, and ideal for practicing foundational stitches. Whether decorating clothes, creating wall art, or simply stitching for relaxation, flowers offer endless possibilities for creativity.
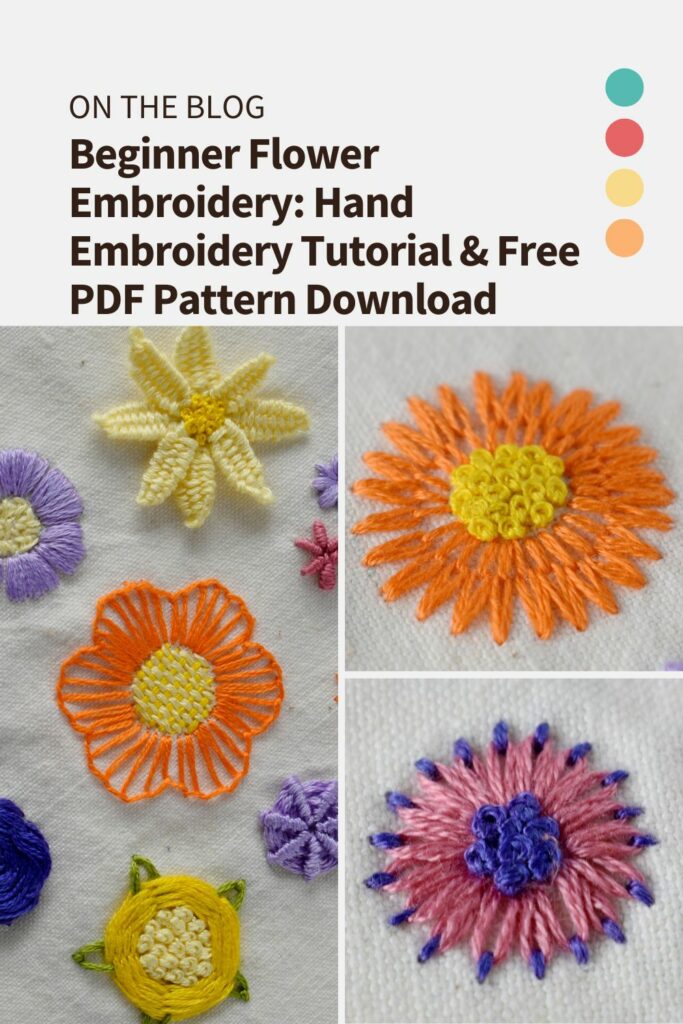
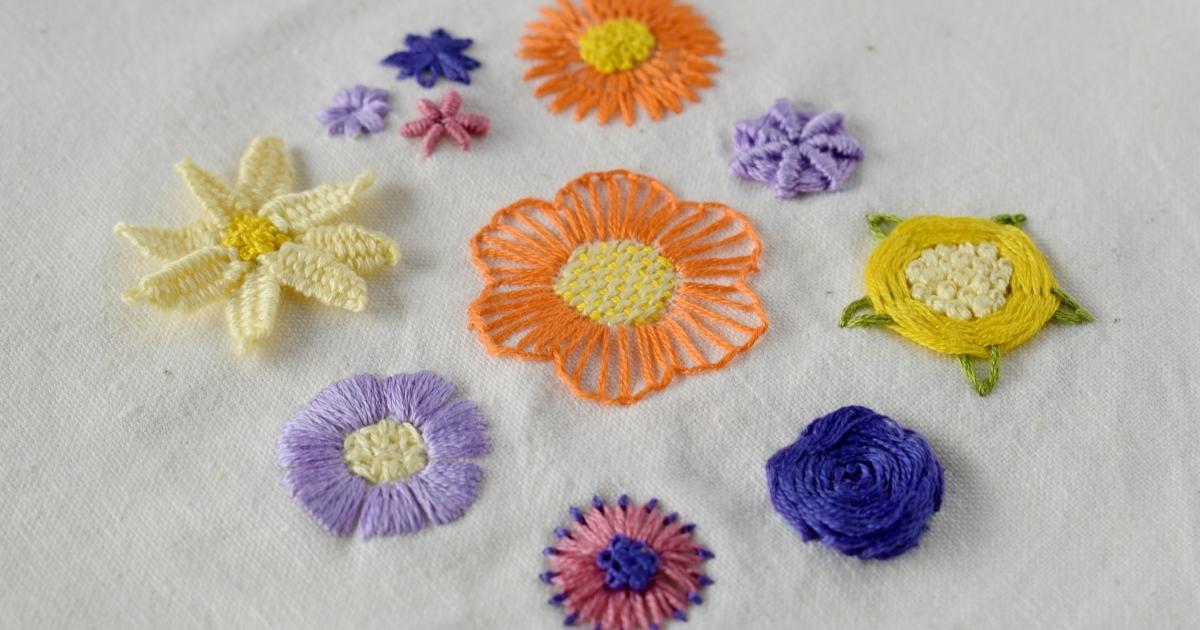
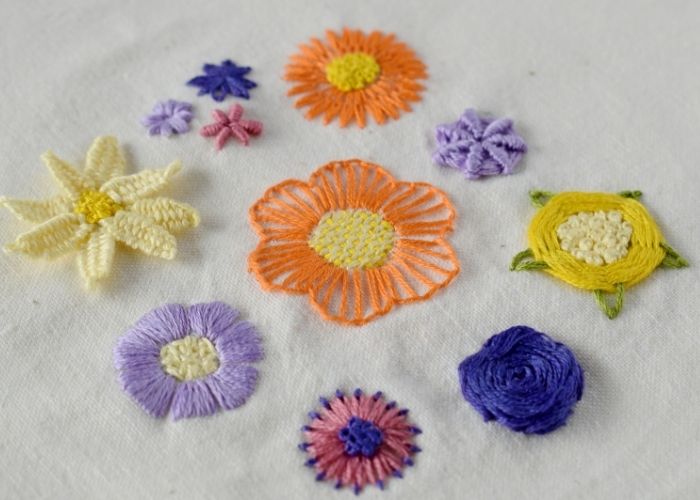
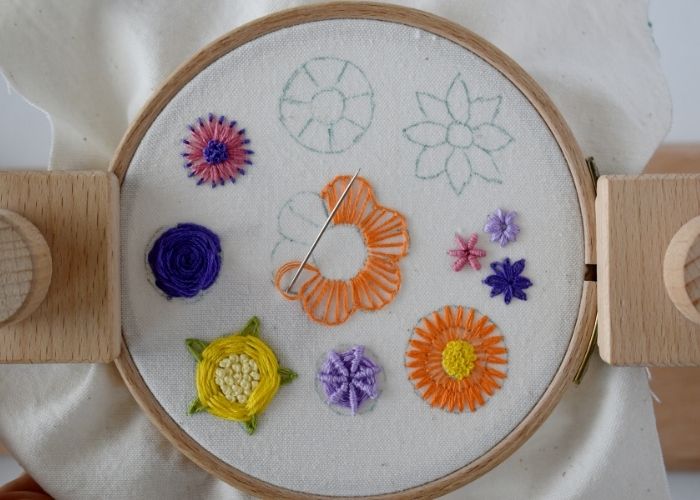
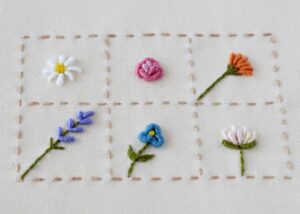
Use this step-by-step hand embroidery guide to explore eleven beginner-friendly ways to embroider flowers – from a basic Lazy Daisy to more textured designs like Bullion Knots and Woven Spider Wheels. Each motif introduces a different stitch or technique, helping to build confidence while creating beautiful results.
I’ve included a free Beginner Friendly Flower Embroidery Pattern into this tutorial, so you can follow along and stitch all the blooms with me!
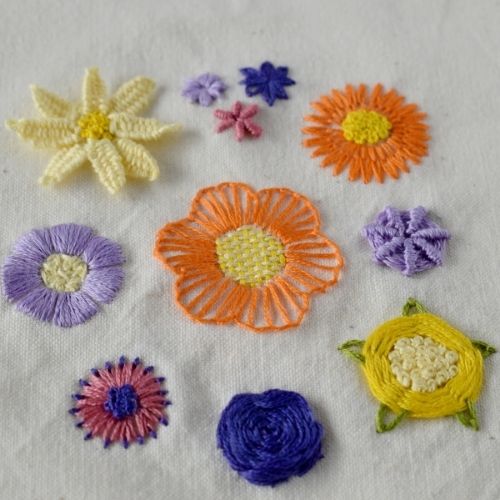
11 ways to embroider flowers
Step-by-step hand embroidery instructions for beginners
Tolls and materials
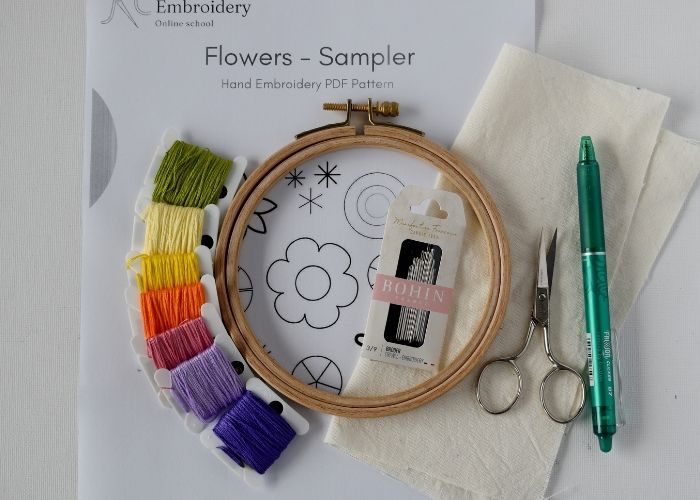
- Embroidery pattern. Download and print my Free Beginner Friendly Flower Embroidery Pattern.
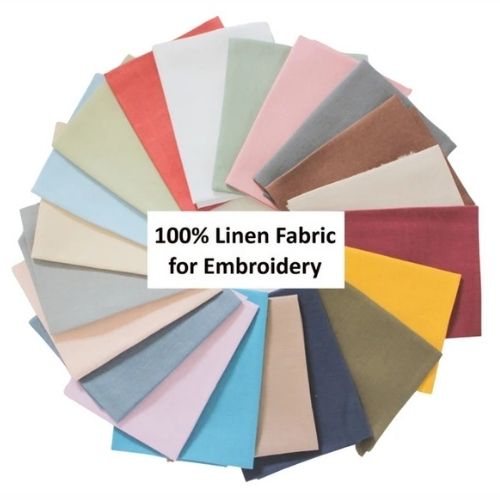
- Fabric. Use linen, cotton, or blended fabric with a high thread count.
- Embroidery hoop and hoop stand. I used a small 13 cm (5 inches) hoop and a tabletop hoop stand.
- Scissors.
- Embroidery needles.
- Friction pen for pattern transfer.
- Embroidery floss. I used bright-colored DMC embroidery floss.
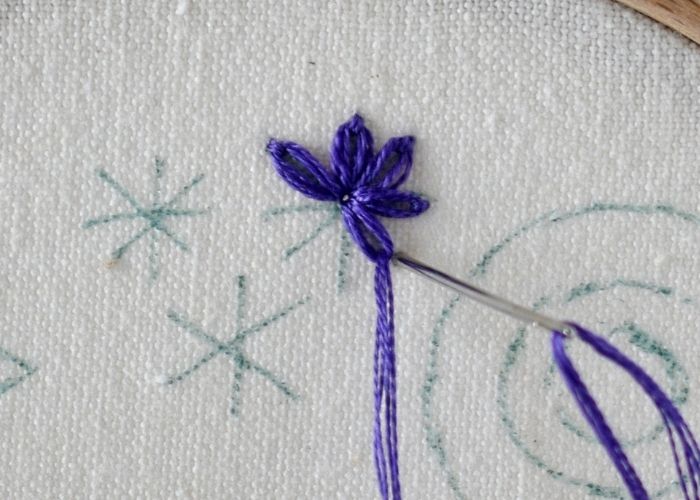
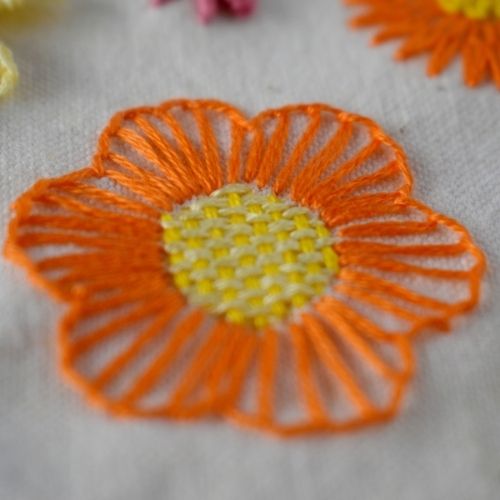
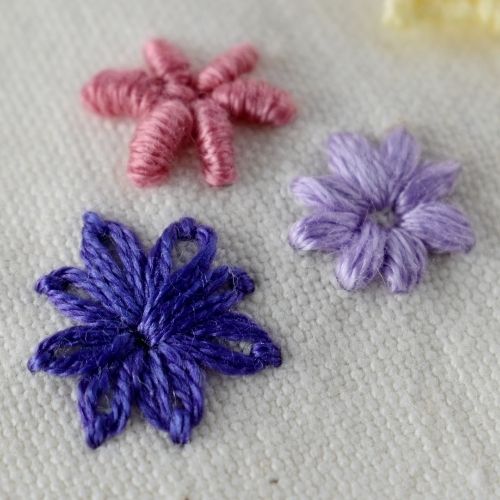
Flower embroidery with Lazy Daisy stitch
1. For this small floral motif, we will use the most basic Lazy Daisy stitch. Take the needle to the surface at the center of the shape and form a loop. Take the needle up to the surface inside the loop and pull through.
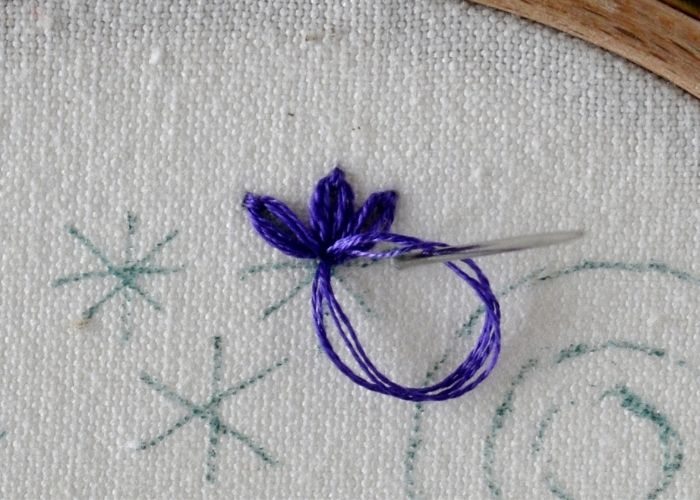
2. Anchor the loop with a tiny anchoring stitch.
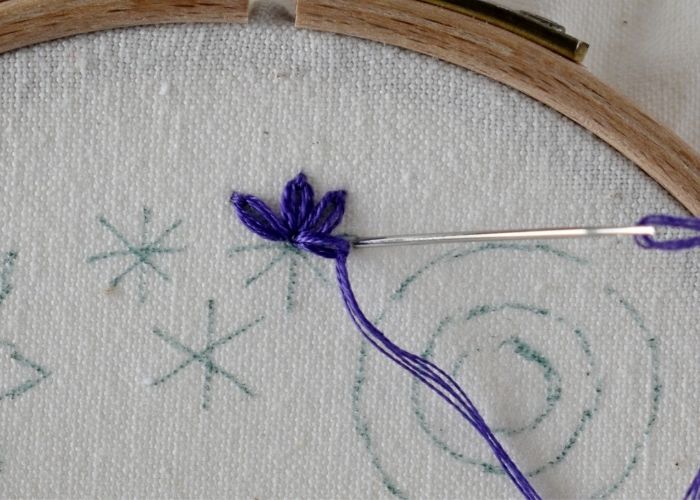
3. Add a Detached chain stitch on each spoke of the design.
Granitos stitch flower
1. Simple Granitos stitch is perfect for depicting tiny floral motifs. Start with a small straight stitch on one of the spokes of the design.
2. Add one more straight stitch above the first one.
3. Add the second, third, fourth, and fifth stitches above the first one. This will create a tiny raised petal.
4. Make clusters of five stitches for each petal.
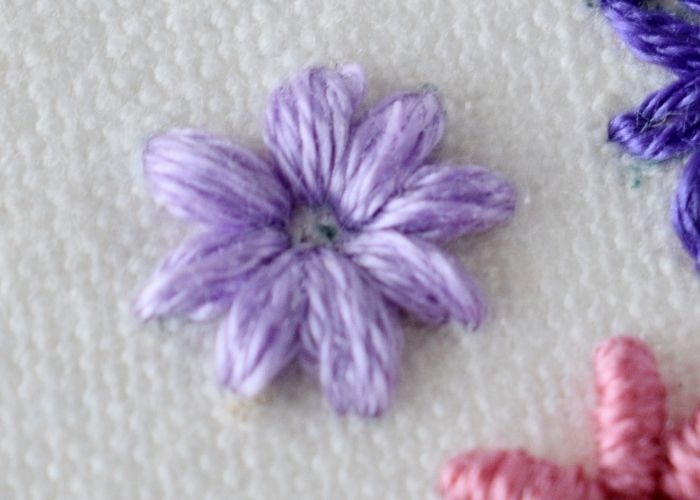
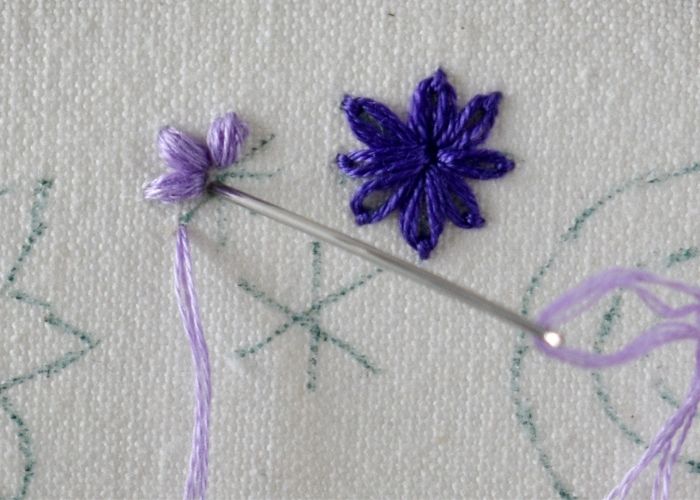
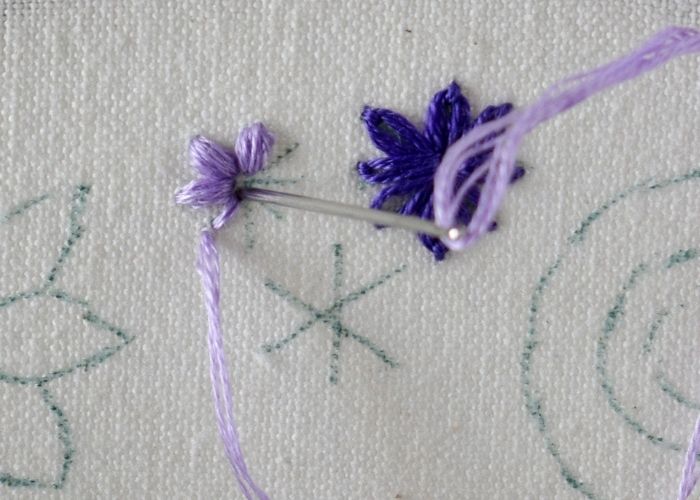
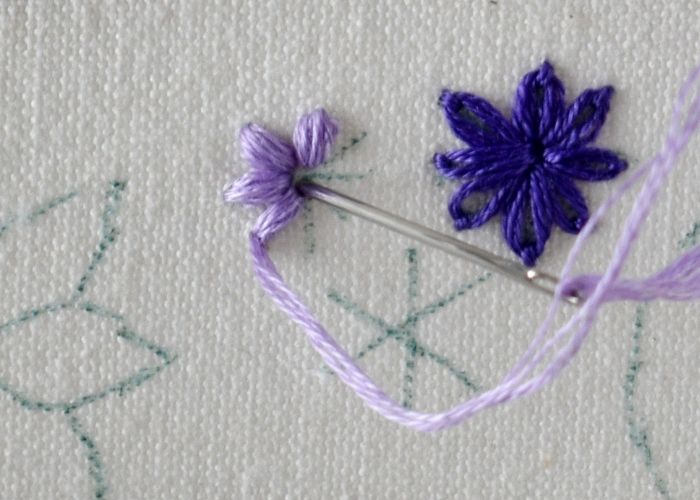
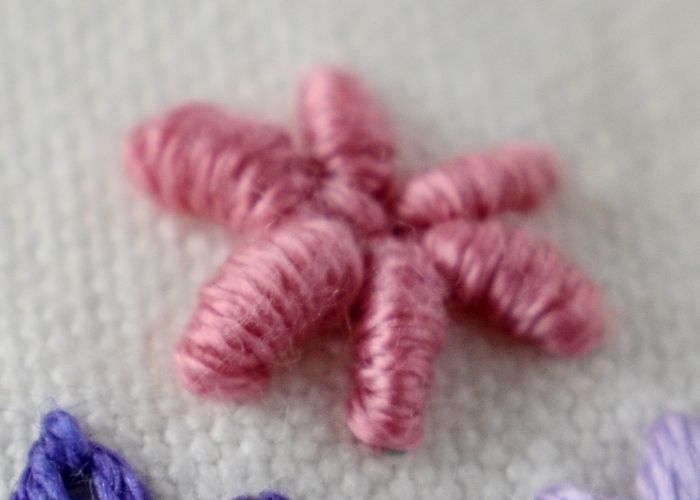
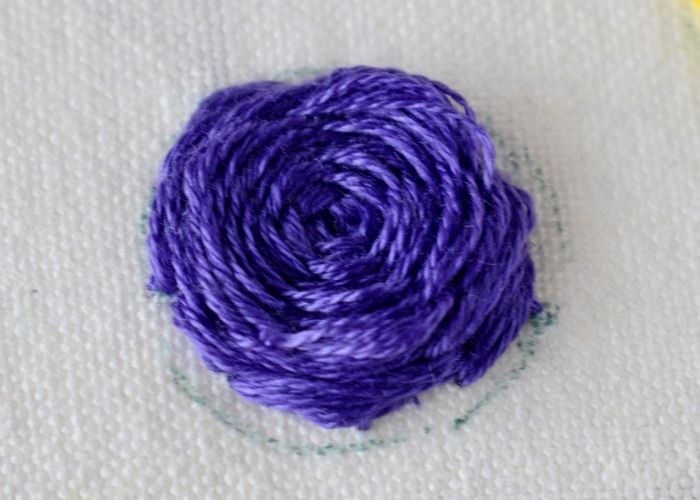
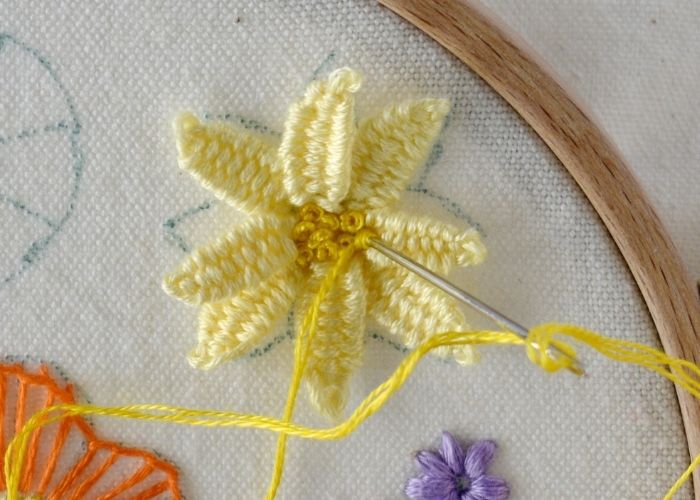
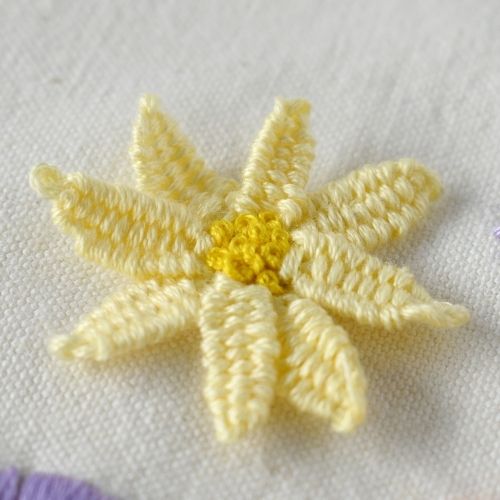
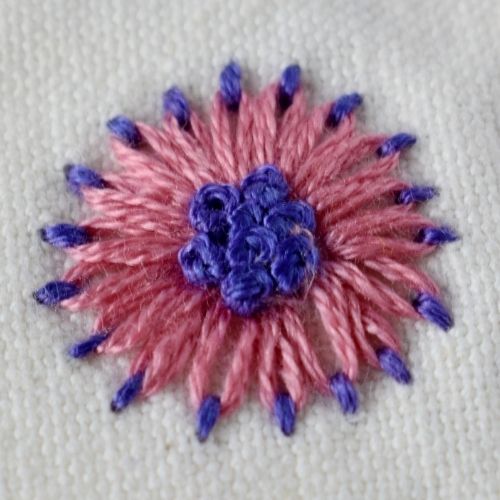
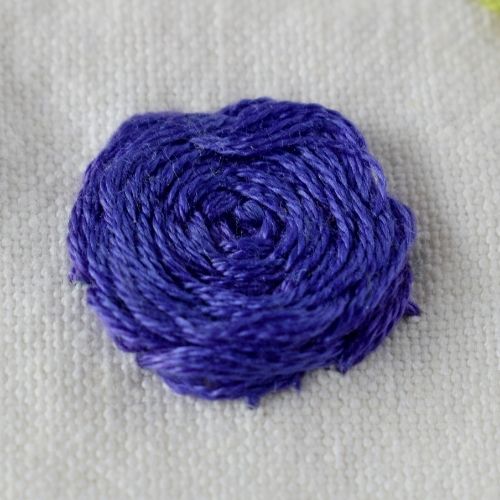
Bullion stitch flower
1. Bullion knot is a perfect technique for floral designs.
Make a straight stitch on one of the spokes. Do not pull the thread to the back side of the fabric, but leave a generous loop of the working thread on the surface. Take the needle up at the starting point. Do not pull the needle out of the fabric.
Wrap the thread of the loop around the needle. Push the spiral down to the base of the stitch and keep the tension of the thread. Adjust the spiral length to match the straight stitch you made.
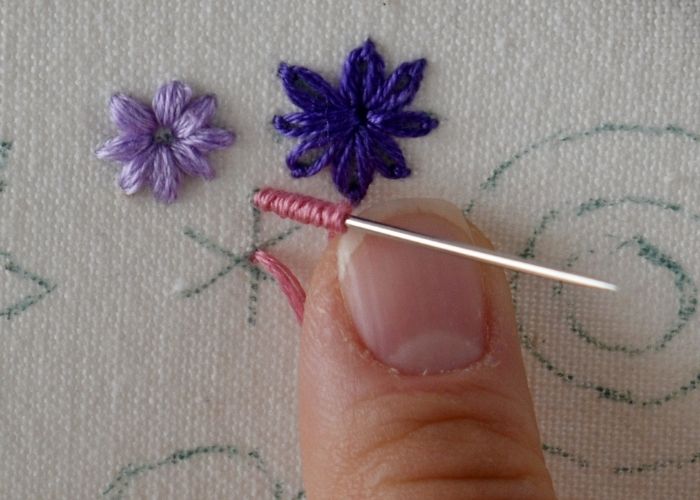
2. With two fingers of the left hand, hold the wrapped thread and, at the same time, pull the needle with the thread through the wraps. Wait to let the spiral until all the thread is on the front side. Take the needle down at the second point of the straight stitch.
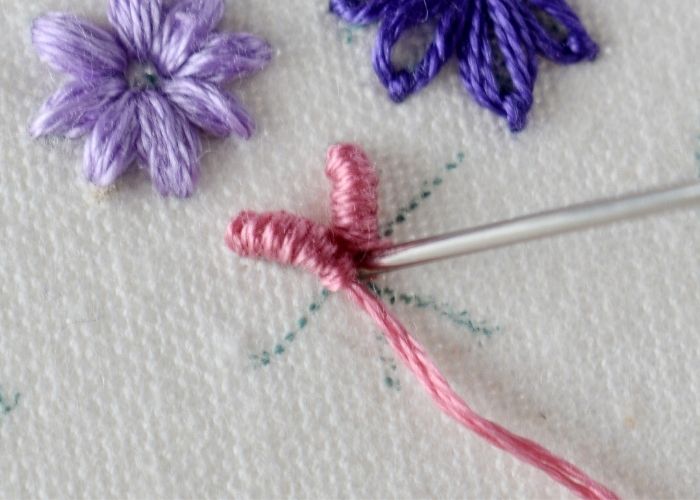
3. Make a Bullion knot for each petal of the design.
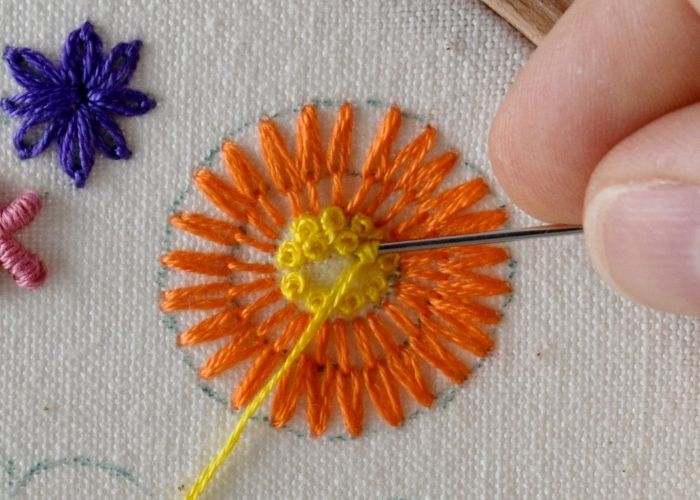
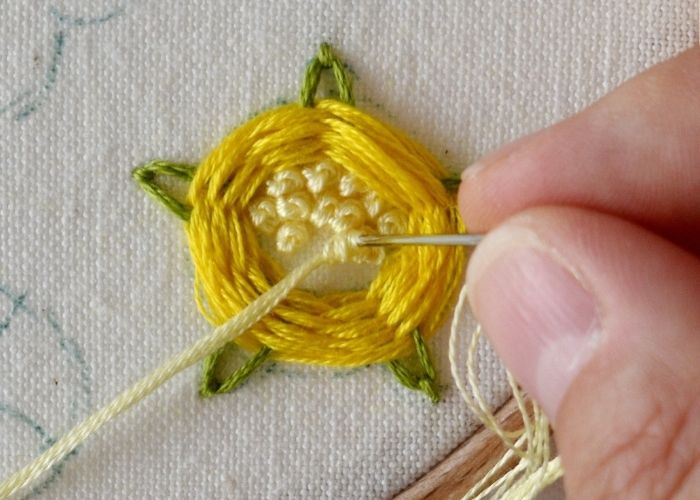
Beginner flower embroidery with Long-tailed chain stitch
1. Embroider Long-tailed Chain stitches positioned in the circle. Start with a loop.
2. Take the needle up inside the loop on the second line of the circle.
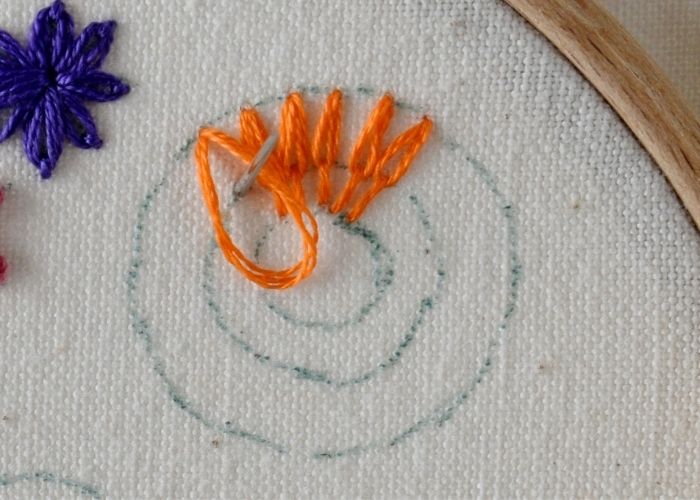
3. Make a long anchoring stitch that is positioned towards the center of the circle.
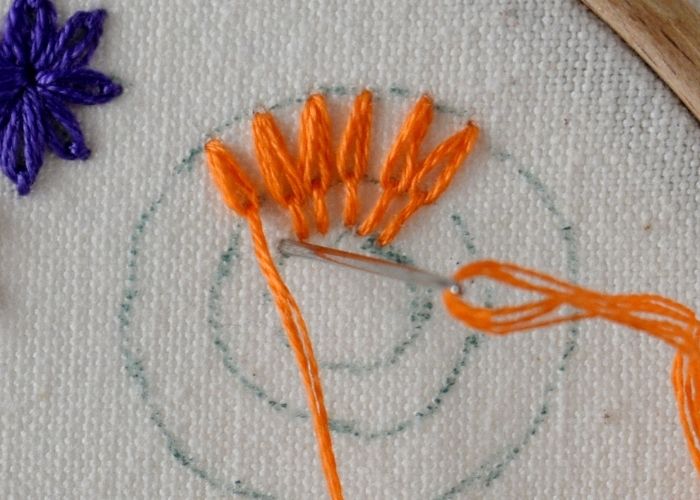
4. Fill the entire circle with long-tailed chain stitches.
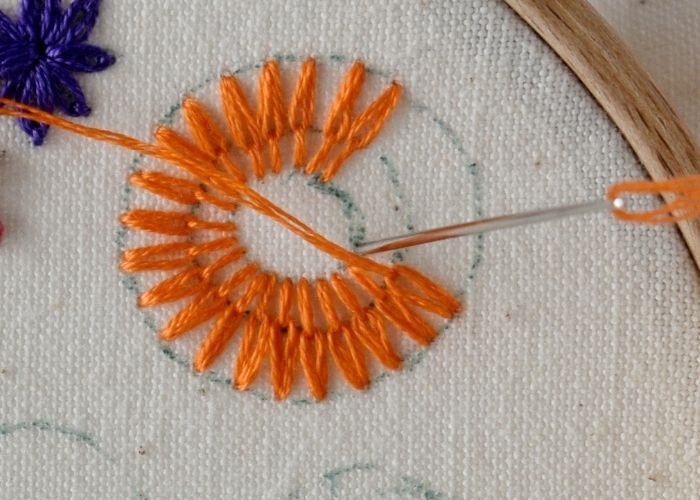
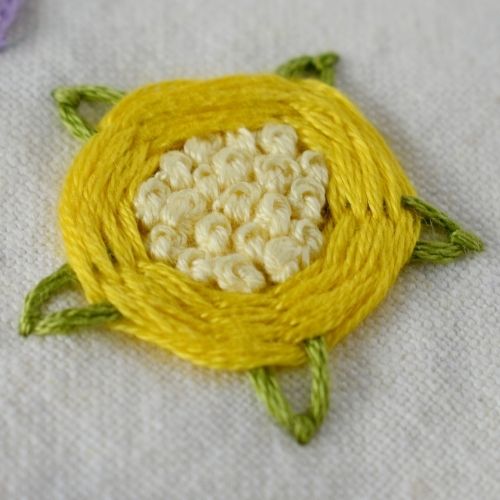
5. Embroider French knots to make a dense filling for the center of the flower.
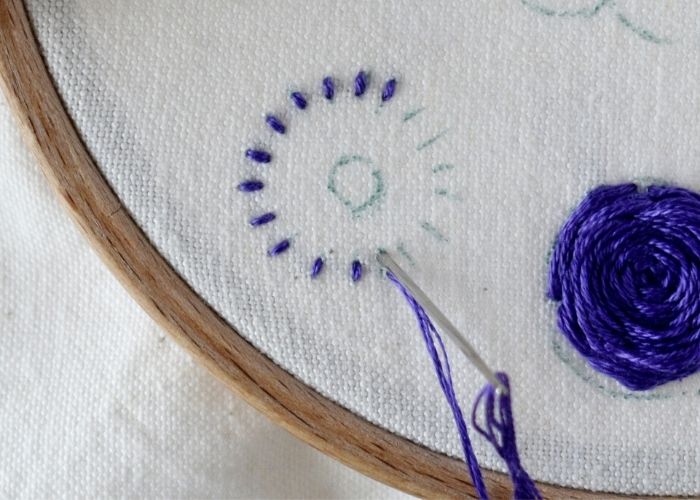
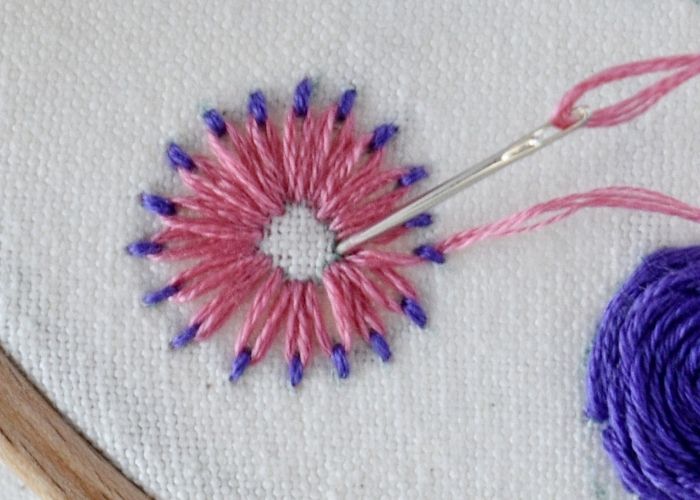
Whipped Spider wheel flower embroidery
- Whipped Spider Wheel stitch is a simple, yet gorgeous way to depict simple florals. Start with the spokes. For each spoke, make a Straight stitch towards the center of the wheel.
2. Take the needle to the surface close to the center of the circle and start whipping. To create a Whipped spider wheel stitch, pass the needle under the first and second spokes. Pull the thread to tighten the whipping stitch.
3. Then, pass the needle under the second and the third spoke. Pull the thread to tighten the whipping stitch.
4. Repeat these whipping stitches until all the spokes are wrapped with the thread.
5. Finally, pass the needle to the back of the fabric and secure it.
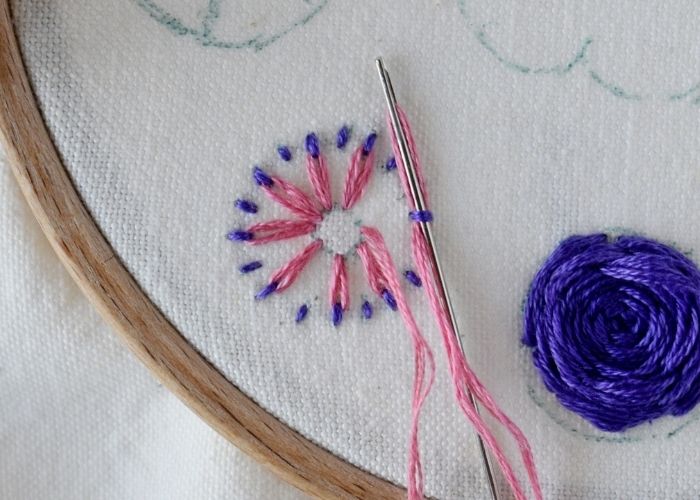
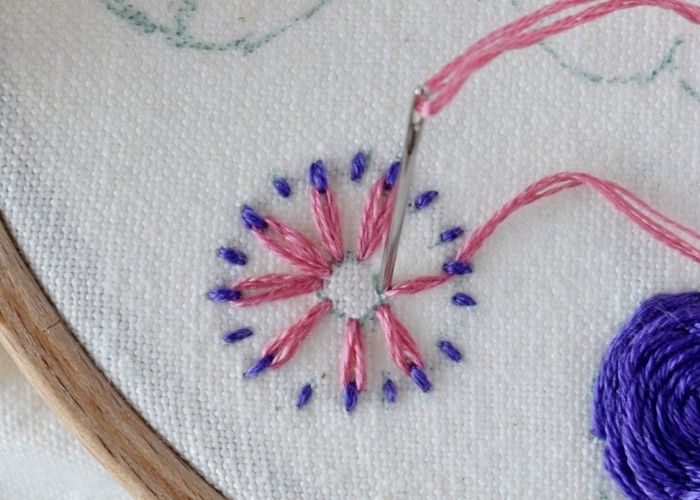
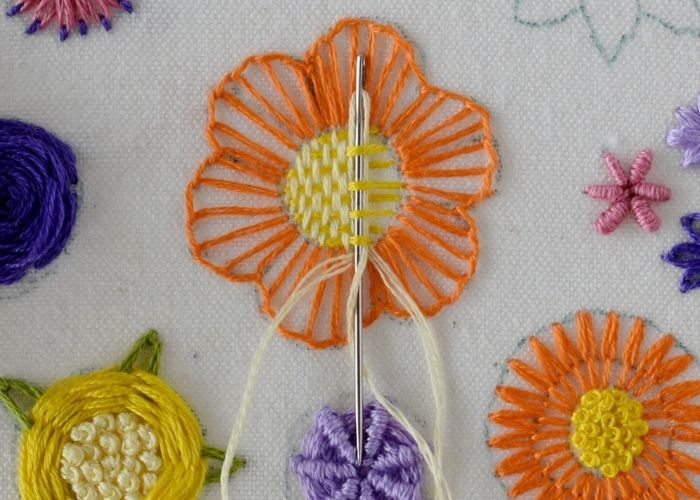
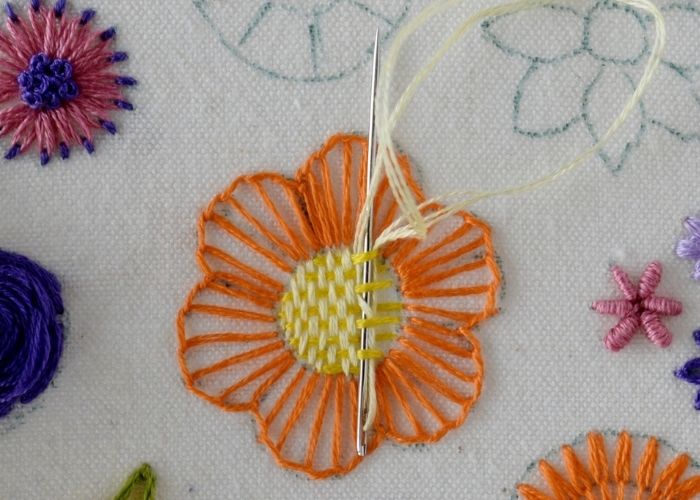
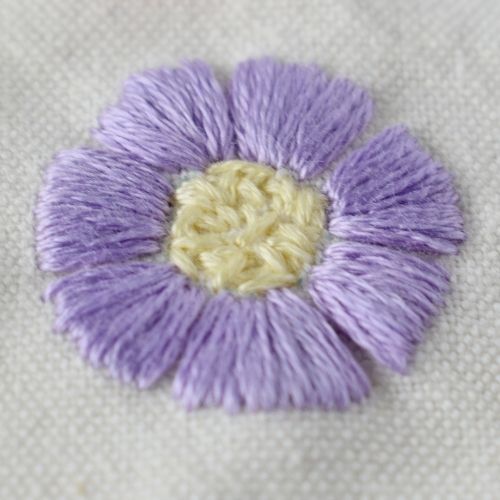
Beginner flower embroidery with Woven Wheel and Fly stitch
1. This simple floral design combines three stitches: Fly Stitch, Woven Spider wheel stitch and French knots.
Start with the leaves. Make a Fly stitch for each leaf. Take the needle at the base of the leaf and push it down on the other side, leaving a loop.
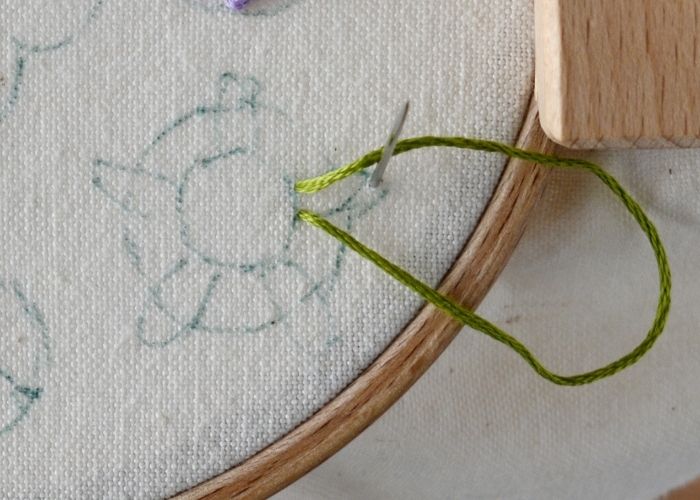
2. To secure the loop, take the needle to the surface at the tip of the leaf, tighten the loop, and secure it with a tiny anchoring stitch.
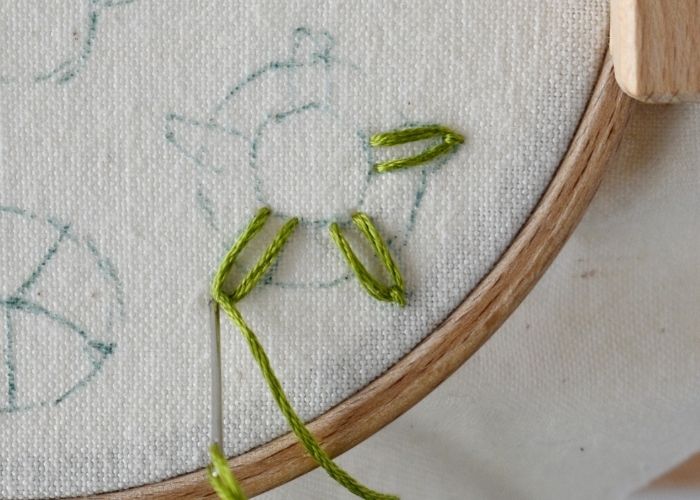
3. Take the thread to the surface and start weaving around the petals. Pass the needle above and under the stitches to create a Woven wheel stitch.
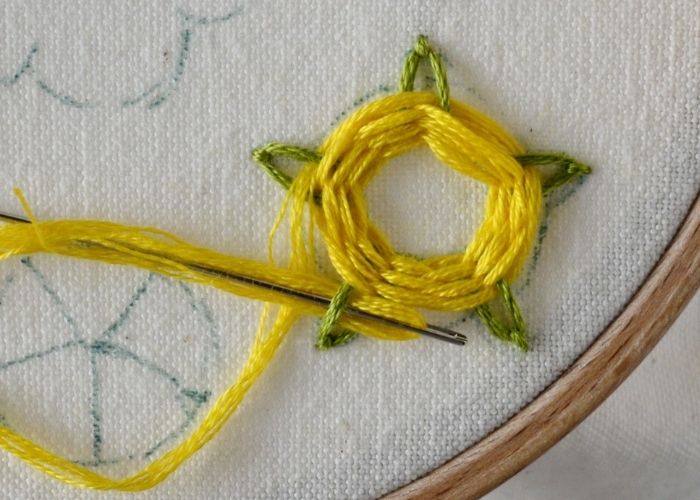
4. When all the weaving is done, push the needle to the back and secure the thread.

5. Fill the center of the flower with dense French knot stitches.
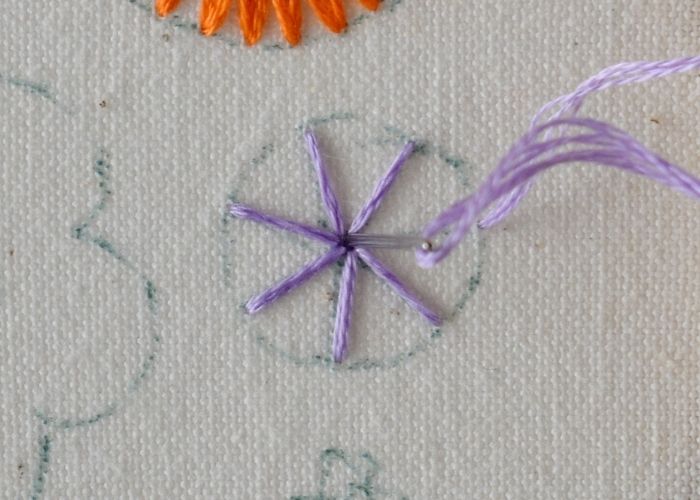
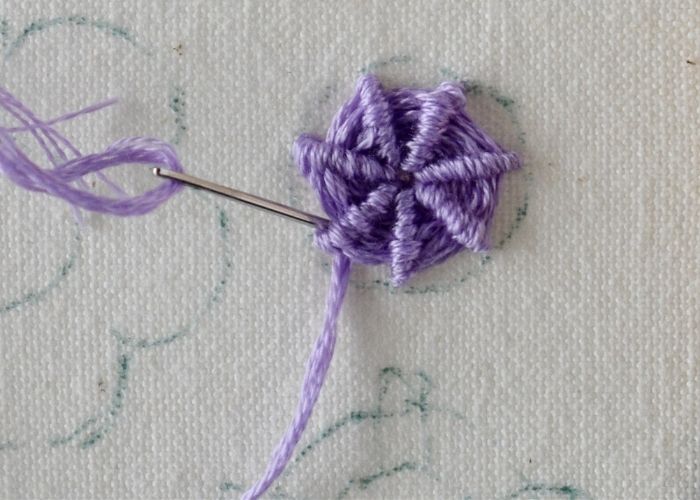
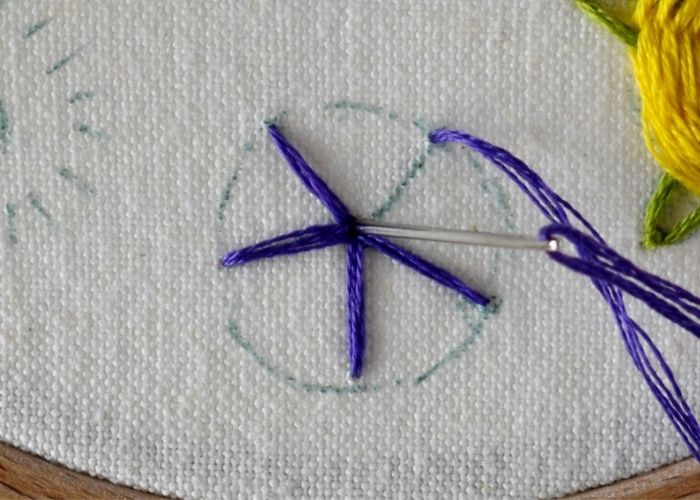
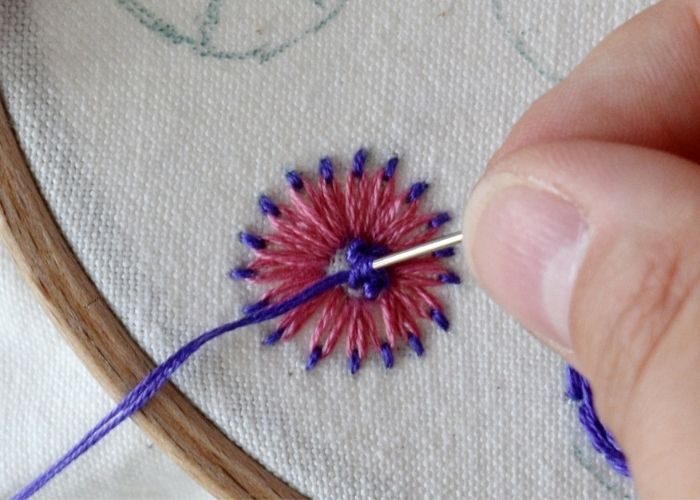
Woven Spider Wheel stitch flower
1. Woven Spider Wheel stitch is one of the easiest ways to stitch a simple flower with one embroidery technique.
First, embroider straight stitches to form a spoked wheel.
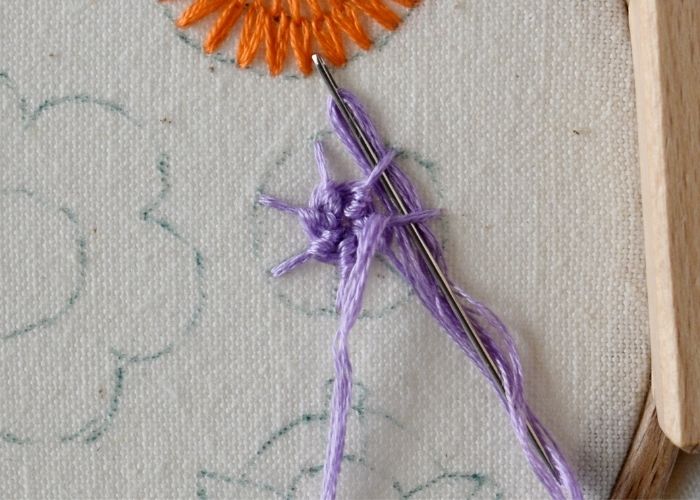
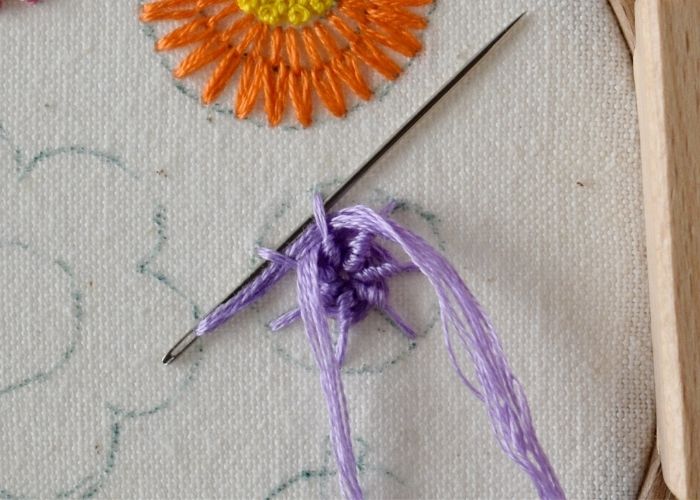
2. Take the needle up at the center and start weaving. Pass the needle under every second spoke. Pull all the thread. Continue weaving these stitches until all the spokes are covered with the thread. For weaving, you can use the back of the needle to avoid snagging the thread or the fabric.
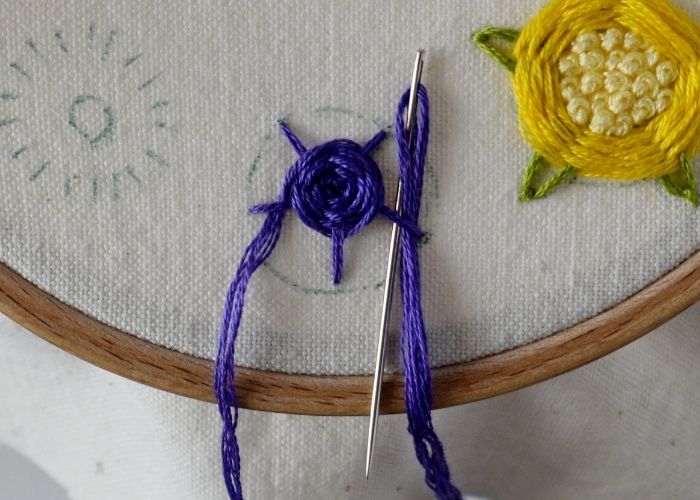
3. When the distance between spokes becomes too big, stop weaving but make long stitches that cover every second poke. This will create a more stable and dimensional flower.
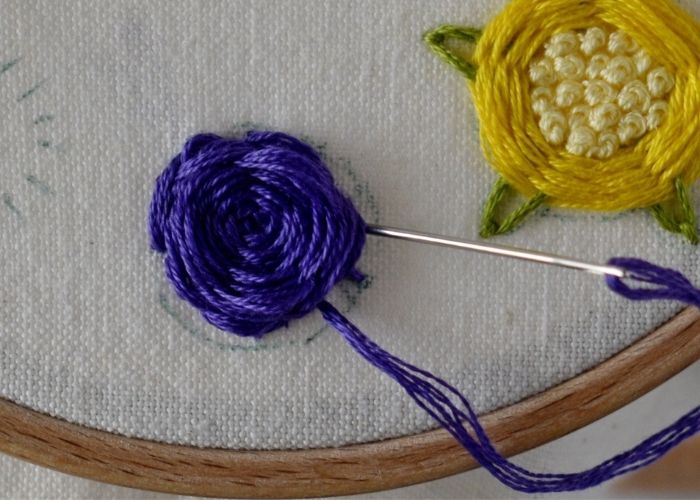
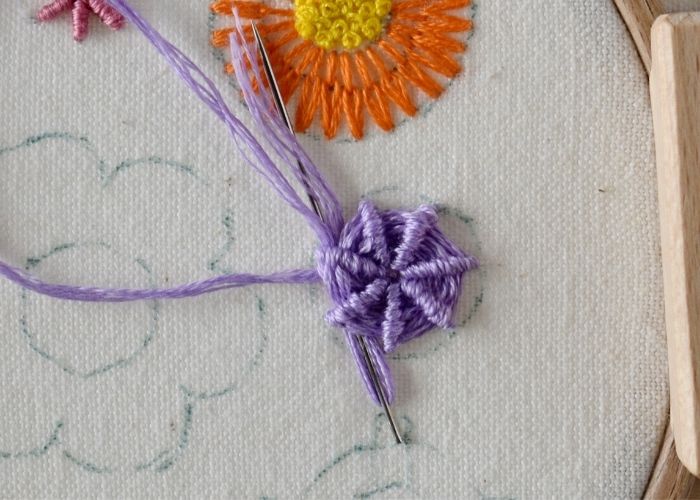
4. After all the weaving is done, secure the thread on the back.
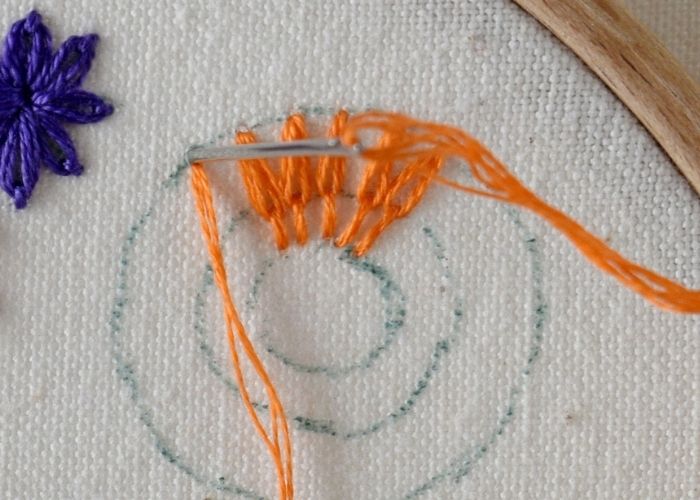
Flower embroidery with Reverse Chain stitch
1. Reverse Chain stitch is a simple hand embroidery technique you can use for easy embroidering flowers.
Make a tiny straight stitch on each mark of the design.
2. Now, make Reverse Chain stitches. Take the needle to the surface on the edge of the smaller circle in the center and pass the needle under the tiny anchoring stitch.
3. Take the needle back to the surface, closing the Chain stitch. To make it easier to stitch, make every second Reverse chain stitch first.
4. Stitch the rest of the stitches on the second round.
5. Fill the center of the flower with French knots.
Beginner flower embroidery with Blanket and Weave stitches
- The combination of Blanket stitch and Weave stitch will create a surface floral image. Us this combination when you do not need dimensional raised florals, but a flatter version instead.
First, embroider Blanket stitch around the floral shape. You can mark guiding lines to help you position your stitches more accurately.
2. Move around in a circle and make equally spaced stitches.
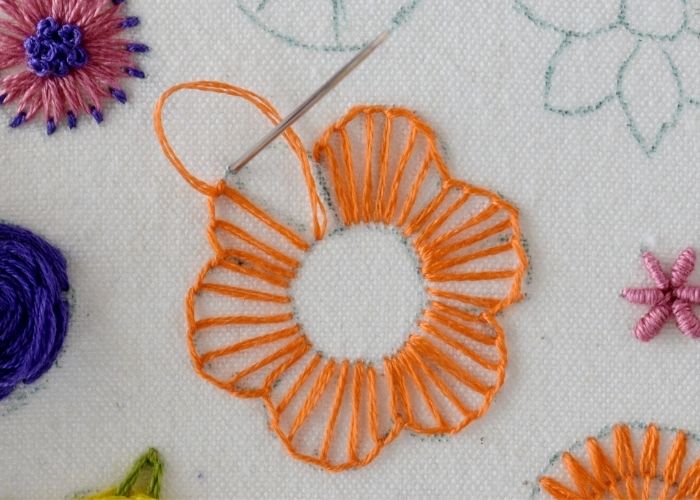
3. To fill the center with a Weave stitch, start with horizontal parallel stitches.

4. Then – weave in the yarn of the second color.
5. Start weaving in the center. Fill in one side, then return to the center and fill the second half of the shape. When finished, secure the thread on the back.
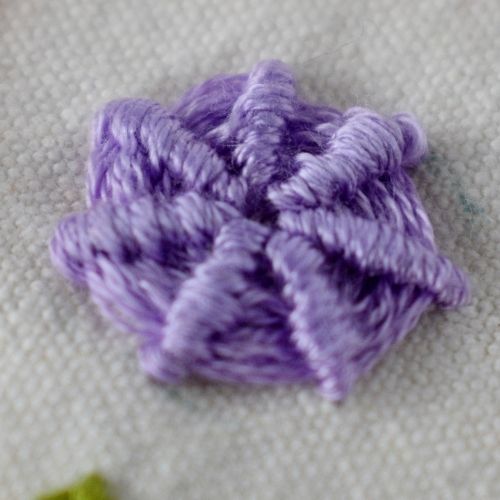
Flower embroidery with Detached Woven Picot stitch
1. To create a petal using the Detached Woven Picot Stitch, place a pin in the fabric. Take the needle up on the left side of the pin, pass the thread under the head of the pin, and push the needle down on the right side of the pin.
2. Take the needle up at the center between the starting points of the first stitch. Pass the thread under the head of the pin. Start weaving a petal.
3. Pass the needle under the central prong.
4. Change the direction. Weave the needle under the first prong, above the central one, and under the third prong. Pull the thread through.
5. First, embroider the petals on the back of the design.
6. Then – embroider the petals in the center.
7. Finally – fill the center of the flower with French knots.
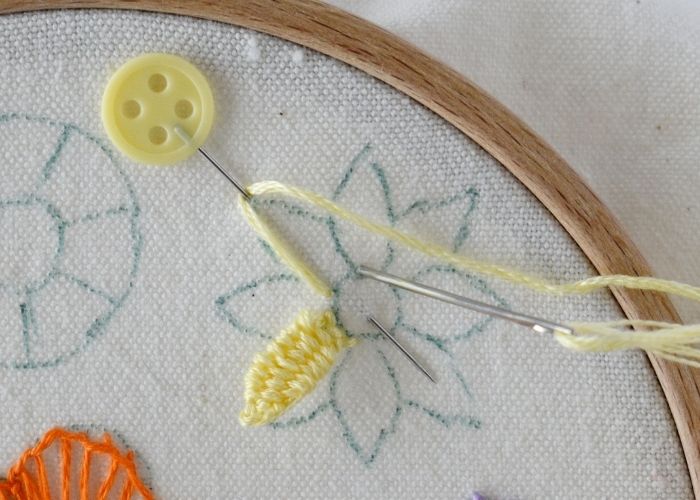
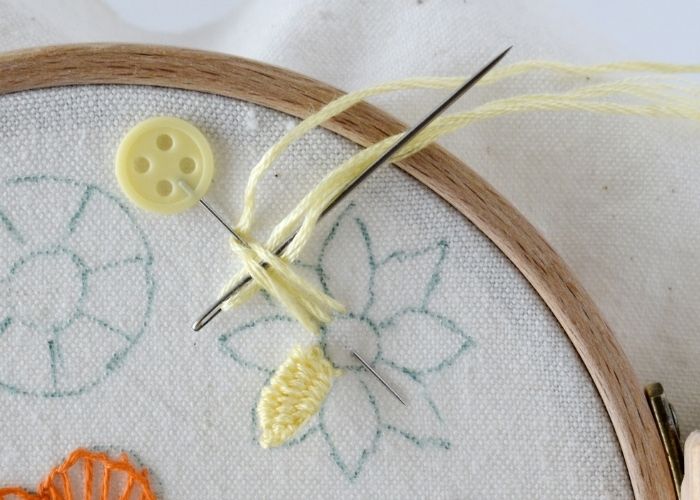
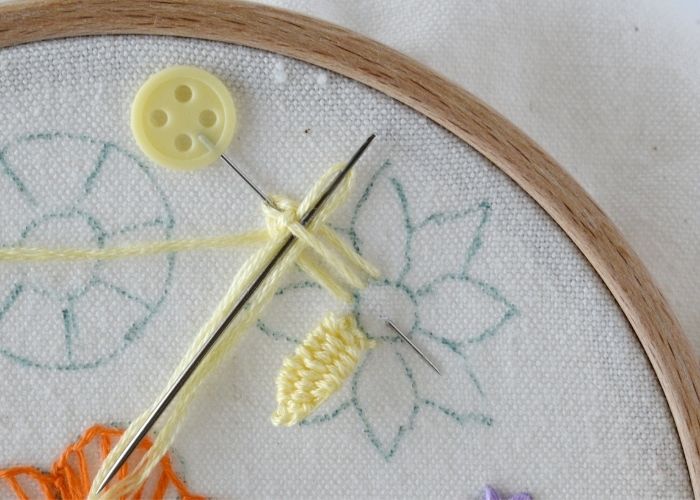
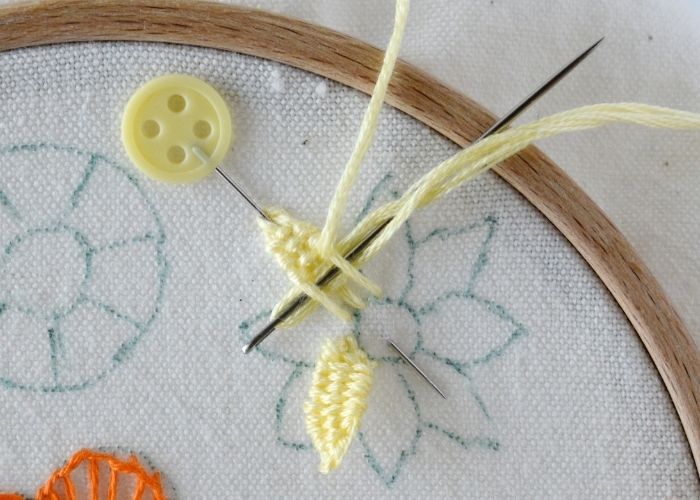
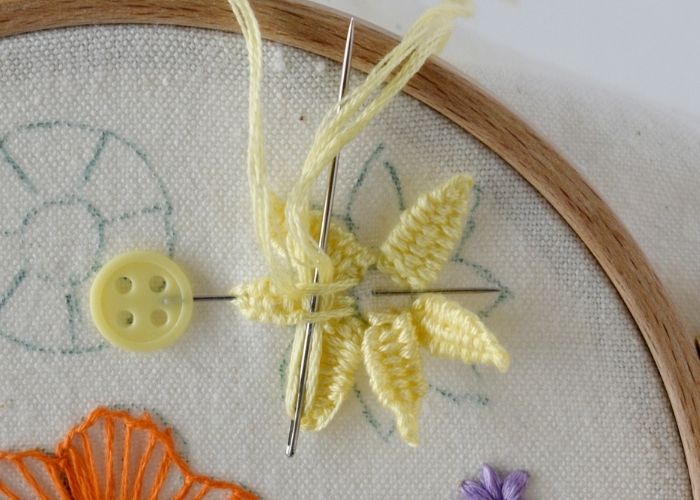
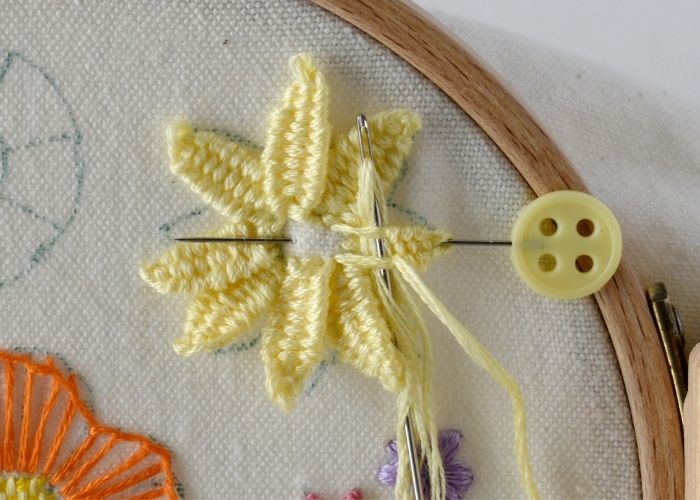
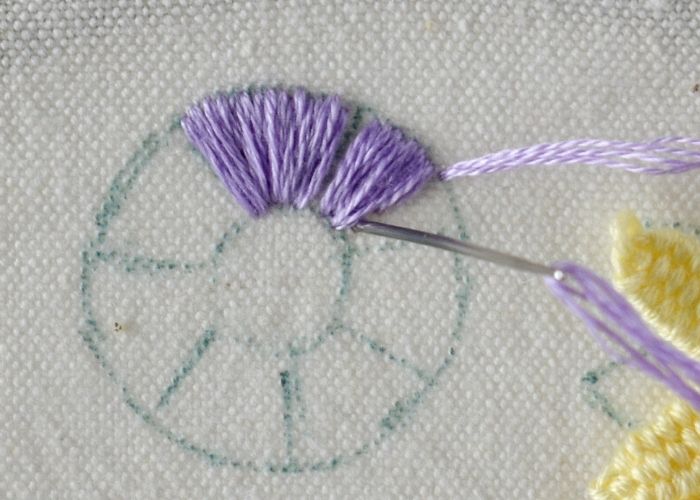
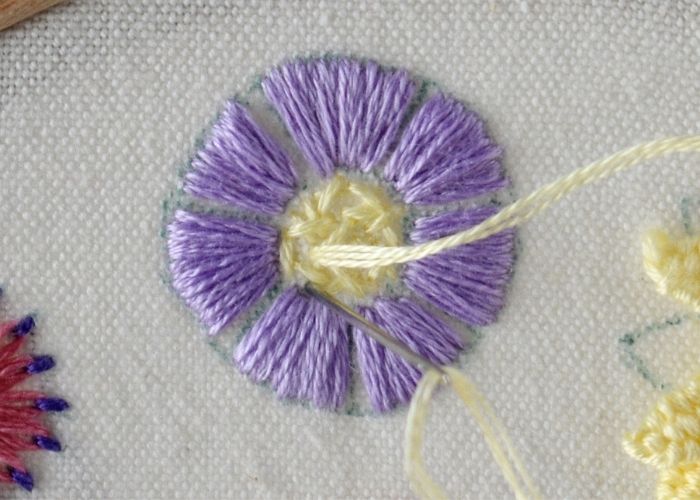
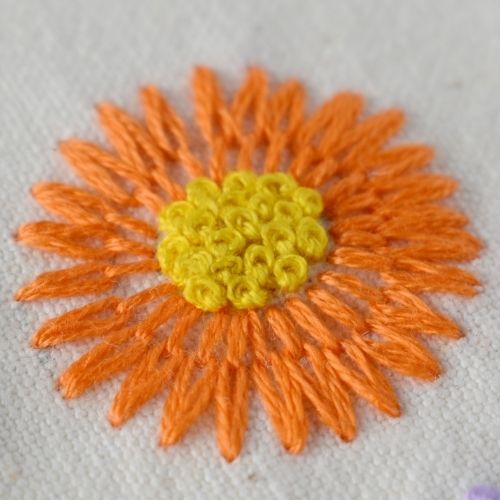
Satin stitch for flower embroidery
1. Satin stitch is a straightforward choice for depicting petals of the flowers. Combining it with Seed stitch for the center of the flower will result in densely filled floral motif.
To embroider the petals with a Satin stitch, start at the center of the petal. Make a long, straight stitch from the edge towards the center of the flower.
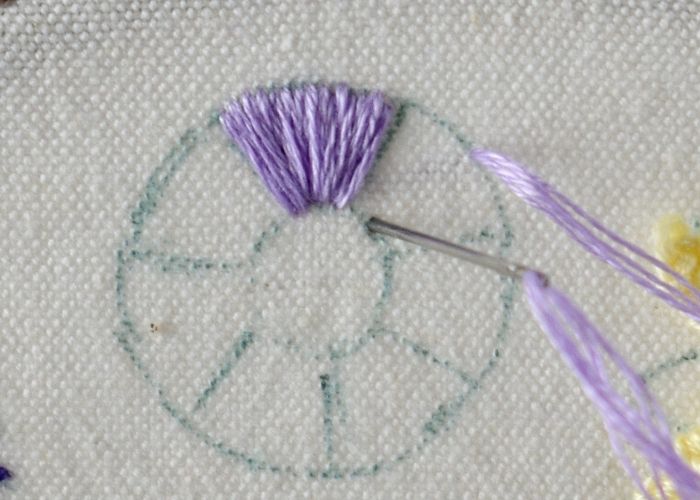
2. Add a slightly shorter stitch close to the first one.
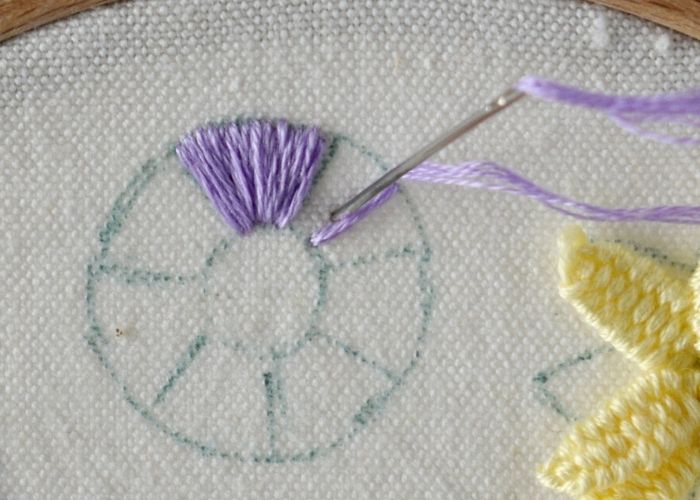
3. Make one more shorter stitch. These short stitches will ensure the curved shape of the petal is nicely filled.
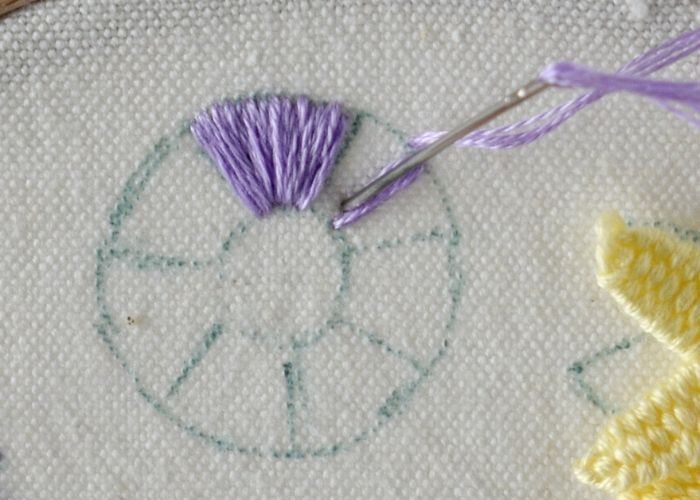
4. After shorter stitches, add a full-length stitch to balance the curve.
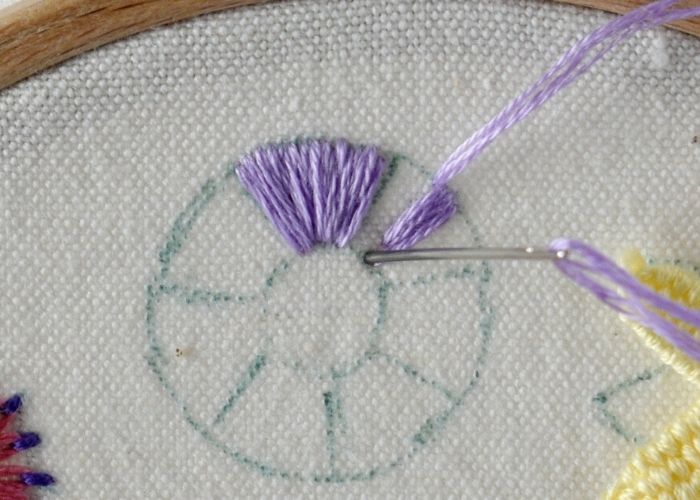
5. Once one side of the petal is filled, return to the center and continue stitching in the opposite direction.
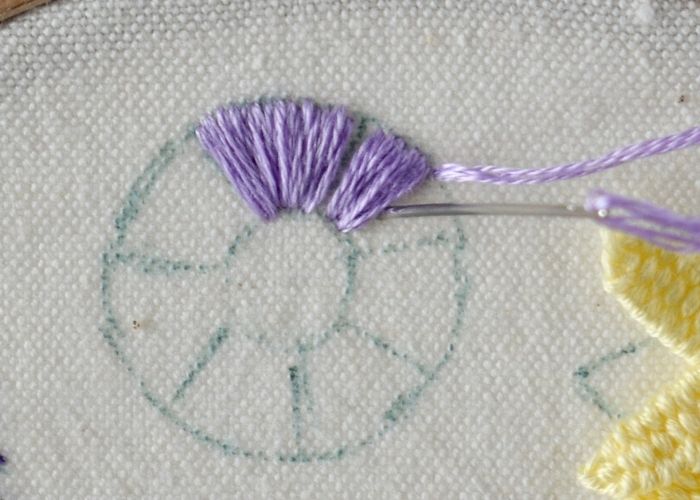
6. Finish one petal and move to the next one. Fill all the petals of this flower with a smooth Satin stitch.
7. To fill the center of this flower, use dense overlapping Seed stitch.
Beginner Flower Embroidery Video Tutorial
Recommended Products
Disclaimer. To cover the cost of creating free embroidery patterns and video tutorials for this blog, I do sometimes link to products. Please assume these links are affiliate links. If you choose to buy through my links then THANK YOU! – it will make it possible for me to keep doing this.


Personalize and experiment
This step-by-step tutorial walked you through 11 ways to stitch flowers. But there is more to it!
You can use the same floral pattern to experiment and try new stitch combinations. For example – change the way you fill the centers of the flowers. Instead of French knots, you can use Seed stitch, Satin stitch, or Bullion knots. The same goes for the petals – instead of a Satin stitch, you can opt for a Long and Short stitch or substitute a Blanket stitch with a Herringbone stitch.
Another way to experiment with beginner flower embroidery is to try different tread sizes. Instead of bulky six-strand threads, try stitching with two or three strands of embroidery floss and vice versa.
Finally, try stitching the same design with another stitch. The floral motifs you will find inside the pattern download are relatively simple and universal; therefore, you can experiment with different stitches and techniques to fill them.
Over to you
Whether you’re trying embroidery for the very first time or looking to expand on the basics, these beginner flower embroidery techniques provide a strong foundation and endless room for creativity.
Together, we explored eleven ways to stitch the flowers and fill the fabric with texture and colors. Now, it’s time to practice these floral motifs in unique ways and use them in your designs!
There’s no single right way to embroider a flower, which is precisely what makes it such a joyful subject to explore.
Which technique will you try first? Is there a favorite flower already?
Leave a comment below and share which stitch or floral design felt the most fun—or even the most challenging. It’s always exciting to see how others interpret my designs and embroidery patterns.
Don’t miss a thing!
Follow me on YouTube, Instagram, Facebook, Flipboard, Telegram and Pinterest. On the other hand, you can subscribe to the Practical Embroidery newsletter and get embroidery tips straight to your inbox every week!
More beginner-friendly embroidery projects
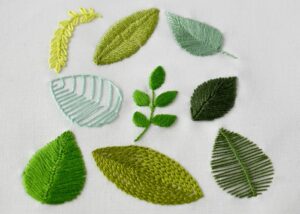
9 Ways To Embroider Leaves: Free PDF Pattern + Step-by-step Hand Embroidery Tutorial
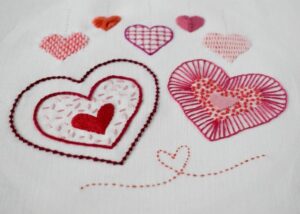
How to Embroider Hearts: 13 Ways to Stitch a Heart
Six Bullion stitch flowers. Step-by-step hand embroidery guide